To Remove:
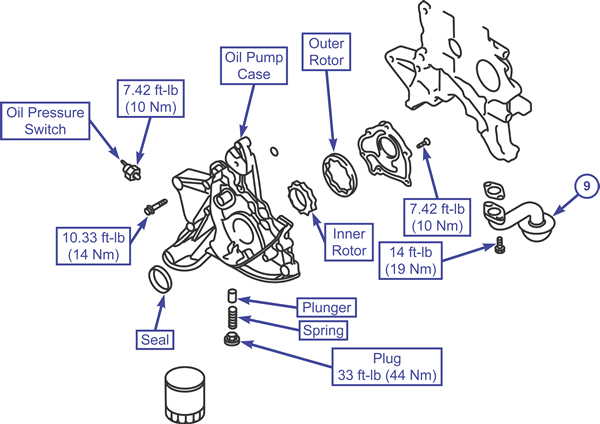
| Exploded view of oil pump (2.0L)

|
- Drain the engine oil.
- Remove the oil filter.
- Remove the oil pan.
- Remove the oil pump case.
- Remove the oil pump cover.
NOTE: Mark the inner and outer rotors so they can be installed in the same positions.
- Remove the rotors from the oil pump.
To Install:
NOTE: Apply engine oil to oil pump moving parts before installation.
- Align the marks made during removal and install the rotors in the oil pump.
- Install the oil pump cover.
- Install the oil pan.
- Install a new oil filter.
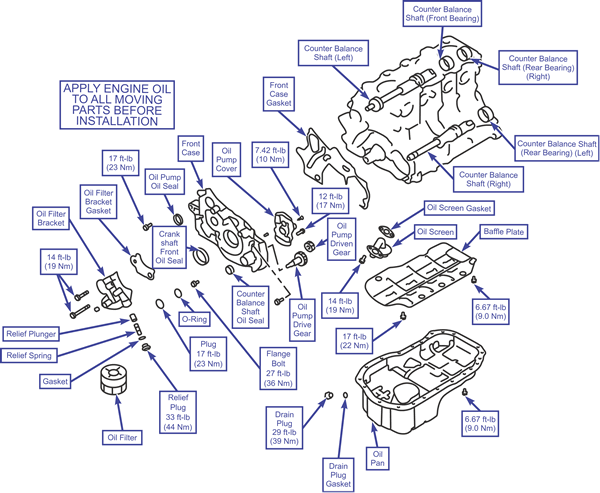
To Remove:
| Oil pump and oil pan

|
- Remove the drain plug and gasket.
- Remove the oil filter.
- Remove the oil Pan.
- Remove the baffle plate.
- Remove the oil screen and oil screen gasket.
- Remove the relief plug.
- Remove the gasket.
- Remove the relief spring.
- Remove the relief plunger.
- Remove the oil filter bracket.
- Remove the oil filter bracket gasket.
- To remove the plug, do the following:
- Step 1: Align the plug wrench (special tool #MD998162) with the notch.
- Step 2: Place the plug wrench retainer (special tool #MD998783) and push it lightly. Put the washer on to fit the clearance between the plug retainer and the housing.
CAUTION
Be careful not to loosen the plug cap too much because the oil pump shaft will be bent by excessive force.
- Step 3: Loosen the plug cap a bit and remove the plug wrench (special tool #MD998162).
- Step 4: Remove the plug cap.
- Remove the O-ring.
- When removing the flange bolt, do the following:
- Step 1: Remove the plug on the side of the cylinder block.
- Step 2: Insert a Phillips screwdriver (shank diameter 0.3 in [8 mm]) into the plug hole to lock the counterbalance shaft.
- Step 3: Loosen the flange bolt.
- Remove the front case and front case gasket.
- Remove the oil pump cover.
- Remove the oil pump driven gear.
- Remove the oil pump drive gear.
- Remove the crankshaft front oil seal.
- Remove the oil pump oil seal.
- Remove the counterbalance shaft oil seal.
- Remove the counterbalance shafts (left) and (right).
- To remove the counterbalance shaft (front bearing), use the silent shaft bearing puller (special tool #MD998371) to remove the counterbalance shaft front bearing from the cylinder block.
CAUTION
Remove the front bearing first. If it has not been removed, use a silent shaft bearing puller (special tool #MD998372) cannot be used for rear balance shaft bearing removal.
- To remove the counterbalance shaft (rear bearing) (right) and the counterbalance shaft (rear bearing) (left), install a bearing installer stopper (special tools #MB991603) and silent shaft bearing puller (special tool #MD998372). Next use the silent shaft bearing puller to remove the right counterbalance shaft rear bearing from the cylinder block.
To Install:
- To install the counterbalance shaft (rear bearing) (left), do the following:
- Step 1: Install the bearing installer stopper (special tool #MB991603) to the cylinder block.
- Step 2: Apply the engine oil to the rear bearing outer surface and bearing hole the cylinder block.
- Step 3: Use a silent shaft bearing installer (special tool #MD998705) to install the rear bearing.
NOTE: The left rear bearing has no oil holes.
- To install the counterbalance shaft (rear bearing) (right), do the following:
- Step 1: Install the guide pin of the silent shaft bearing installer (special tool #MD998705) in the threaded hole of the cylinder block as shown.
- Step 2: Align the ratchet ball of the silent shaft bearing installer with the oil hole in the rear bearing to install the bearing of the silent shaft bearing installer.
- Step 3: Apply clean engine oil to the bearing outer surface and bearing hole in the cylinder block.
- Step 4: Using the silent shaft bearing installer, install the rear bearing, then make sure that the oil hole of the bearing is aligned with the oil hole of the cylinder block.
- To install the counterbalance shaft (front bearing), do the following:
- Step 1: Remove the rear bearing installing portion from the silent shaft bearing installer (special tool #MD998705).
- Step 2: Install the guide pin of the silent shaft bearing installer into the threaded hole of the cylinder block.
- Step 3: Align the ratchet ball of the silent shaft bearing installer with the oil hole in the rear bearing to install the bearing of the silent shaft bearing installer.
- Step 4: Apply clean engine oil to the front bearing outer surface and bearing hole in the cylinder.
- Step 5: Use the silent shaft bearing installer to install the rear bearing. Be certain that the oil hole of the bearing is aligned with the oil hole of the cylinder block.
- Remove the counterbalance shafts (right) and (left).
- Use a socket wrench to install the counterbalance shaft oil seal into the front case.
- Use a socket wrench to install the oil pump oil seal onto the front case.
- Use a crankshaft front oil seal installer (special tool #MD998375) to install the crankcase front oil seal onto the front case.
- When installing the oil pump drive gear and the oil pump driven gear, install them onto the front case and line up the alignment marks.
- Install the oil pump cover.
- Install the front case gasket and the front case.
- To install the flange bolt, do the following:
- Step 1: Place a crankshaft front oil seal guide (special tool #MD998285) onto the front end of the crankshaft and apply a thin coating of clean engine oil onto the outer surface of the crankshaft front oil seal guide.
- Step 2: Put clean engine oil onto the lip of the crankshaft front oil seal.
CAUTION
When installing the tightening bolts, carefully note their different lengths and install into the correct places.
- Step 3: Install the front case gently to avoid damaging the oil seal.
- Step 4: Tighten all of the flange bolts to 17 ft-lbs (23 Nm).
- Install the O-ring.
- When installing the plug, do the following:
- Step 1: Insert a Phillips head screwdriver (shank diameter 0.3 in [8 mm]) into the hole in the left side of the cylinder block to lock the counterbalance shaft.
- Step 2: Tighten the flange bolt to 27 ft-lbs (36 Nm) to secure the oil pump driven gear onto the left counterbalance shaft.
- Step 3: Pull out the screwdriver and screw in the plug.
- Install the oil filter bracket gasket.
- To install the oil filter bracket, do the following:
- Step 1: Install the new O-ring onto the oil pump case.
- Step 2: Lightly hand-tighten the plug cap.
- Step 3: Put the plug wrench retainer (special tool #MD998783) onto the plug cap notch.
- Step 4: Correctly place the plug wrench retainer, lightly pushing it. Put the washer in place to fit the clearance between the plug wrench retainer and the housing.
CAUTION
The clearance between the plug wrench retainer and the housing should fit, otherwise the oil pump shaft will be bent by excessive force.
- Step 5: Tighten the plug cap to 17 ft-lbs (23 Nm).
- Install the relief plunger.
- Install the relief spring.
- Install the gasket.
- Install the relief plug.
- Install the oil screen gasket and the oil screen.
- Install the baffle plate.
- To install the oil pan, do the following:
NOTE: Wait for one hour after installing to allow the sealant to dry. During this time, keep oil away from the area.
- Install a new oil filter.
- Install the drain plug gasket.
CAUTION
Be sure to install the drain plug gasket in the correct direction because if it is installed in the wrong direction, the result will be oil leaks.
- Install the drain plug.
To Remove:
| Oil pump and oil pan (2.4L)
|
- Remove the drain plug and gasket.
- Remove the oil filter.
- Remove the oil Pan.
- Remove the baffle plate.
- Remove the oil screen and oil screen gasket.
- Remove the relief plug.
- Remove the gasket.
- Remove the relief spring.
- Remove the relief plunger.
- Remove the oil filter bracket.
- Remove the oil filter bracket gasket.
- To remove the plug, do the following:
- Step 1: Align the plug wrench (special tool #MD998162) with the notch.
- Step 2: Place the plug wrench retainer (special tool #MD998783) and push it lightly. Put the washer on to fit the clearance between the plug retainer and the housing.
CAUTION
Be careful not to loosen the plug cap too much because the oil pump shaft will be bent by excessive force.
- Step 3: Loosen the plug cap a bit and remove the plug wrench (special tool #MD998162).
- Step 4: Remove the plug cap.
- Remove the O-ring.
- When removing the flange bolt, do the following:
- Step 1: Remove the plug on the side of the cylinder block.
- Step 2: Insert a Phillips screwdriver (shank diameter 0.3 in [8 mm]) into the plug hole to lock the counterbalance shaft.
- Step 3: Loosen the flange bolt.
- Remove the front case and front case gasket.
- Remove the oil pump cover.
- Remove the oil pump driven gear.
- Remove the oil pump drive gear.
- Remove the crankshaft front oil seal.
- Remove the oil pump oil seal.
- Remove the counterbalance shaft oil seal.
- Remove the counterbalance shafts (left) and (right).
- To remove the counterbalance shaft (front bearing), use the silent shaft bearing puller (special tool #MD998371) to remove the counterbalance shaft front bearing from the cylinder block.
CAUTION
Remove the front bearing first. If it has not been removed, use a silent shaft bearing puller (special tool #MD998372) cannot be used for rear balance shaft bearing removal.
- To remove the counterbalance shaft (rear bearing) (right) and the counterbalance shaft (rear bearing) (left), install a bearing installer stopper (special tools #MB991603) and silent shaft bearing puller (special tool #MD998372). Next use the silent shaft bearing puller to remove the right counterbalance shaft rear bearing from the cylinder block.
To Install:
| Oil pump and oil pan (2.4L)
|
- To install the counterbalance shaft (rear bearing) (left), do the following:
- Step 1: Install the bearing installer stopper (special tool #MB991603) to the cylinder block.
- Step 2: Apply the engine oil to the rear bearing outer surface and bearing hole the cylinder block.
- Step 3: Use a silent shaft bearing installer (special tool #MD998705) to install the rear bearing.
NOTE: The left rear bearing has no oil holes.
- To install the counterbalance shaft (rear bearing) (right), do the following:
- Step 1: Install the guide pin of the silent shaft bearing installer (special tool #MD998705) in the threaded hole of the cylinder block as shown.
- Step 2: Align the ratchet ball of the silent shaft bearing installer with the oil hole in the rear bearing to install the bearing of the silent shaft bearing installer.
- Step 3: Apply clean engine oil to the bearing outer surface and bearing hole in the cylinder block.
- Step 4: Using the silent shaft bearing installer, install the rear bearing, then make sure that the oil hole of the bearing is aligned with the oil hole of the cylinder block.
- To install the counterbalance shaft (front bearing), do the following:
- Step 1: Remove the rear bearing installing portion from the silent shaft bearing installer (special tool #MD998705).
- Step 2: Install the guide pin of the silent shaft bearing installer into the threaded hole of the cylinder block.
- Step 3: Align the ratchet ball of the silent shaft bearing installer with the oil hole in the rear bearing to install the bearing of the silent shaft bearing installer.
- Step 4: Apply clean engine oil to the front bearing outer surface and bearing hole in the cylinder.
- Step 5: Use the silent shaft bearing installer to install the rear bearing. Be certain that the oil hole of the bearing is aligned with the oil hole of the cylinder block.
- Remove the counterbalance shafts (right) and (left).
- Use a socket wrench to install the counterbalance shaft oil seal into the front case.
- Use a socket wrench to install the oil pump oil seal onto the front case.
- Use a crankshaft front oil seal installer (special tool #MD998375) to install the crankcase front oil seal onto the front case.
- When installing the oil pump drive gear and the oil pump driven gear, install them onto the front case and line up the alignment marks.
- Install the oil pump cover.
- Install the front case gasket and the front case.
- To install the flange bolt, do the following:
- Step 1: Place a crankshaft front oil seal guide (special tool #MD998285) onto the front end of the crankshaft and apply a thin coating of clean engine oil onto the outer surface of the crankshaft front oil seal guide.
- Step 2: Put clean engine oil onto the lip of the crankshaft front oil seal.
CAUTION
When installing the tightening bolts, carefully note their different lengths and install into the correct places.
- Step 3: Install the front case gently to avoid damaging the oil seal.
- Step 4: Tighten all of the flange bolts to 17 ft-lbs (23 Nm).
- Install the O-ring.
- When installing the plug, do the following:
- Step 1: Insert a Phillips head screwdriver (shank diameter 0.3 in [8 mm]) into the hole in the left side of the cylinder block to lock the counterbalance shaft.
- Step 2: Tighten the flange bolt to 27 ft-lbs (36 Nm) to secure the oil pump driven gear onto the left counterbalance shaft.
- Step 3: Pull out the screwdriver and screw in the plug.
- Install the oil filter bracket gasket.
- To install the oil filter bracket, do the following:
- Step 1: Install the new O-ring onto the oil pump case.
- Step 2: Lightly hand-tighten the plug cap.
- Step 3: Put the plug wrench retainer (special tool #MD998783) onto the plug cap notch.
- Step 4: Correctly place the plug wrench retainer, lightly pushing it. Put the washer in place to fit the clearance between the plug wrench retainer and the housing.
CAUTION
The clearance between the plug wrench retainer and the housing should fit, otherwise the oil pump shaft will be bent by excessive force.
- Step 5: Tighten the plug cap to 17 ft-lbs (23 Nm).
- Install the relief plunger.
- Install the relief spring.
- Install the gasket.
- Install the relief plug.
- Install the oil screen gasket and the oil screen.
- Install the baffle plate.
- To install the oil pan, do the following:
NOTE: Wait for one hour after installing to allow the sealant to dry. During this time, keep oil away from the area.
- Install a new oil filter.
- Install the drain plug gasket.
CAUTION
Be sure to install the drain plug gasket in the correct direction.
- Install the drain plug.