To Remove:
NOTE: If the timing belt is to be reused, draw an arrow in the direction of travel on the timing belt with chalk. The timing belt must be installed in the same direction.
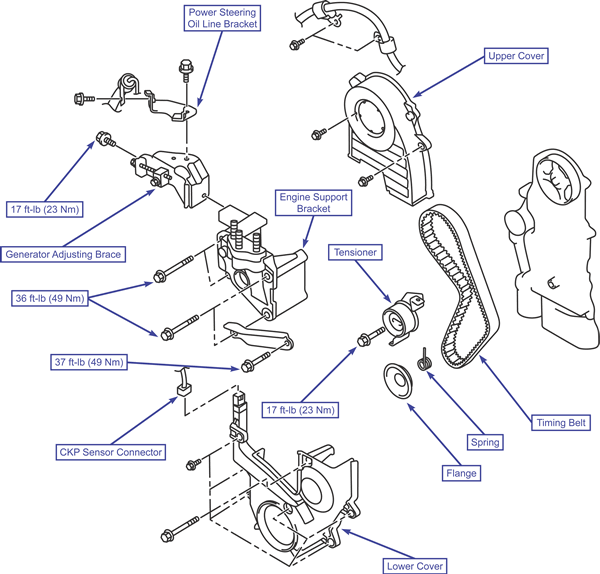
| Timing belt removal/installation (2.0L SOHC)
|
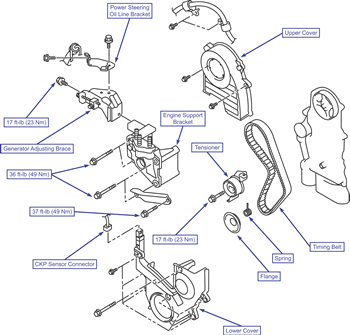
- Remove the left under cover.
- Support the engine and remove the engine mount insulator.
- Remove the crankshaft pulley.
- Disconnect the crankshaft position sensor.
- Remove the upper front timing belt cover.
- Remove the pressure hose clamp.
- Remove the power steering oil line bracket.
- Remove the generator adjusting brace.
- Remove the lower timing belt cover.
- Remove the power steering pump bracket stay.
- Note the direction and remove the flange.
- Remove the engine support bracket.
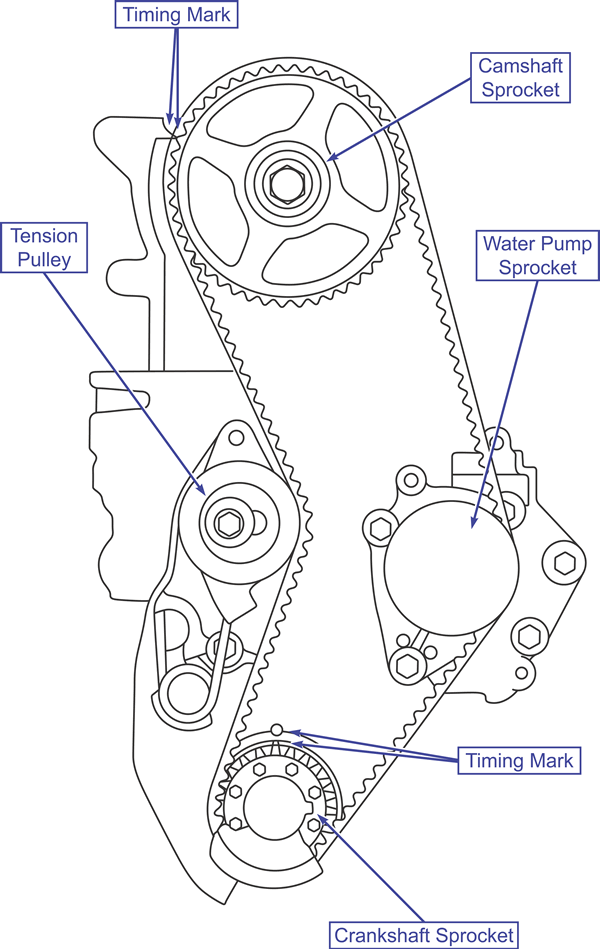
- Turn the crankshaft clockwise and align the timing marks. The number 1 cylinder should be on compression at top dead center.
- Loosen the tension pulley center bolt and pry the pulley away from the belt and temporarily tighten the center bolt.
- Remove the timing belt.
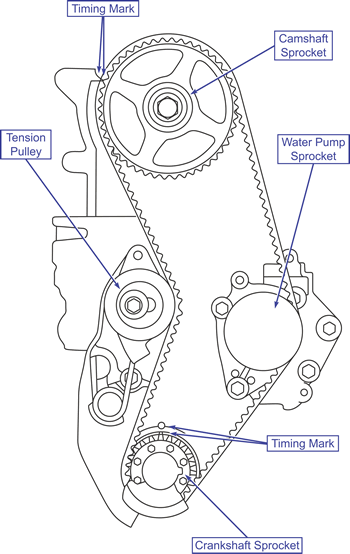
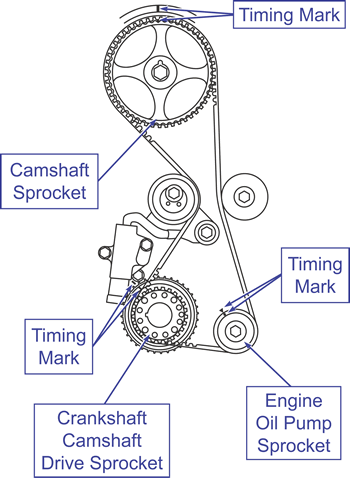
| Timing marks (2.0L SOHC)
|
To Install:
- Push the tensioner as close to the engine mount as possible and temporarily tighten the center bolt.
- Align the timing marks on the crankshaft and camshaft sprockets
- Install the timing belt in the following order;
- crankshaft
- water pump
- camshaft
- tensioner
- Loosen the tensioner center bolt slightly and allow the tensioner spring to tighten the belt.
- Turn the crankshaft clockwise two complete turns and align the timing marks again. Make sure the all of the timing belt teeth are properly seated in the camshaft and crankshaft sprockets.
- Tighten the tensioner center bolt to 17 ft-lbs (23 Nm).
- Install the engine support bracket.
- Install the flange in the correct direction.
- Install the power steering pump bracket stay.
- Install the lower timing belt cover.
- Install the generator adjusting brace.
- Install the power steering oil line bracket.
- Install the pressure hose clamp.
- Install the upper front timing belt cover.
- Connect the crankshaft position sensor.
- Install the crankshaft pulley.
- Install the engine mount insulator.
- Install the left under cover.
To Remove:
NOTE: Mark the rotating direction of the timing belt if reusing the belt. Always install the belt in the original direction.
| Valve timing belt removal/installation (2.0L Turbo, 2.4L)
|
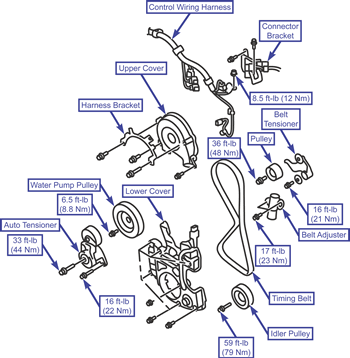
- Remove the control wiring harness connection.
- Remove the connector bracket and harness bracket.
- Remove the upper cover.
- Remove the front engine mount bracket.
- Remove the water pump pulley and idler pulley.
- Remove the belt tensioner.
- Remove the lower cover.
- Turn the crankshaft to align the timing marks.
| Valve timing belt timing marks (2.0L Turbo, 2.4L)
|
- Turn the crankshaft to align the timing marks.
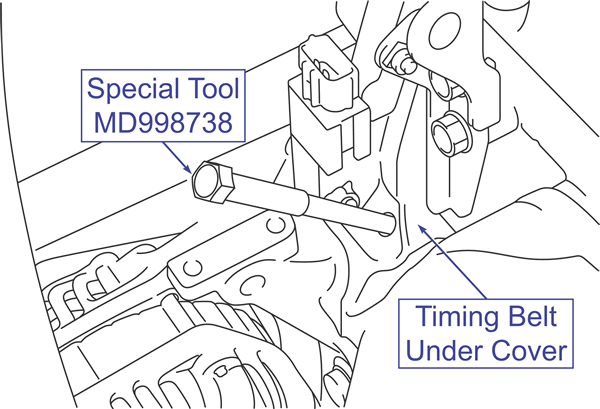
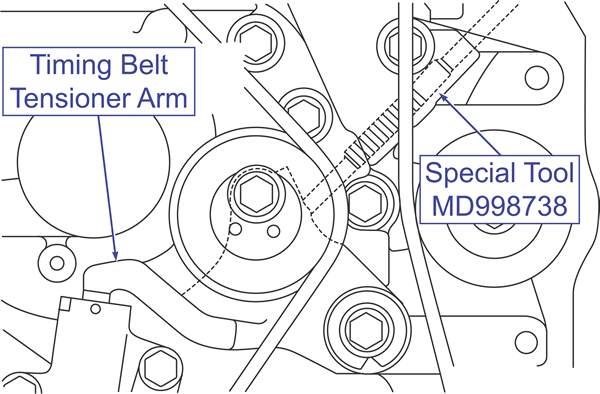
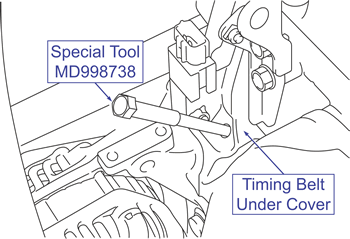
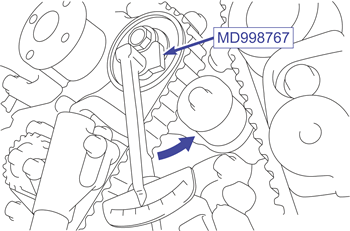
- Remove the timing belt under cover rubber plug and slowly install special tool MD998738 or equivalent to release the tension from the belt.
| Install special tool MD998738 through the timing belt under cover (2.0L Turbo, 2.4L)
|
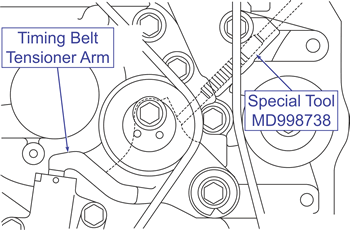
| Use special tool MD998738 to relieve the tension on the belt (2.0L Turbo, 2.4L)
|
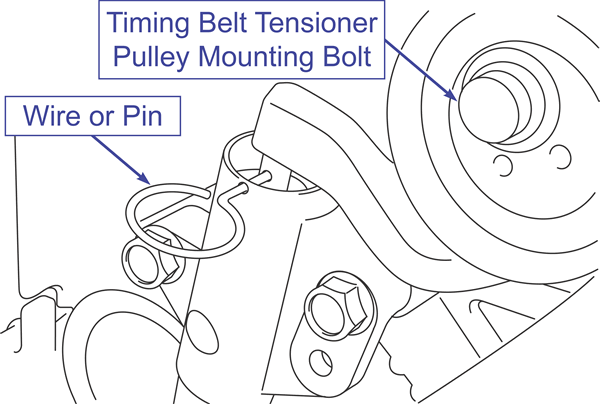
- Insert a pin through the holes in the tensioner and remove the special tool.
- Loosen the tensioner pulley center bolt and remove the valve timing belt.
| Insert a pin through the tensioner (2.0L Turbo, 2.4L)

|
To Install:
- Align the timing marks on the camshaft, crankshaft and engine oil pump sprocket.
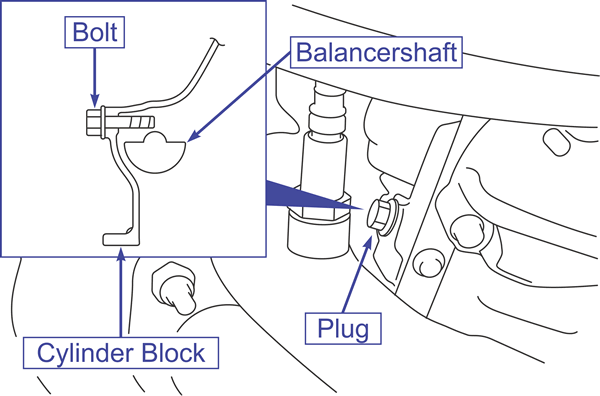
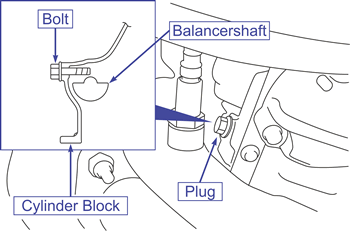
- Remove the cylinder block plug. Insert a bolt (M6, section width 10 mm, nominal length 45 mm) in the plug hole. If the bolt contacts the balancer shaft, turn the oil pump sprocket 360° and install the bolt. Do not remove the bolt until the valve timing belt is installed.
| Balance shaft inspection hole (2.0L Turbo, 2.4L)
|
- Install the belt on the pulleys beginning with the tensioner and moving to the crank, oil pump, idler and camshaft sprockets.
- Rotate the tensioner pulley counterclockwise and temporarily tighten the center bolt.
- Verify the timing marks are aligned.
- Remove the bolt from the balance shaft inspection hole and install the plug.
- Slowly install special tool MD998738 until the pin inserted in the timing belt tensioner moves slightly.
- Turn the crankshaft 90° counterclockwise.
- Turn the crankshaft clockwise to align all the timing marks.
- Loosen the tensioner pulley center bolt and apply a force of 31 in-lbs (3.5 Nm) to the tension pulley as shown.
| Apply a force of 31 in-lbs (3.5 Nm) to the tension pulley (2.0L Turbo, 2.4L)
|
- Tighten the center bolt to 36 ft-lbs (48 Nm).
- Remove the pin from the tensioner. Remove the special tool and install the rubber plug.
- Rotate the crankshaft clockwise two complete turns and let it rest for 15 minutes.
- Verify that the tension pin can be easily installed and removed from the tensioner. This indicates the belt is tensioned correctly. Repeat steps 7-11 if the pin can not be installed and removed easily.
- Install the lower cover.
- Install the belt tensioner.
- Install the water pump pulley and idler pulley.
- Install the front engine mount bracket.
- Install the upper cover.
- Install the connector bracket and harness bracket.
- Install the control wiring harness connection.
To Remove:
NOTE: Mark the rotating direction of the timing belt if reusing the belt. Always install the belt in the original direction.
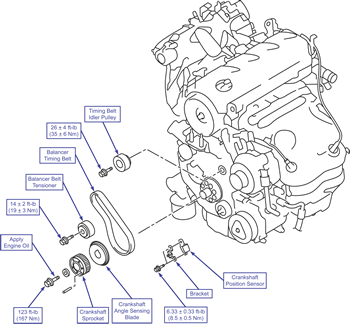
- Remove the timing belt idler pulley.
- Remove the timing belt lower cover bracket and crankshaft position sensor.
- Remove the crankshaft sprocket.
- Remove the crankshaft angle sensing blade.
- Loosen the tensioner pulley bolt and remove the belt.
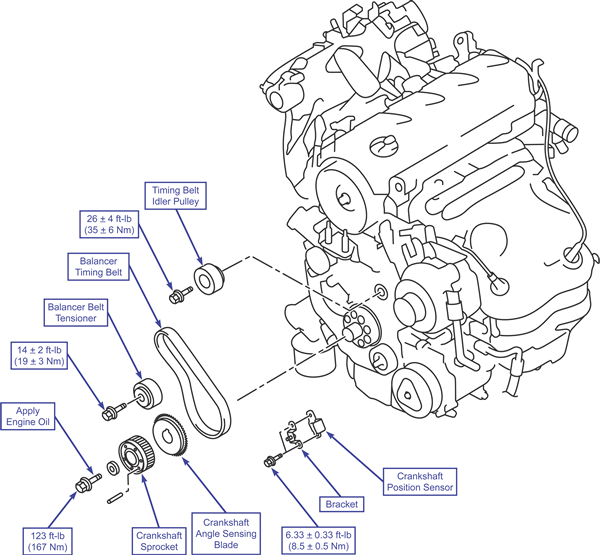
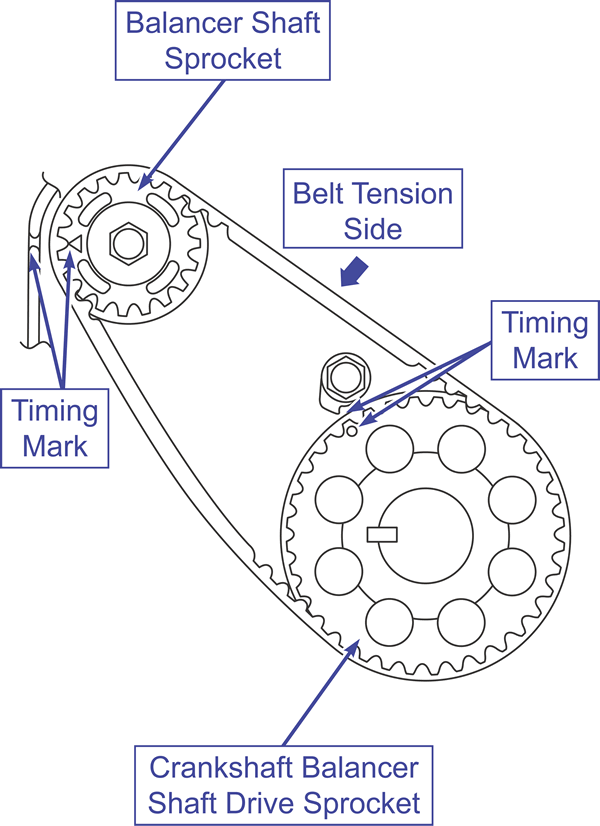
| Balance timing belt removal/installation (2.0L Turbo, 2.4L)
|
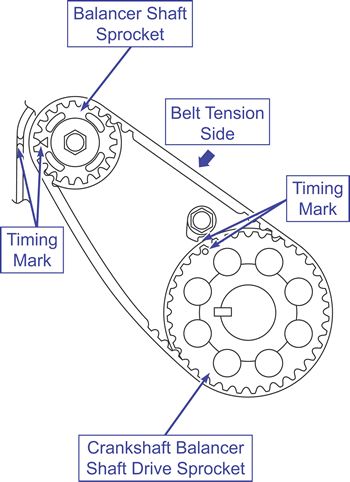
| Balance timing belt timing marks (2.0L Turbo, 2.4L)
|
To Install:
- Align the timing marks and install the belt on the sprockets.
- Rotate the tensioner pulley by hand to remove all looseness from the belt and tighten the bolt to 14 ft-lbs (19 Nm).
- Turn the crankshaft clockwise two complete turns and verify the timing marks align.
- Apply a force of 13 lbs (59 N) at the center of the belt tension side. Verify belt deflection is 0.43 inch (11 mm).
- Install the crankshaft angle sensing blade.
- Install the crankshaft sprocket.
- Install the timing belt lower cover bracket and crankshaft position sensor.
- Install the timing belt idler pulley.