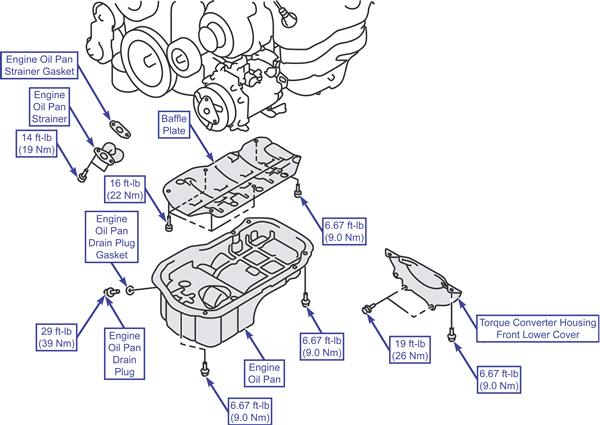
To Remove:
| Oil pan
|
- Remove the side under cover.
- Drain the engine oil.
- Remove the exhaust pipe and main muffler.
- Remove the torque converter housing front lower cover.
- Remove the engine oil pan drain plug.
- Remove the engine oil pan drain plug gasket.
- To remove the engine oil pan, do the following:
- Step 1: Remove the engine oil pan mounting bolts.
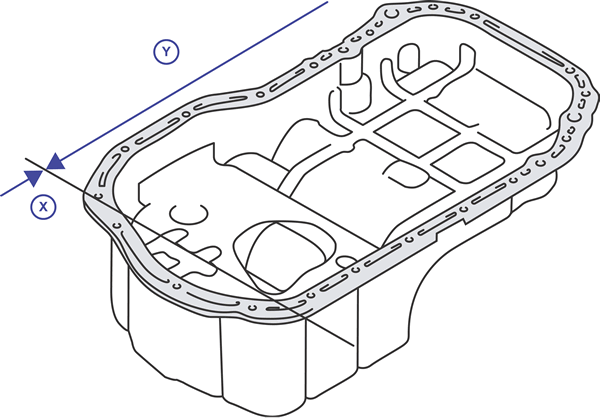
| Oil pan locations
|
CAUTION
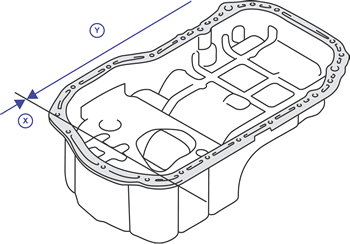
Using the oil pan FIPG cutter (#MD998727) in area "X" on the engine oil pan may cause the aluminum front case to deform.
- Step 2: Tap the oil pan FIPG cutter (special tool #MD998727) in the range of area "Y" between the cylinder block and the engine oil pan, then slide the tool sideways.
NOTE: If you find that any sounding parts interfere with the removal, you do not need to use the oil pan FIPG cutter (#MD998727)
- Remove the engine oil pan.
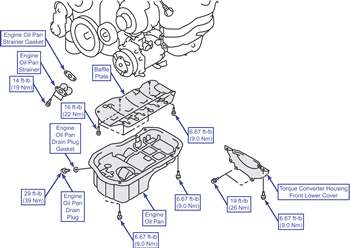
- Remove the engine oil pan strainer and gasket.
- Remove the baffle plate.
To Install:
| Oil pan
|
- Install the baffle plate.
- Install the engine oil pan strainer gasket.
- Install the engine oil pan strainer.
- To install the engine oil pan, do the following:
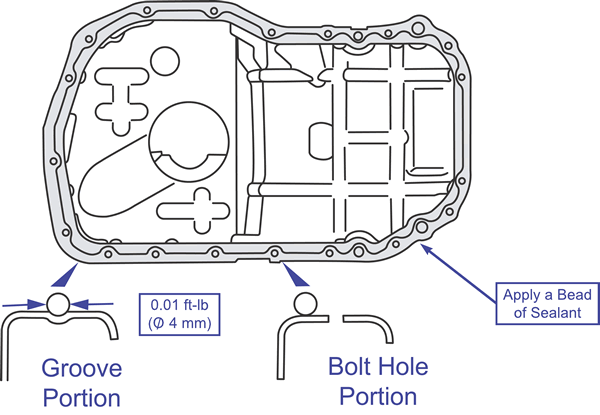
- Step 1: Remove the sealant from the engine oil pan, front case, and cylinder block surfaces.
| Oil pan sealant placement
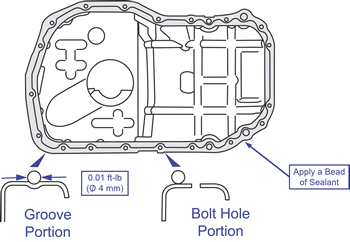
|
- Step 2: Apply an even bead of sealant to the cylinder block mating surface of the engine oil pan as seen in the illustration. The manufacturer recommends using 3M AAD part #8672, 8704, 3M AAD part #8679/8678 or an equivalent.
NOTE: Be sure to install the engine oil pan within 15 minutes after applying the sealant.
- Step 3: Assemble the engine oil pan to the cylinder block.
CAUTION
Wait at least an hour after installing the engine oil pan. Never start the engine or allow engine oil or coolant to touch the sealant surface during that hour.
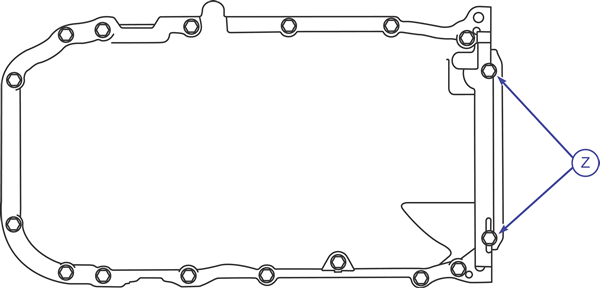
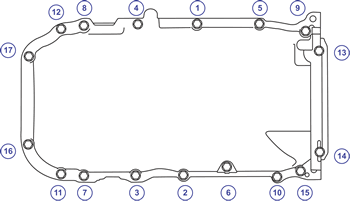
- Step 4: Tighten the engine oil pan mounting bolts to 80 in-lbs (9.0 Nm). When installing the engine oil pan mounting bolts (M6 x 8 mm), note that they have different lengths from the other bolts.
- When installing the engine oil pan drain plug gasket be sure to replace the gasket with a new one. Install the new gasket with the open side facing the engine oil pan side.
- Install the engine oil pan drain plug.
- Install the torque converter housing front lower cover.
To Remove:
| Oil pump and oil pan (3.8L)
|
- Drain the engine oil.
- Remove the lower oil pan. Tap the lower oil pan sideways with a hammer and block of wood to break the seal.
- Remove the cover.
- Remove the upper oil pan. Remove the two front bolts first. Screw M10 bolts into the two bolt holes in the oil pan to break the joint and remove the oil pan.
- Remove the baffle plate.
- Remove the oil pickup.
- Remove the baffle plate.
- Remove the engine oil pressure switch.
- Remove the oil filter cover, filter and bracket.
- Remove the relief plug, spring and plunger.
- Remove the crankshaft front oil seal and oil pump case assembly.
- Remove the oil pump cover, mark the oil pump rotors so they can be installed in the original position if removing them.
| Oil pan bolt removal (3.8L)

|
To Install:
NOTE: Do not allow the parts with fresh sealant to come in contact with oil or coolant for at least one hour.
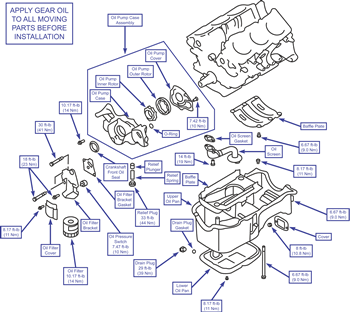
NOTE: Apply gear oil to all moving parts before assembly.
- Install the oil pump rotors in their original positions.
- Install the oil pump case assembly. Apply sealant to the sealing surfaces.
- Install the front crankshaft seal.
- Install the plunger, spring and plug.
- Apply sealant to the oil pressure switch and install the switch.
- Install the baffle plate.
- Install the oil pickup.
- Install the baffle plate.
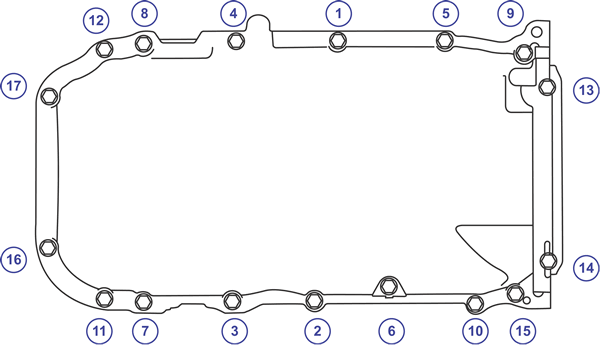
| Upper oil pan bolt tightening sequence (3.8L)
|
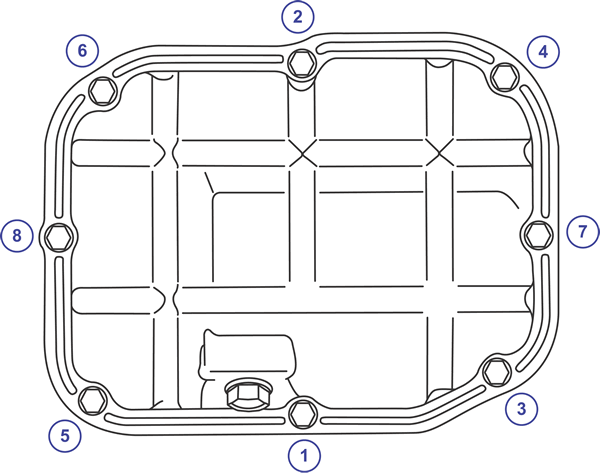
| Lower oil pan bolt tightening sequence (3.8L)
|
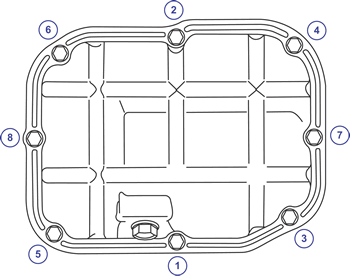
- Install the upper oil pan. Apply sealant to the sealing surfaces and tighten the bolts in the sequence shown.
- Install the lower oil pan. Apply sealant to the sealing surfaces and tighten the bolts in the sequence shown.
- Wait one hour and then add the correct amount of oil to the engine.