Previous Next

Camshafts and Bearings

REMOVAL & INSTALLATION

2.0L and 2.4L Engines
  1. Disconnect the negative battery cable.
  2. Remove the distributor following procedures outlined in Section 1.
  3. Remove the valve cover and remove the timing belt assembly following procedures described in this section.
  4. Remove the rocker arm assembly following procedures given in this section.
  5. Lift the camshaft off the cylinder head. Place it on a padded surface in a protected area. Inspect the camshaft.

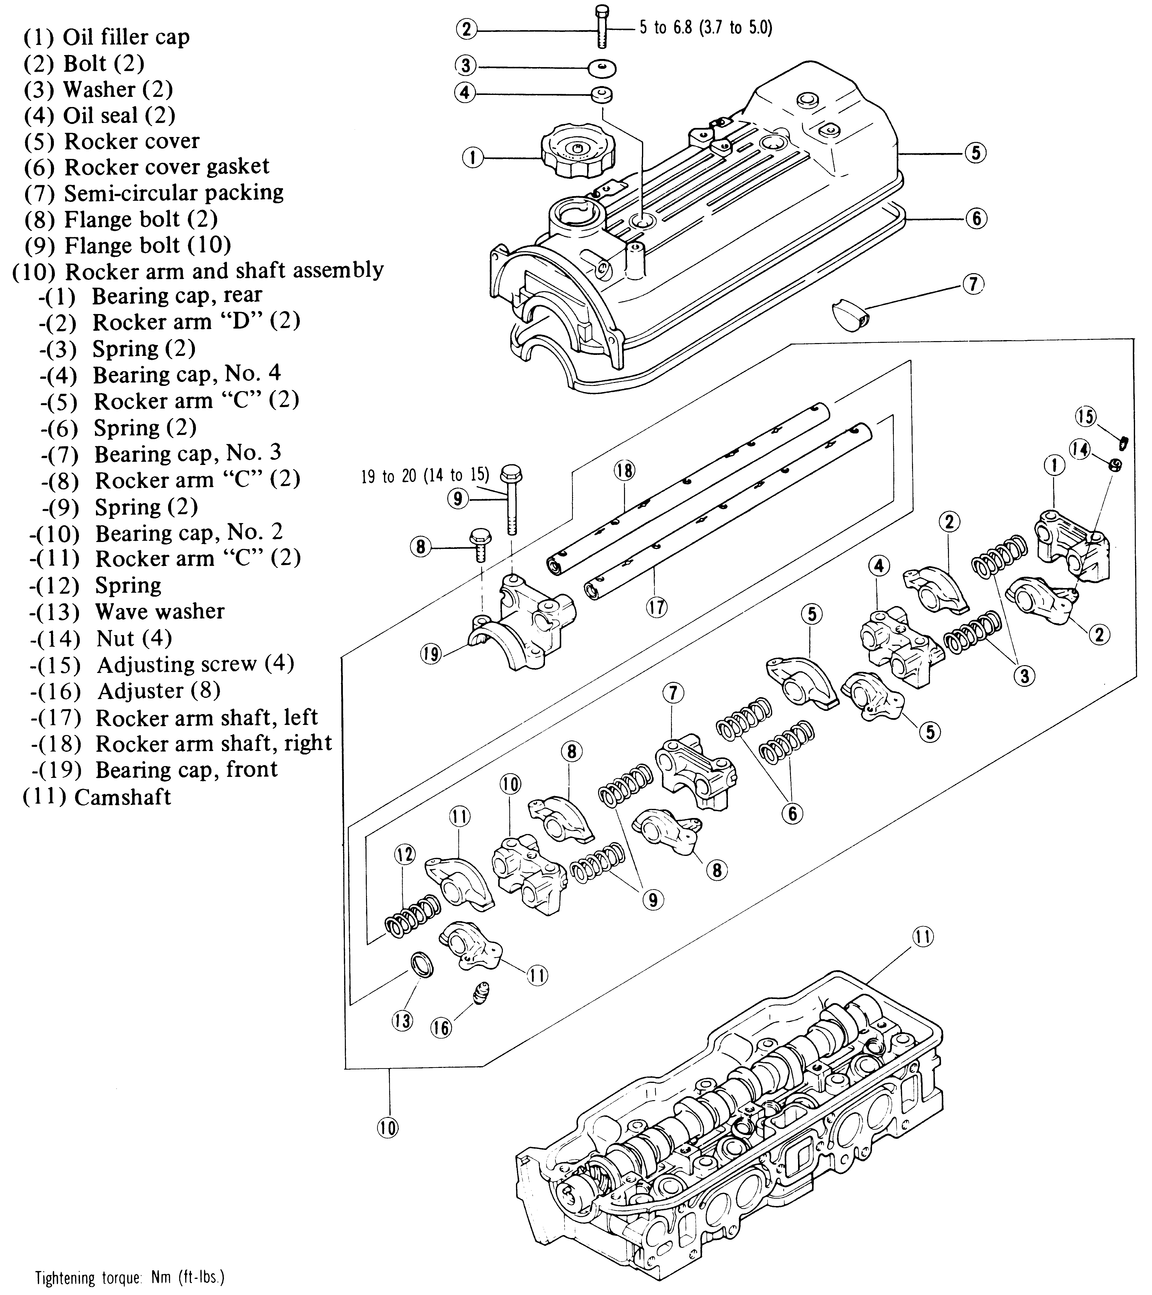
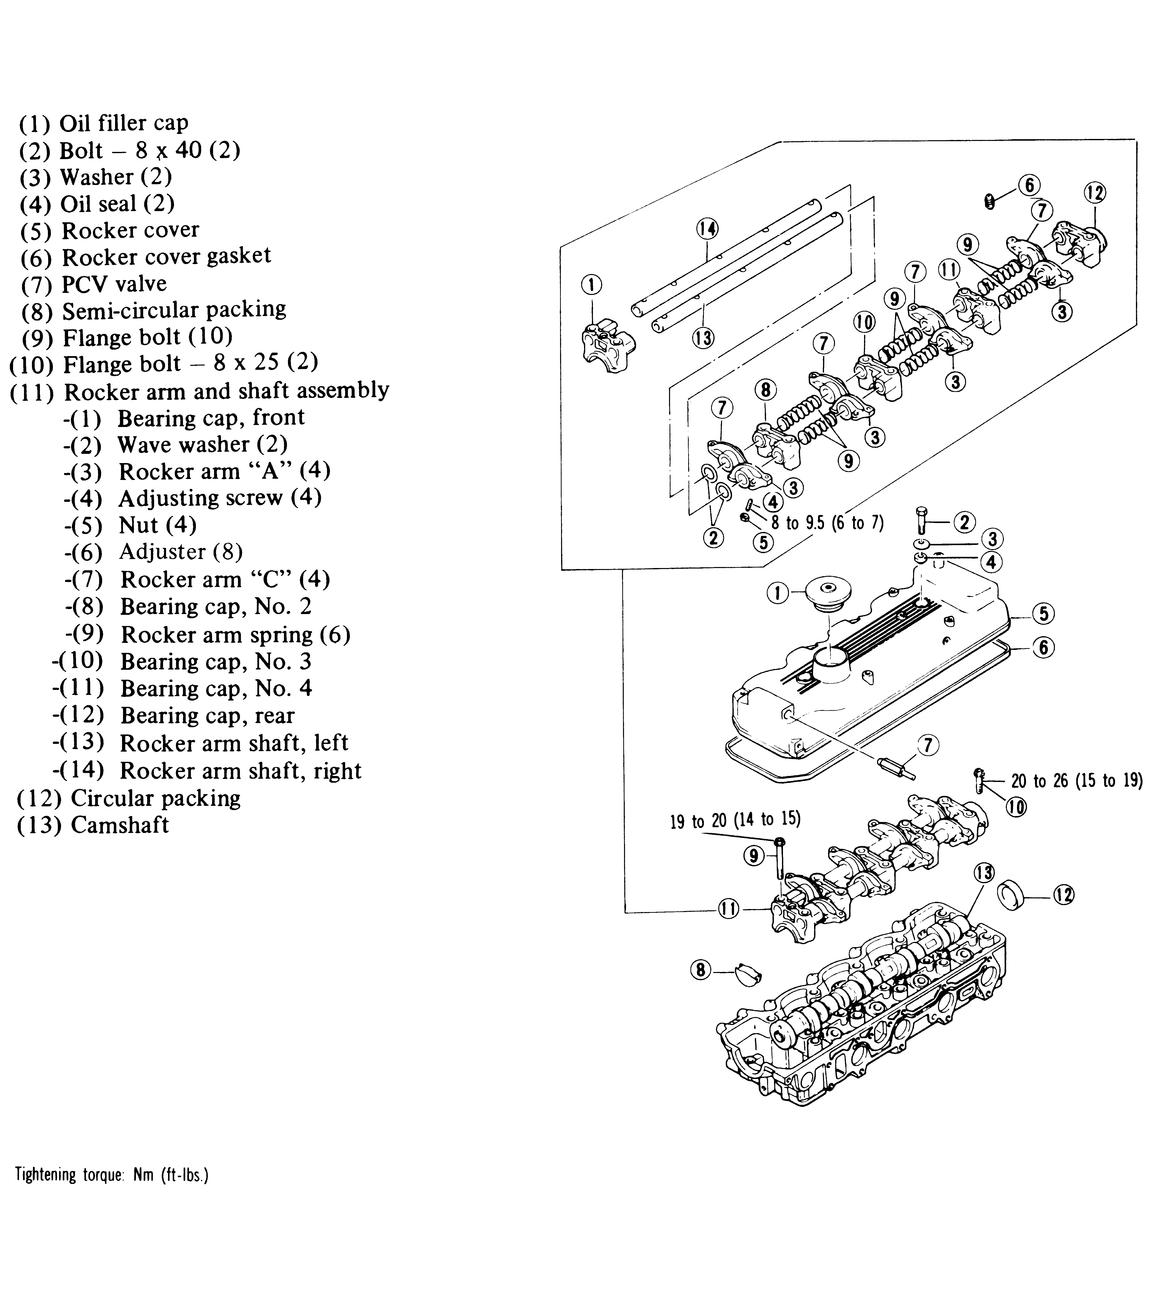
    Fig. 1: Camshaft assembly — 2.0L engines

    To install:

  6. Thoroughly lubricate the bearing journals on the camshaft and the bearing seats in the head with clean engine oil. Place the camshaft in position on the head.
  7. Liberally coat the bearing caps with clean engine oil. Install the rocker shaft and bearing cap assembly. Tighten the bearing cap assembly bolts evenly in two or three steps; final torque should be 15 ft. lbs. (20 Nm).
  8. Reinstall the camshaft sprocket and timing belt.
  9. Install the valve cover.
  10. Install the distributor. Connect the negative battery cable.
2.3L Diesel Engine
  1. Disconnect the negative battery cable.
  2. Label and disconnect the breather hose and any vacuum hoses running around or across the valve cover.
  3. Remove the valve cover.
  4. Remove the upper timing cover.
  5. Using a wrench on the center bolt, turn the crankshaft clockwise until all the timing marks line up. This positions the No.1 piston on TDC/compression. Both valves for No.1 cylinder are closed.
  6. Without disturbing the engine position, loosen the center bolt on the camshaft sprocket.
  7. Loosen the retaining bolts on the timing belt adjuster. Move the adjuster towards the water pump and temporarily tighten the bolts, holding the adjustor in the slack position.
  8. Remove the sprocket with the timing belt attached. Note the relative position of the camshaft to the camshaft sprocket. Keep upward tension on the sprocket and belt.
  9. Remove the rocker assembly, following directions outlined earlier in this section.
  10. Remove the camshaft bearing caps, keeping them in order. Remove the front camshaft oil seal and discard.
  11. Lift the camshaft off the cylinder head. Place it on a padded surface in a protected area. Inspect the camshaft.

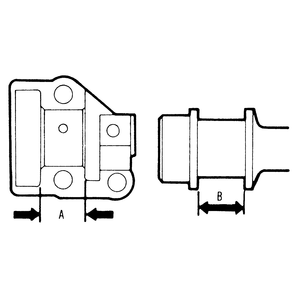
    Fig. 2: Find the camshaft end-play by subtracting the measurement of A from the measurement of B — 2.3L Diesel Engines

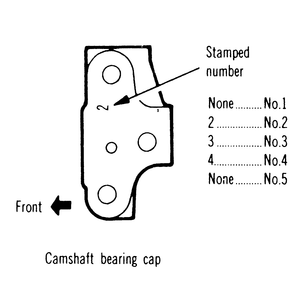
    Fig. 3: Install the camshaft bearing caps in the order shown — 2.3L Diesel Engines

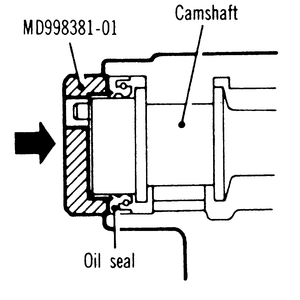
    Fig. 4: Use the oil seal installing tool MD998381–01 and a hammer to insert the new oil seal — 2.3L Diesel Engines

    To install:

  12. Thoroughly lubricate the bearing journals on the camshaft and the bearing seats in the head with clean engine oil. Place the camshaft in position on the head.
  13. Liberally coat the bearing caps with clean engine oil. Install the bearing caps. Tighten the bolts evenly in two or three steps; final torque should be 15 ft. lbs. (20 Nm).
  14. After the camshaft bearing caps are in place and tightened to the correct amount of torque, drive the new oil seal onto the front end of the camshaft with a camshaft oil seal installer (part MD998381–01) with a hammer until the oil seal is fully seated.
  15. Rotate the camshaft until it is in its original position (do NOT rotate the timing belt assembly) and reinstall the camshaft sprocket and timing belt. Tighten the center bolt to 52 ft. lbs. (70 Nm). Make certain the sprocket lines up on the guide pin in the end of the camshaft.
  16. Double check the alignment of all the timing marks, particularly the camshaft sprocket.
  17. Loosen the bolts on the tensioner, allowing the tensioner to move against the belt under its spring tension.

    WARNING
    Do not assist the tensioner by pushing on it — let the spring do the work.

  18. Use a wrench on the crankshaft bolt to turn the engine clockwise until the camshaft sprocket has moved two teeth out of position. Note that this is done with the belt adjustor loose. Be certain to turn the engine smoothly and only by the specified amount; the motion is necessary to correctly tension the belt.
  19. Tighten the upper bolt on the tensioner, then tighten the lower bolt. Correct torque for each bolt is 18 ft. lbs. (25 Nm). If the order of tightening is not followed the tensioner will turn, allowing the belt to receive incorrect tension.
  20. Turn the engine in the reverse (counterclockwise) direction until all the timing mark align.
  21. Push on the belt midway between the cam sprocket and the injection pump; correct deflection is 0.16–0.20 in. (4–5mm).
  22. Install the valve cover and gasket.
  23. Reconnect the vacuum and breather hoses.
2.6L Engine
  1. Disconnect the negative battery cable.
  2. Remove the distributor.
  3. Remove the valve cover by adhering to the previously described directions in this section.
  4. Remove the rocker arm assembly following procedures given in this section.
  5. Remove the camshaft sprocket along with the timing chain. Secure these two pieces together with wire or string. Set these two down on the lower chain stays.
  6. Remove the rear bearing cap bolts and the cap. These are not associated with the rocker shaft assembly.
  7. Lift the camshaft off the cylinder head. Place it on a padded surface in a protected area. Refer to the inspection section following for correct procedures.

    Fig. 5: Camshaft assembly — 2.6L engines

    To install:

  8. Thoroughly lubricate the bearing journals on the camshaft and the bearing seats in the head with clean engine oil. Place the camshaft in position on the head. Be careful not to damage the camshaft journals during installation.
  9. Apply a sealer to the outside diameter of the circular seal for the rear bearing and install it in the head with one side directly in contact with the rear of the camshaft. The packing will end up under the rearmost portion of the rear bearing cap.
  10. Install the rocker shaft/bearing cap assembly. tighten retaining bolts in steps working from the center out to 15 ft. lbs. (20 Nm).
  11. Reinstall the cam sprocket and chain to the camshaft.
  12. Inspect the semi-circular seal that goes in the front of the timing chain cover. Seal the top with an adhesive such as 3M® Adhesive 8001 or equivalent.
  13. Install the rocker cover.
  14. Install the distributor. Connect the negative battery cable.
  15. Start the engine and allow it to idle until the temperature gauge indicates normal operating temperature. Check to make sure that it is running correctly and not leaking.
3.0L Engines
  1. Disconnect the negative battery cable.
  2. Follow the directions for timing belt removal, located in this section.
  3. Remove the two camshaft sprockets using the special Mitsubishi tools (MB990767–01 and MIT308239).
  4. Remove the cooling fan stay, the alternator bracket stay and the alternator bracket.
  5. Remove the oil filler hose filter and hose.
  6. Remove the rocker arm covers and the old gaskets. Discard the gaskets as new ones will be needed for installation.
  7. Remove the circular packing from the rear of the camshaft bore, and the oil seal from the front of the camshaft bore. Discard both, as new ones will be needed for installation.
  8. Remove the distributor adapter and O-ring. Discard the old O-ring, a new one will be needed for installation.
  9. Remove the rocker arm shaft assemblies.
    1. Install the special tools (MD998443–01) to the rocker arms to hold the lash adjusters.
    2. Loosen the camshaft bearing cap bolt. Do not remove the bolts from the cap.
    3. Remove the rocker arms, shaft and bearing cap as an assembly.
  10. Lift the camshaft off the cylinder head. Place it on a padded surface in a protected area. Refer to the inspection section following for correct procedures.

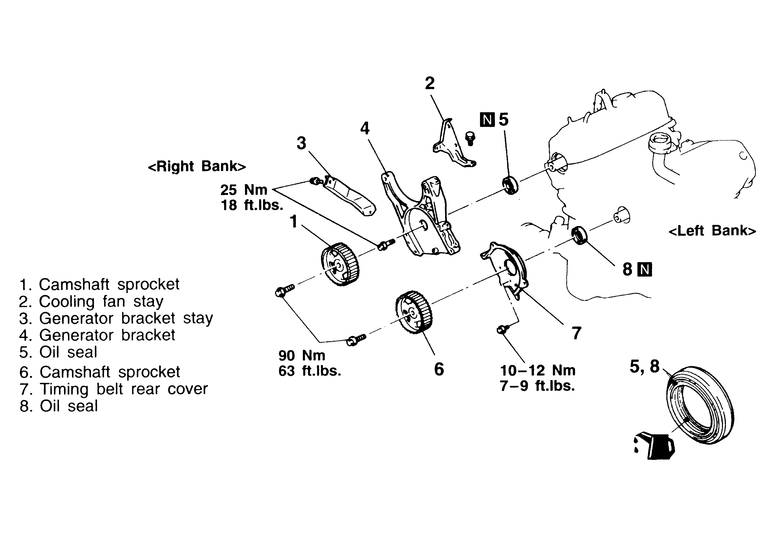
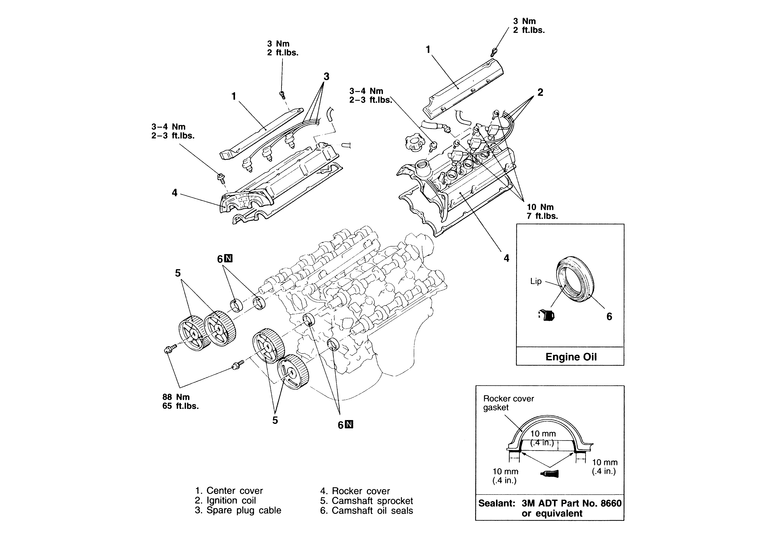
    Fig. 6: Preliminary camshaft removal components — 3.0L Engines

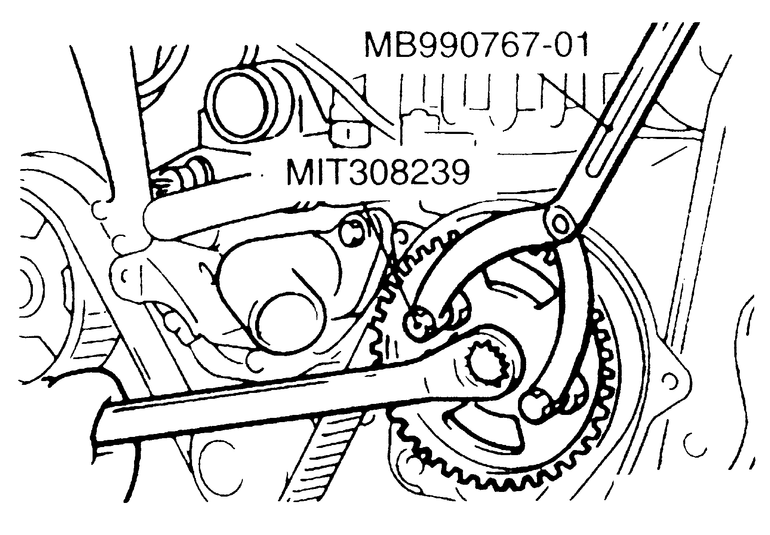
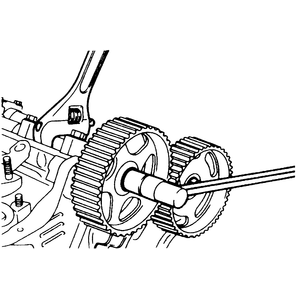
    Fig. 7: Use these two special tools to remove the camshaft sprockets — 3.0L Engines

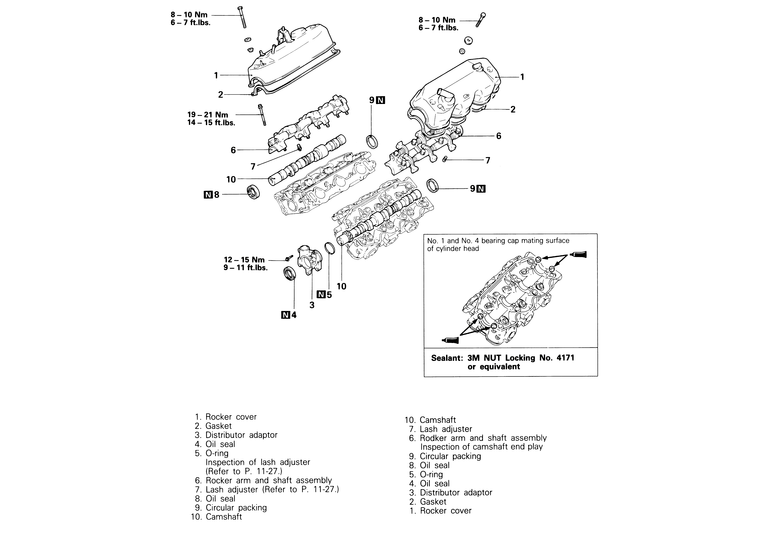
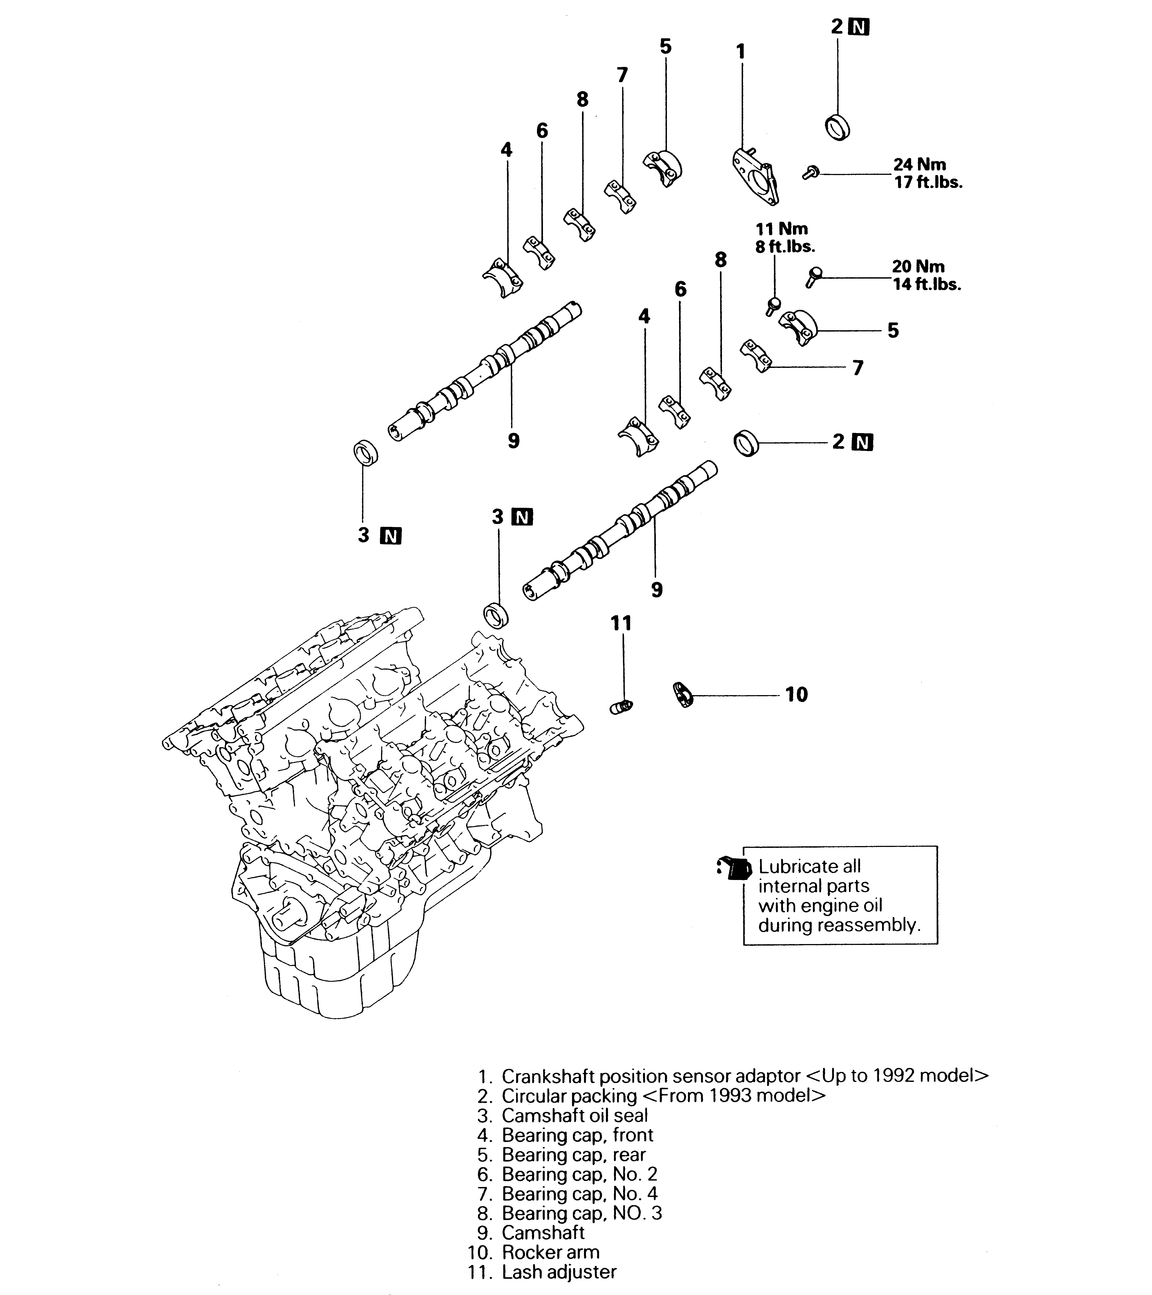
    Fig. 8: Camshaft assembly — 3.0L Engines

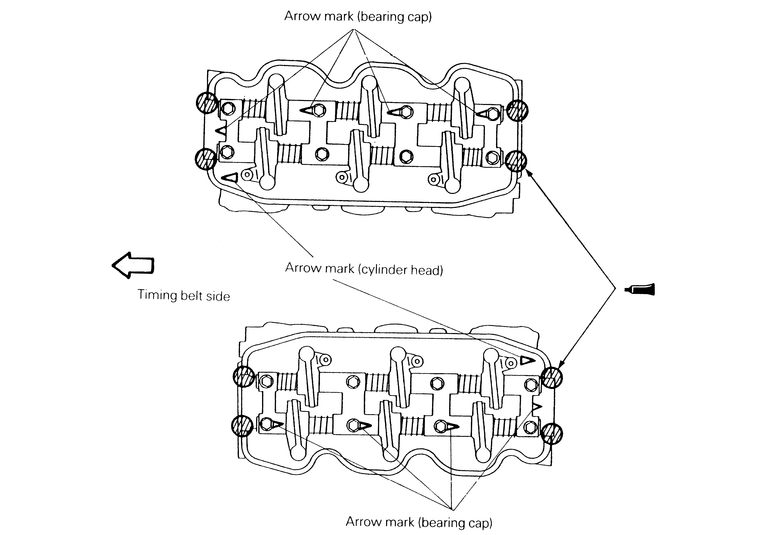
    Fig. 9: Match the arrow marks on the rocker arm assemblies with the directional arrows on the heads — 3.0L Engines

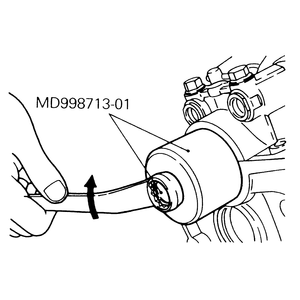
    Fig. 10: Use the special tool (MD998713–01) to install the camshaft oil seal — 3.0L Engines

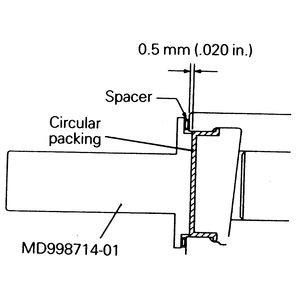
    Fig. 11: Use the special tool (MD998714–01) and the washer to install the circular packing — 3.0L Engines

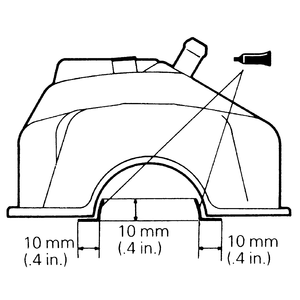
    Fig. 12: Apply the sealant to the specified areas — 3.0L Engines

    To install:

  11. Thoroughly lubricate the bearing journals on the camshaft and the bearing seats in the head with clean engine oil. Place the camshaft in position on the head. Be careful not to damage the camshaft journals during installation.
  12. Install the rocker arm shaft assembly (if the rocker arm shaft assembly was disassembled, refer to the rocker arm removal directions, outlined previously in this section).
    1. Apply a minimum amount of the specified sealant (3M® Nut Locking No. 4171 or equivalent) on the four places of the cylinder head.

      NOTE: Be sure the sealing agent does not swell out onto the camshaft journal surface of the cylinder heads. If it swells out, immediately wipe it off before it can dry.

    2. Install the rocker arms, shafts and bearing caps such that the arrow mark on the bearing cap faces in the same direction as the arrow mark on the cylinder heads.
    3. Tighten the bearing cap bolts to the specified torque.
    4. Remove the special tools from all of the rocker arms.
  13. Install the distributor adapter with a new O-ring.
  14. Install the new camshaft oil seal. Use the special Mitsubishi tool (MD998713–01 or equivalent) to install the new camshaft oil seal. Coat the rubber seal edge with a layer of clean engine oil before installation.
  15. Install the rear circular packing.
    1. Install a 0.052–0.059 in. (1.3–1.5mm) thick spacer to the special tool (MD998714–01) and drive the circular packing in.

      NOTE: Use of the tool (MD724328) spacer for transmissions is recommended.

      CAUTION
      The packing is overdriven if no spacer is fitted to the special tool.

  16. Install the rocker arm cover with the old gasket, if the old gasket is not damaged (for more information — refer to the removal instructions for rocker arm covers in this section). Apply specified sealant (3M® ATD Part No. 8660 or equivalent) on the areas specified in the illustration.
  17. Install the oil filler tube and oil filler filter.
  18. Install the alternator bracket, the alternator bracket stay and the cooling fan stay.
  19. Install the camshaft sprockets using the special tools that were used upon removal.
  20. Follow the timing belt installation instructions and install all equipment taken off the engine during removal.
3.5L DOHC Engines
  1. Follow the directions for intake manifold removal and installation outlined previously in this section.
  2. Remove the timing belts by following the procedures described previously in this section.
  3. Remove the center covers on the rocker arm covers.
  4. Remove the three (3) ignition coils and their respective spark plug wires. Label the wires for ease of installation.
  5. Remove the rocker arm covers from the heads.
  6. Remove the four (4) camshaft sprockets. Use a wrench to hold the hexagonal part of the camshaft to prevent the crankshaft from turning, and then loosen the camshaft sprocket bolt.

    CAUTION
    Do not hold the camshaft sprocket with a tool, or a damaged sprocket could be the result.

  7. Remove the camshaft bearing caps in this order: front, rear, No. 2, No. 4, No. 3.
  8. Lift the camshafts off the cylinder head. Place them on a padded surface in a protected area. Refer to the inspection section following for correct procedures.
  9. Remove the rocker arms and lash adjusters, for service of these two parts refer to the procedures described previously in this section.

    Fig. 13: Preliminary camshaft removal components — 3.5L Engines

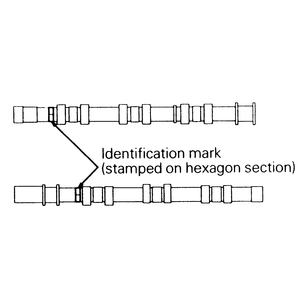
    Fig. 14: Use these two wrenches to remove the camshaft sprockets, make sure to grip the camshaft hexagonal section — 3.5L Engines

    Fig. 15: Camshaft assembly — 3.5L Engines

    Fig. 16: Before installation check the identification stamped on the camshafts' hexagonal section — 3.5L Engines

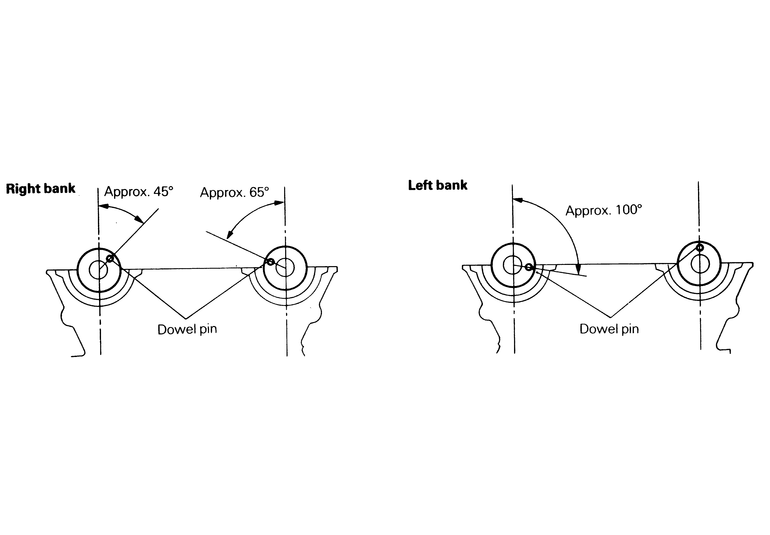
    Fig. 17: Position the camshafts so that their dowel pins are in the positions shown — 3.5L Engines

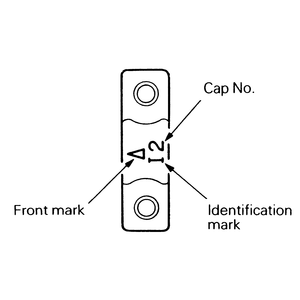
    Fig. 18: The bearing caps have three (3) identification marks stamped on them: the direction of installation, the number of the cap, and whether it is for the intake or exhaust side of the head — 3.5L Engines

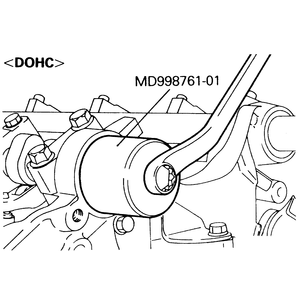
    Fig. 19: Install the camshaft oil seal with the special Mitsubishi tool shown — 3.5L Engines

    To install:

  10. Install the rocker arms on the valve stems and the lash adjusters.
  11. Thoroughly lubricate the bearing journals on the camshaft and the bearing seats in the head with clean engine oil. Place the camshaft carefully in position on the head. Be careful not to damage the camshaft journals during installation.
    1. Make sure the crankshaft is still at top dead center on No. 1 cylinder.
    2. Check to make sure that the rocker arm is installed correctly on the lash adjuster and valve.
    3. Install the camshaft while noting the identification mark (stamped on the hexagonal section).
    4. Install the camshafts with their dowel pins positioned as shown in the illustration.
  12. Loosely install the bearing caps onto the head. Install the bearing caps according to the identification mark and cap number. No. 2, 3 and 4 bearing caps have the front mark stamped on them. Install these caps with the front mark pointing in the same direction as that on the cylinder head. Each cap will have either an "I'' ,for intake, or an "E'', for exhaust.
  13. Gradually tighten the bearing caps in two or three steps. In the final step, tighten to the specified torque.
  14. Install the camshaft oil seals into the front camshaft bearing cap. Use the special tool (MD998761–01) to correctly install the seal. Make sure to apply a thin film of oil to the rubber sealing edge of the seal.
  15. Install the circular packing into the rear camshaft bearing cap. Use the special Mitsubishi tool (MD998762–01) to install this packing correctly.
  16. Install the four (4) camshaft sprockets in the same manner as they were removed.
  17. Install the rocker covers, using a new gasket if the old gasket is damaged in any way. Apply 3M® ADT Part No. 8660 or equivalent sealant to the specified areas.
  18. Reinstall the ignition coils and their spark plug wires. Make sure the wires are routed as they were when removed.
  19. Fasten the center covers back onto the rocker arm covers.
  20. Reinstall and adjust the timing belts using the previous directions.
  21. Install the intake manifold by using the procedures used upon disassembly.
  22. Start the vehicle and check for leaks, noises or other irregularities.

Previous Next