- Disconnect the negative battery cable.
- Remove the timing belts by following the directions for removal of the timing
belts found in this section.
- Remove the oil filter. Drain the engine oil.
CAUTION
Used motor oil may cause skin cancer if repeatedly left in contact with
the skin for prolonged periods. Although this is unlikely unless you handle
oil on a daily basis, it is wise to thoroughly wash your hands with soap
and water immediately after handling used motor oil.
- Remove the oil pan by following the previously outlined procedures.
- Remove the oil pick up screen and gasket.
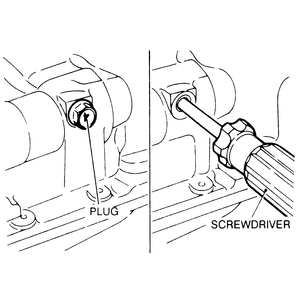
- Remove the plug from the left side of the cylinder block and insert a screwdriver-sized
prytool to keep the left silent shaft in place. The prytool should have a
shaft diameter of 0.3 in. (8mm) and a shaft length of at least 2.4 in. (60mm).
- Remove the bolt holding the oil pump sprocket and remove the sprocket.
- Loosen the mounting bolt for the right silent shaft sprocket until it can
be turned with your fingers. Do not remove it.
- If not already done, remove the tensioner for the silent shaft belt (tensioner
B).
- If not already done, remove the silent shaft belt (timing belt B). Remove
the crankshaft pulley for the silent shaft belt, if so desired.
WARNING
After the timing belt has been removed, do not attempt to loosen the silent
shaft bolt by holding the sprocket with pliers. If the sprocket is to be
removed, hold the pulley with your fingers.
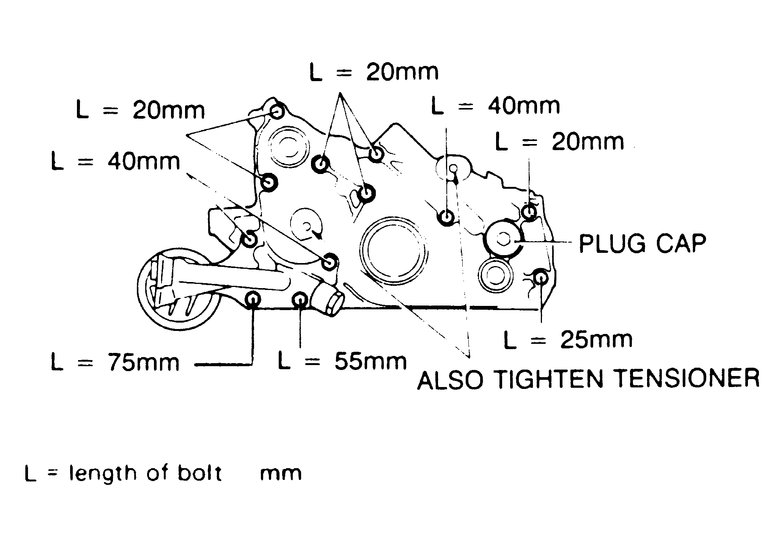
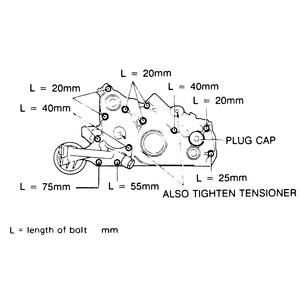
- Remove the front case mounting bolts; remove the front case assembly and
its gasket.
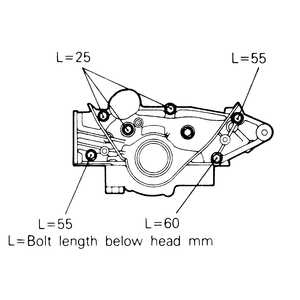
WARNING
The front case bolts are of several different lengths and must be replaced
exactly as removed. Labeling or diagramming their placement during removal
is very important.
- Remove the prytool from the left silent shaft. Remove the silent shafts
from the engine.
- Remove the oil pump cover from the front case.
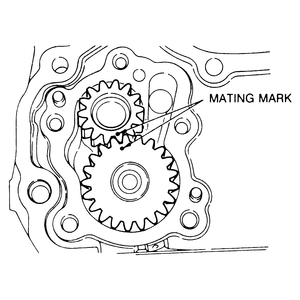
- Remove the oil pump gears.
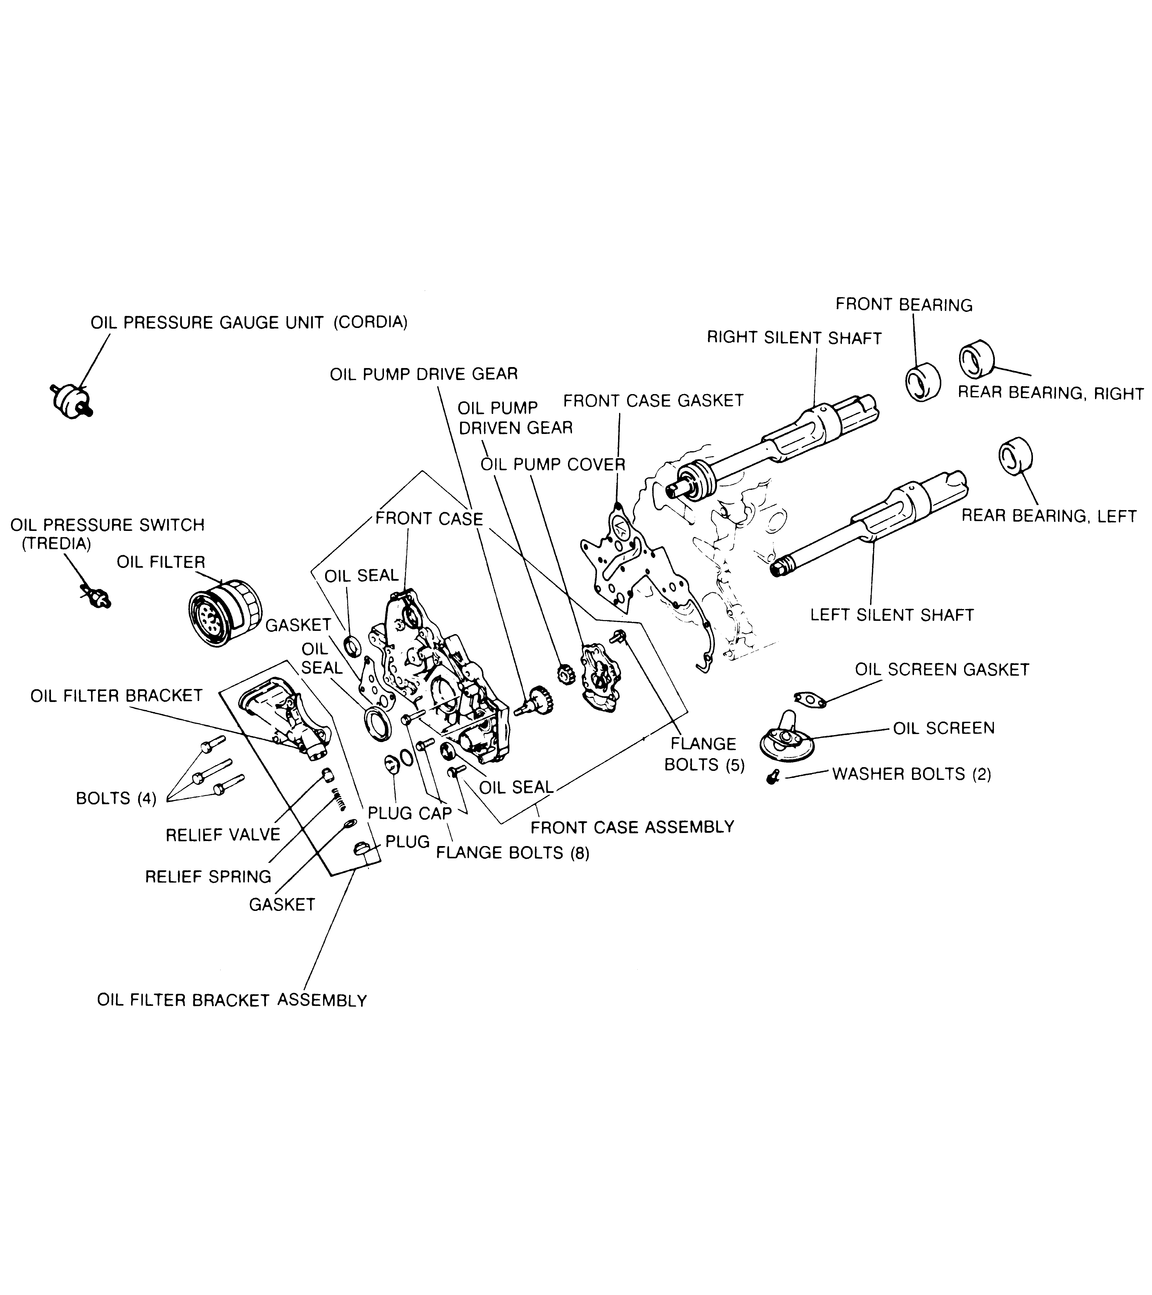
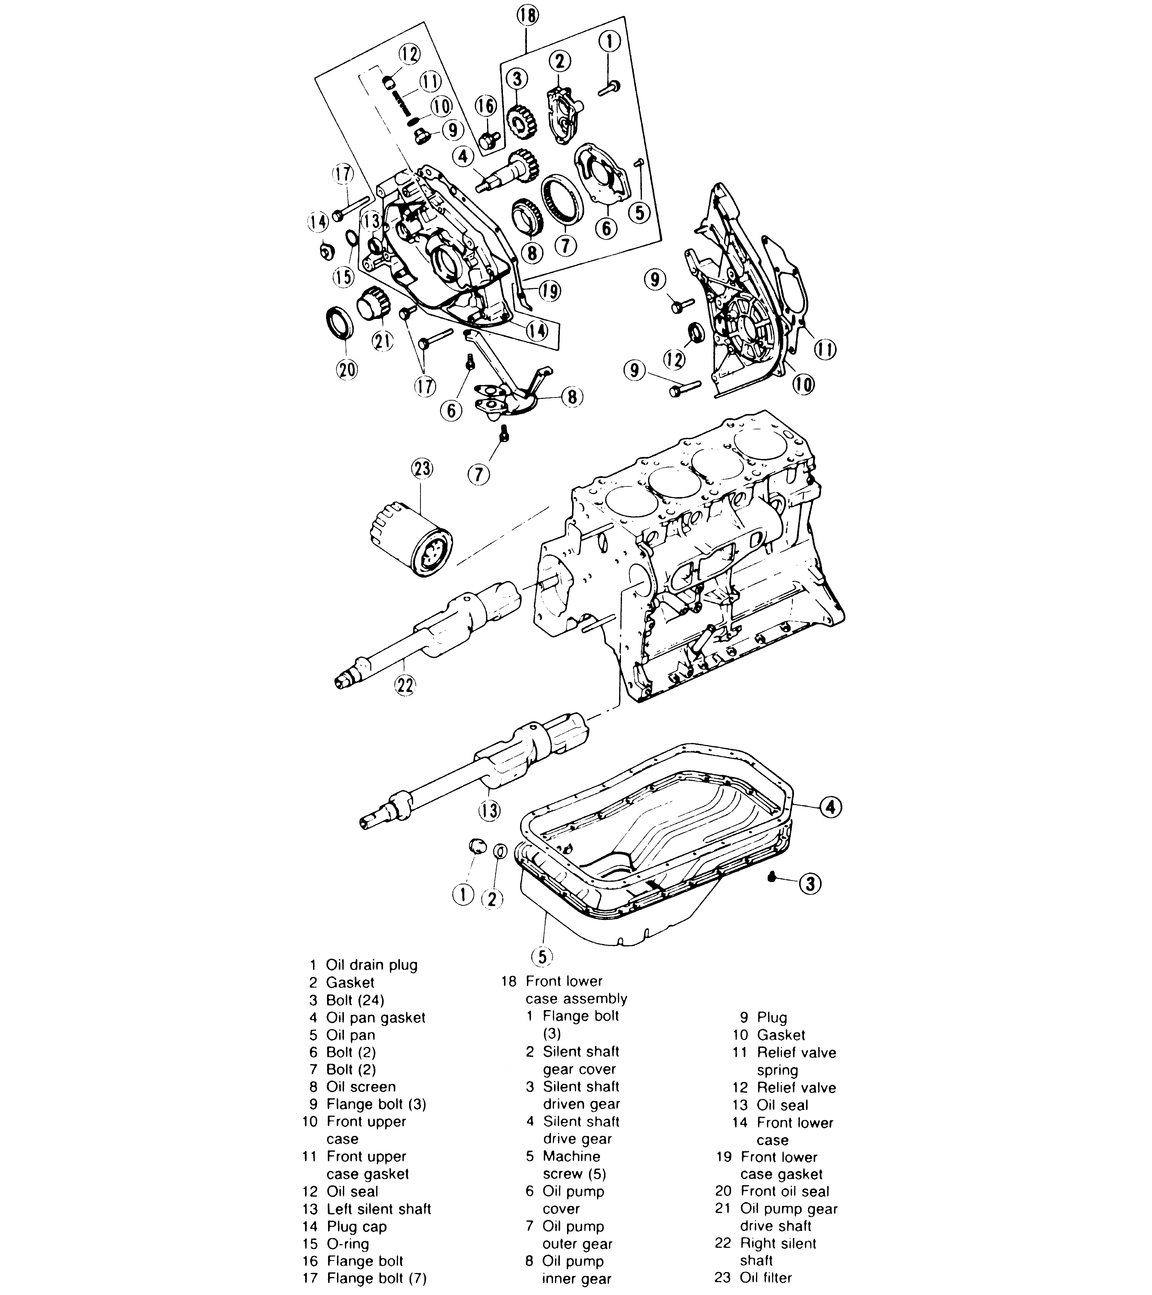
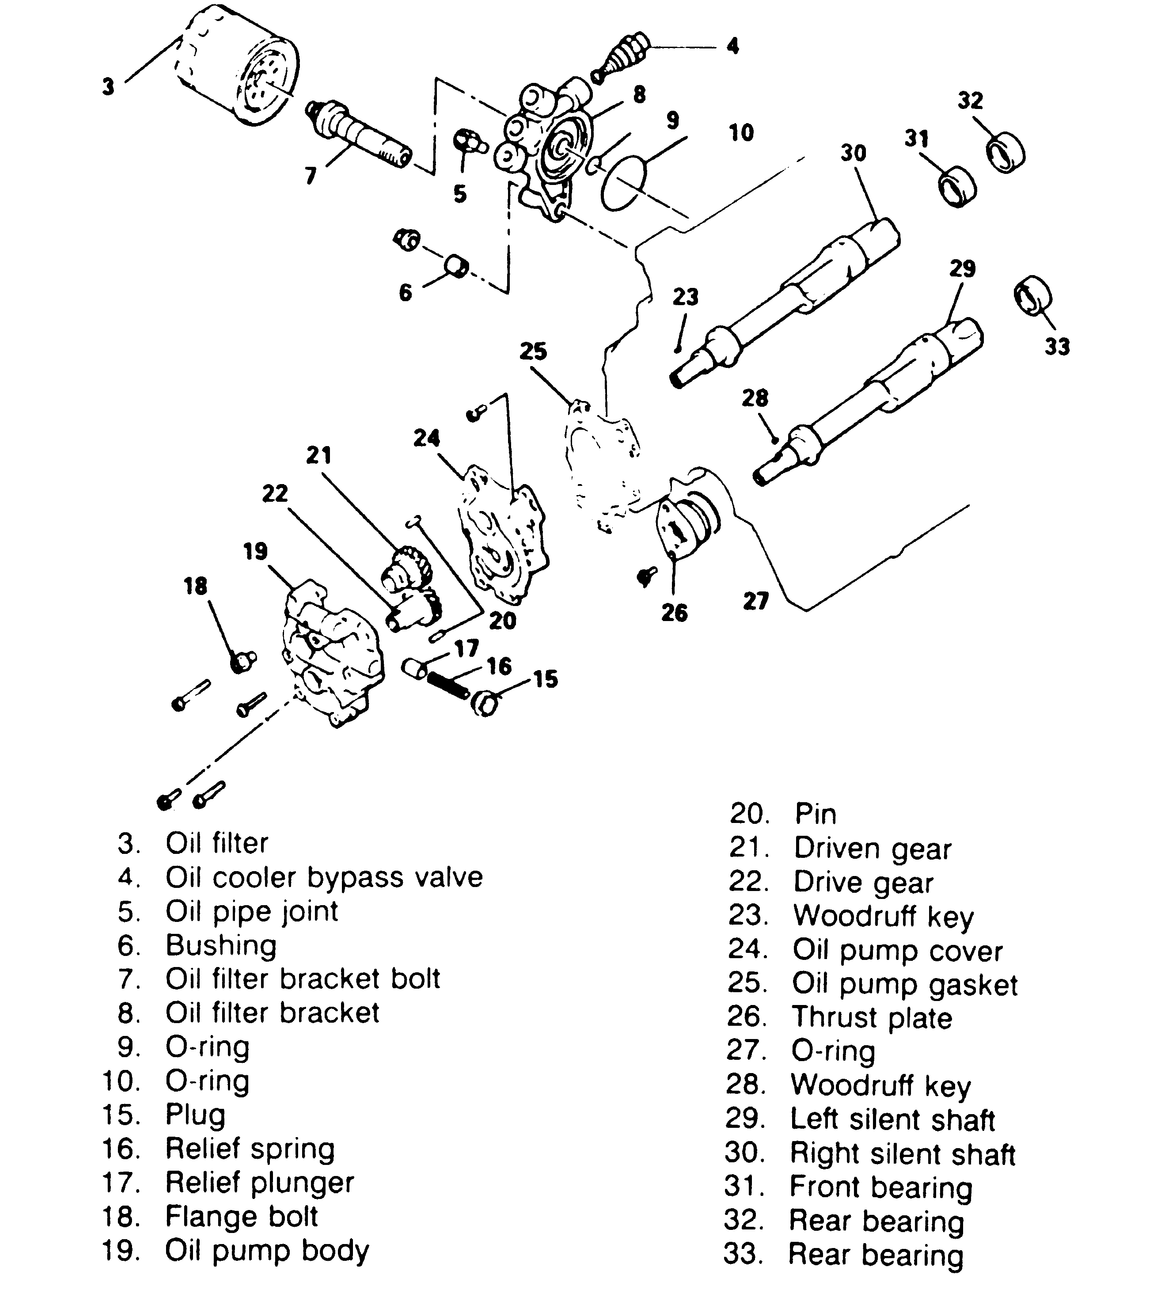
| Fig. 1: Oil pump and silent shaft assembly — 2.0L
engine
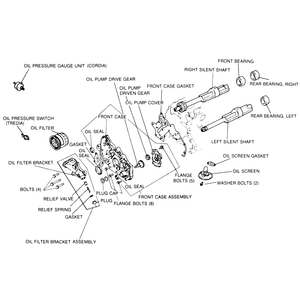
|
| Fig. 2: Use a prytool to block the left silent shaft
|
| Fig. 3: Removing the oil pump cover from the front
case

|
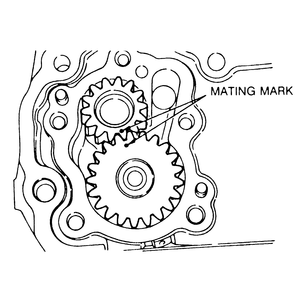
| Fig. 4: Carefully align the marks on the oil pump
gear
|
| Fig. 5: Seal guide tool in place — note
the engine is removed and inverted
|
| Fig. 6: Correct bolt placement by length — 2.0L
and 2.4L engines
|
To install:
- Visually check the contact surfaces of the oil pump cover and the front
case for wear. If excessive wear is present, replace the components. Inspect
the oil passages for clogging and clean them as needed. The silent shafts
should be inspected for any of wear or seizure. Closely inspect the oil seals
on the front case, replacing any with worn or damaged lips.
- Insert the relief plunger into the oil filter bracket and check for smooth
operation.
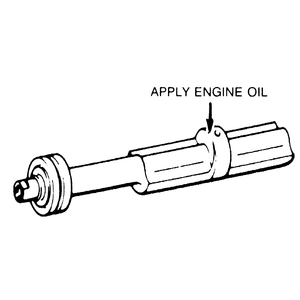
- Apply engine clean engine oil to the oil pump gears and install them in
the front case. Align the mating marks.
- Install the oil pump cover to the front case and tighten the bolts to 16
ft. lbs. (21 Nm).
- Carefully install the left and right silent shafts into the engine; the
bearings can be damaged by careless installation.
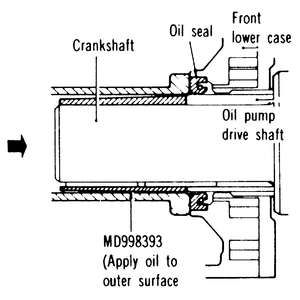
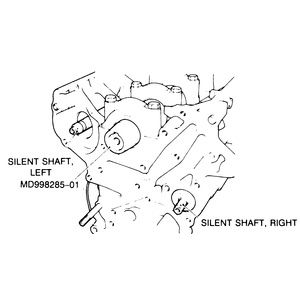
- Install a seal guide tool such as MD 998285–01 or its equivalent to
the crankshaft. Note that the tapered end should face away from the block.
Coat the surface of the guide with clean engine oil. This guide will help
in installing a new seal in the front case. If the seal is already in place,
the guide will protect the seal during installation.
- Install a new front case gasket, carefully aligning all the bolt holes.
- Install the front case to the block and lightly tighten the eight bolts.
When the case is properly seated, the seal guide may be removed.
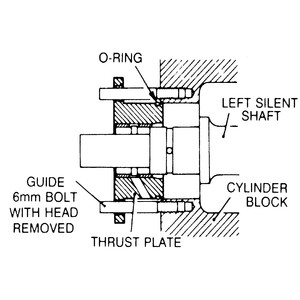
- Insert a prytool through the left side access hole and block the left silent
shaft.
- Install the silent shaft end bolt and tighten it to 26 ft. lbs. (35 Nm).
- Install the oil filter bracket and gasket. Tighten the front case mounting
bolts to 17 ft. lbs. (23 Nm) and the oil filter bracket bolts.
- Install the plug cap at the end of the left silent shaft.
- Coat the relief plunger and spring in clean engine oil and install them
into the oil filter bracket. Install the relief plug and gasket, tightening
the plug to 34 ft. lbs. (46 Nm).
- Install the oil screen and gasket.
- Install the oil pan.
- Install a new oil filter.
- Check that the timing marks are still aligned. Push down on the center of
the tension side of the belt with your finger. Correct belt deflection is
approximately 1⁄4 in.
(5–7mm). If the deflection is not correct, the tensioner must be released
fully and the belt re-tensioned.
- Install the flange and the crankshaft sprocket onto the crankshaft. Make
certain the flange is installed in the correct direction. If it is put on
incorrectly, the belt will wear and break.
- Install the special washer and the sprocket retaining bolt to the crankshaft.
Tighten the bolt to 88 ft. lbs. (119 Nm).
- Install the camshaft sprocket to the camshaft and tighten the bolts to 66
ft. lbs. (89 Nm).
- Install the spacer, tensioner and tensioner spring if they were removed.
Install the lower end of the spring to its position on the tensioner, then
place the upper end in position at the water pump. Move the tensioner towards
the water pump and temporarily tighten it in this position.
- Install the oil pump sprocket, tightening the nut to 40 ft. lbs. (54 Nm).
Remember that the oil pump drives the left silent shaft, which is still blocked
by the screwdriver. Hold the sprocket by hand when tightening the nut.
- Double check the alignment of the timing marks for the cam, crank and oil
pump sprockets. If any adjustment is needed to the oil pump sprocket, remove
the screwdriver blocking the silent shaft before adjusting the sprocket. Once
everything is aligned, replace the screwdriver in the left side of the block
and leave it there until installation of the timing belt is complete.
NOTE: If the screwdriver can only be inserted about 1 in.
(25mm) or less, the shaft is out of position. Turn the oil pump sprocket
through one full turn clockwise; the screwdriver should then go in about
2 1⁄2 in.
(63mm).
- Install the timing belt onto the crankshaft sprocket, the oil pump sprocket
and the cam sprocket in that order. Keep the belt taut between sprockets.
If reusing an old belt, make certain that the direction of rotation arrow
is properly oriented.
- Loosen the tensioner mounting nut and bolt. The spring will move the tensioner
against the belt and tension it.
- Check the belt as it passes over the camshaft sprocket. The belt may tend
to lift in the area to the left of the sprocket (roughly 7 o'clock to 12 o'clock
when viewed from the pulley end.) Make certain the belt is well seated and
not rubbing on any flanges or nearby surfaces.
- At the tensioner, tighten the bolt in the slotted hole first, then tighten
the nut on the pivot. If this order is not followed, the belt will become
too tight and break.
- Once again, check all the timing marks for alignment. Nothing should have
changed; check anyway.
- Remove the prytool blocking the left side silent shaft. Using a socket on
the crankshaft bolt, turn the crankshaft clockwise smoothly one full turn
(360°). Do NOT turn the engine backwards.
- Loosen the tensioner nut and bolt. The spring will allow the tensioner to
tighten a little bit more because of the slack picked up during engine rotation.
Tighten the bolt, then the nut to 36 ft. lbs. (48 Nm).
- Check the deflection of the belt. At the middle of the right (tension) side
of the belt, deflect the belt outward with your finger, toward the timing
case. The distance between the belt and the line of the cover seal should
be about 9⁄16 in.
(14mm).
- Install the lower and upper timing belt covers. Make certain the gaskets
are properly seated in the covers and that they don't come loose during installation.
Tighten the bolts to 8 ft. lbs. (11 Nm).
- Install the crankshaft pulley.
- Install the water pump pulley, and install the belt. Adjust the belt to
the correct tension.
- Install the correct amount of motor oil.
- Connect the negative battery cable. Start the engine and let it idle, listening
for any unusual noises from the area of the timing belt. Possible causes of
noise are the belt rubbing against the covers or a sprocket flange, the belt
being too loose and slapping, or a tensioner binding. Do not accelerate the
engine if abnormal noises are heard from the timing belt train — severe
damage can result.