NOTE: Elevate and safely support the vehicle as needed to gain
access to any components. Depending on tools, arm length and agility, each operation
may be easier from above or below. All wires and hoses should be labeled at
the time of removal. The amount of time saved during reassembly makes the extra
effort well worthwhile.
- If the vehicle is equipped with air conditioning, take the vehicle to a
trained and certified mechanic to discharge the air conditioning system using
a recycling/recovery machine.
- Matchmark and remove the hood. Disconnect the negative battery cable at
the battery.
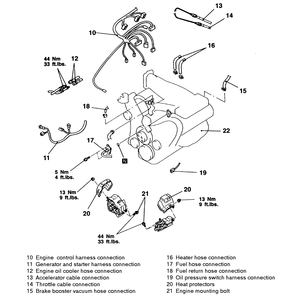
- Elevate and safely support the truck on jackstands. Remove the undercovers
and shields below the engine.
- Drain the engine coolant.
CAUTION
When draining the coolant, keep in mind that cats and dogs are attracted
by ethylene glycol antifreeze, and are quite likely to drink any that is
left in an uncovered container or in puddles on the ground. This will prove
fatal in sufficient quantity. Always drain the coolant into a sealable container.
Coolant should be reused unless it is contaminated or several years old.
- Drain the engine and transmission oil.
- Remove the air cleaner assembly.
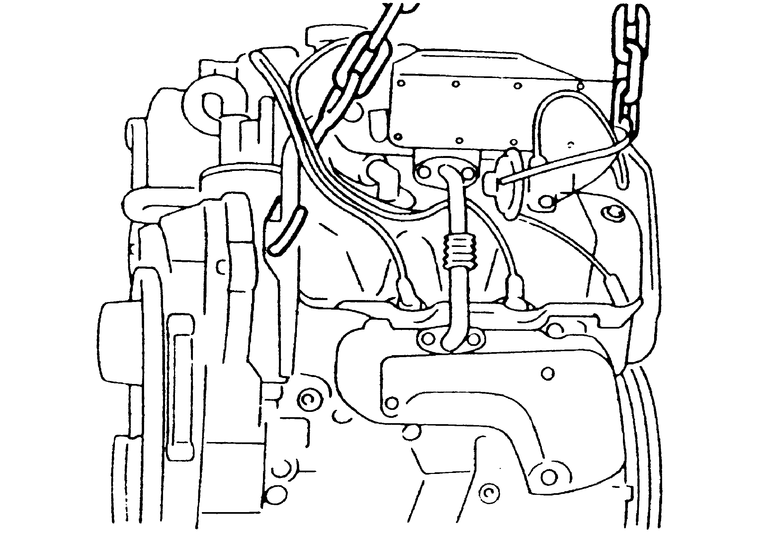
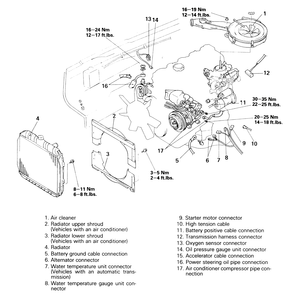
| Fig. 1: Preliminary engine removal components — 2.0L
Engines
|
| Fig. 2: Preliminary engine removal components — 2.6L
Engines
|
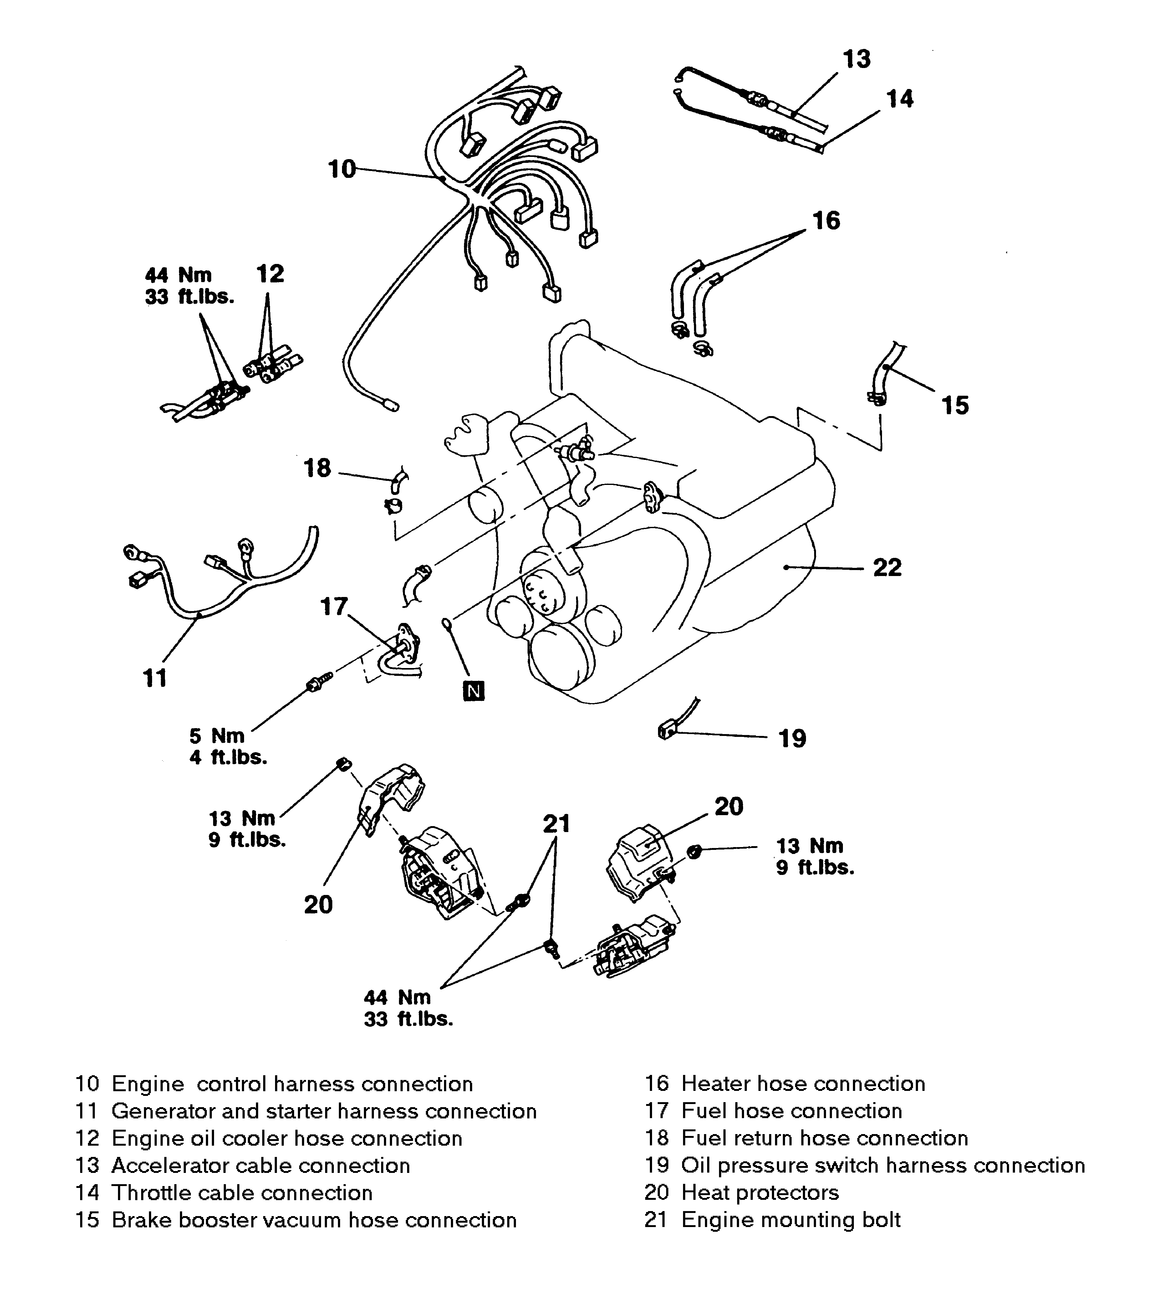
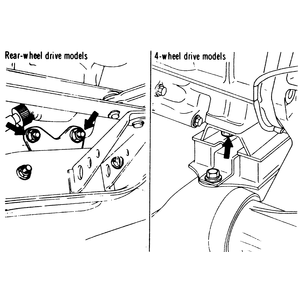
| Fig. 3: Engine and transmission mounting components — 2.0L
Engines
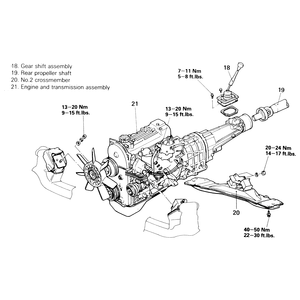
|
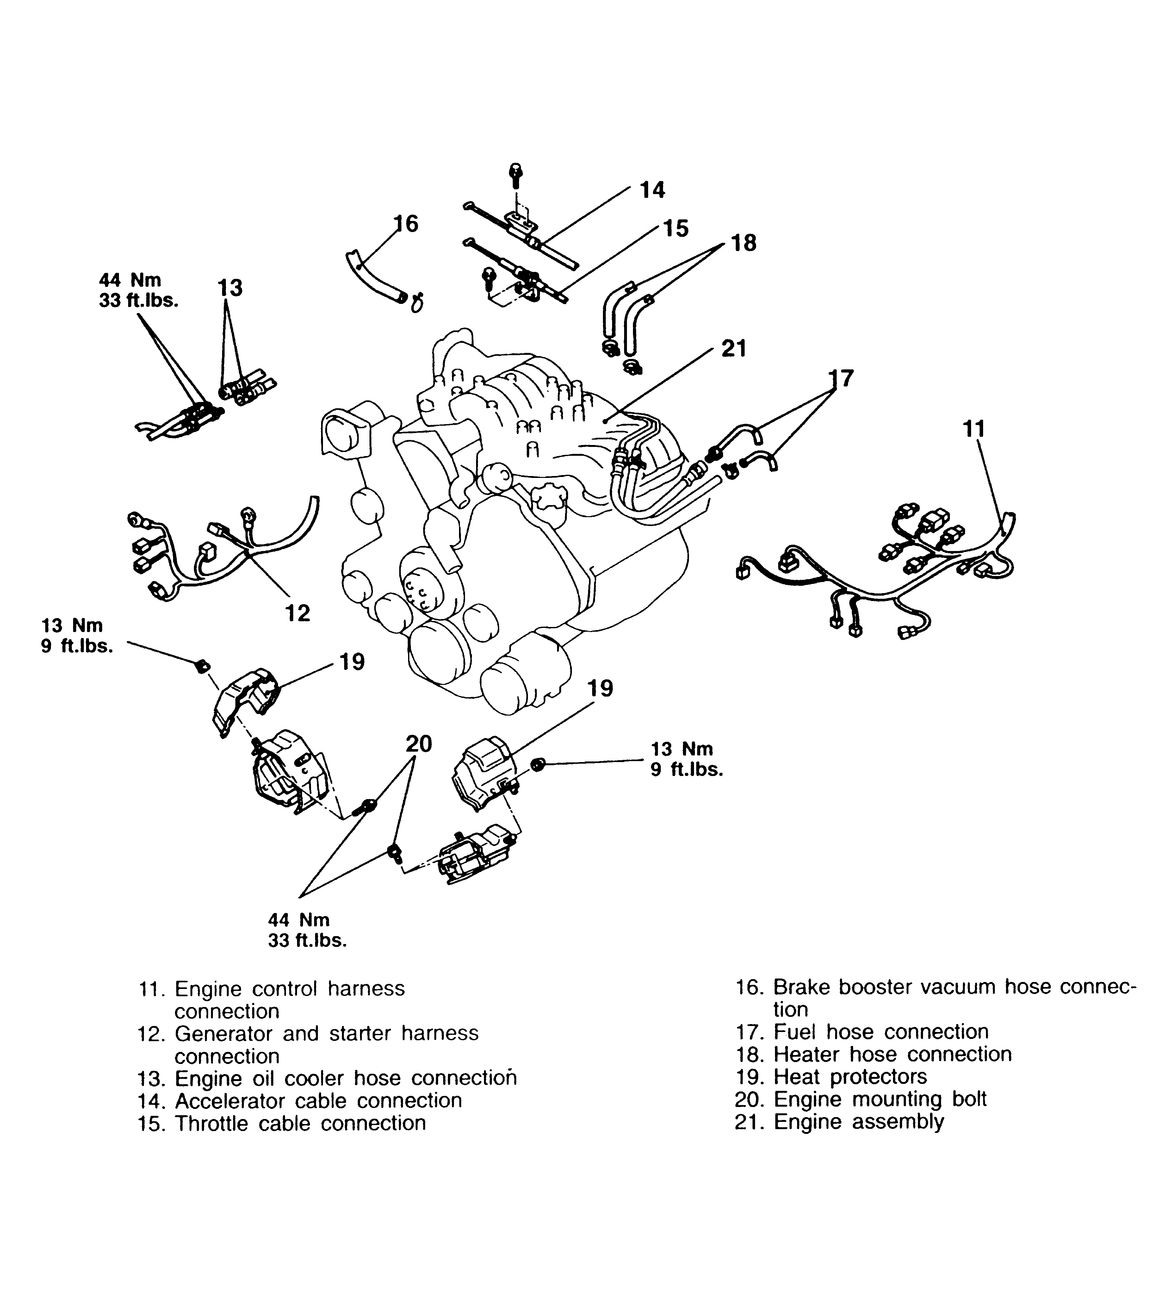
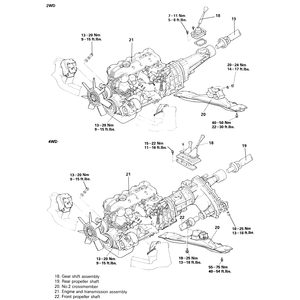
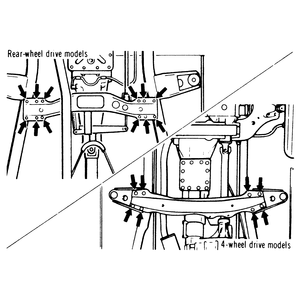
| Fig. 4: 2-Wheel and 4-wheel drive engine and transmission
mounting components — 2.6L Engines
|
| Fig. 5: Removing the 4-wheel drive manual shifter
assembly
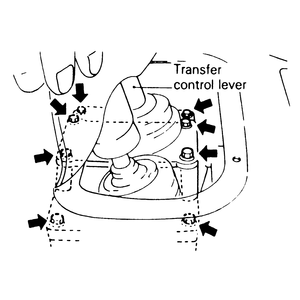
|
- If the vehicle is equipped with air conditioning, remove the upper and lower
fan shrouds from the radiator.
- Disconnect the upper and lower hose from the radiator and remove the radiator.
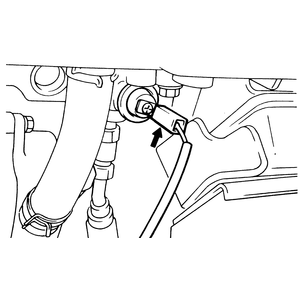
- Disconnect the battery ground cable from the left-hand side of the engine
block.
- Disconnect the coil wire from the distributor cap.
- Label and disconnect the water temperature sensor (with automatic transmission),
the water temperature gauge sender and the starter motor connector.
- Disconnect the positive battery cable from the starter.
- Disconnect the transmission harness, the oxygen sensor connection, the wiring
to the alternator and the oil pressure sender wire.
- Disconnect the accelerator cable.
- Carefully disconnect both hoses from the power steering pump. Do not damage
the hose and mop up any spilled fluid.
- Disconnect both air conditioning hoses from the compressor. Carefully move
the hoses out of the way but do not crimp or crease the hoses. Cap the compressor
nozzles and the lines.
- Disconnect the brake booster vacuum hose.
- Disconnect the exhaust pipe from the bottom of the exhaust manifold. Use
wire or string to support the pipe to the side. Do not let the pipe hang of
its own weight.
- Carefully label and disconnect the fuel lines, breather and vacuum lines
and the canister lines.
CAUTION
On vehicles equipped with fuel injection systems, relieve the fuel system
pressure before loosening or removing any fuel lines.
- Inside the vehicle, remove the shifter assembly (manual transmission) or
disconnect the automatic shift selector linkage.
NOTE: When removing the manual shifter, remove the mounting
bolts from the stopper plate and remove the lever assembly with the stopper
plate.
- Remove the driveshaft, or both driveshafts if the vehicle is equipped with
4-wheel drive. Before disconnecting the rear flange from the axle, scribe
matchmarks on both the shaft and axle flange so that the shaft may be reinstalled
in its original position. If the driveshaft is the 3-joint type, disconnect
the center carrier from the floor pan of the vehicle. After the flange is
free at the rear, slide the shaft out of the transmission housing. Immediately
plug or cover the transmission; do not allow dirt or foreign matter to enter
the transmission case. Do the same for the front driveshaft.
- Install the hoisting equipment and make sure it is securely fastened to
the engine. Draw tension on the hoist just enough to support the weight of
the motor without elevating it.
CAUTION
The truck is supported on stands. Tension the hoist slowly and do not disturb
the position of the truck on the supports.
- Position a floor jack under the transmission (No.2) crossmember and adjust
it to just touch to crossmember for support.
- Remove the outer bolts holding the crossmember to the vehicle. Carefully
remove the two center bolts holding the crossmember to the transmission case.
Lower the jack slowly to remove the crossmember from the vehicle.
- Double check for any remaining cables, hoses, wiring or lines still running
to the engine and/or transmission and remove them. Check that any item which
was moved out of the way is truly in a safe location.
- Place the floor jack with a large block of wood under the transmission case
for support. The jack will need to be adjusted and eventually removed during
the engine removal.
- Double check the security of the lifting apparatus. Make certain the cables
are tensioned properly. Remove the nut, lockwasher and spacer from each motor
mount.
- Elevate the hoist slowly and raise the engine and transmission assembly
out of the truck. The transmission will need to be lowered and the assembly
lifted out on an angle. Take your time; clearances may be close and the unit
is heavy. As soon as the engine is clear, mount it on a stand or support it
on wooden blocks. Do not allow it to rest on the oil pan or lie on its side.
Never leave an engine hanging from a hoist. The transmission should be disconnected
from the engine as soon as convenient.
To install:
- After repairs, make certain the engine and transmission are fully reassembled
before installation. All components removed with the engine out of the truck
should be in place before reinstallation.
- Install the engine into the truck and lower it until the bolt holes for
the mounts align with the brackets. Use the floor jack and wood block to support
and guide the transmission into place as necessary. Install the mount nuts,
tightening them to 14 ft. lbs (19 Nm).
- Using the floor jack as necessary for support, install the No. 2 crossmember.
Tighten the body bolts to 41 ft. lbs. (55 Nm) and the nuts holding the crossmember
to the transmission to 17 ft. lbs. (24 Nm). When the mounts and crossmember
are securely fastened, the floor jack and the engine lifting apparatus may
be removed from the vehicle.
- Install one or both driveshafts, depending on whether the vehicle is 2-wheel
drive or 4-wheel drive. Remove the plug or cover from the transmission and
insert the driveshaft. If the driveshaft is of the 3-joint type, connect the
center support and tighten the nuts to 26 ft. lbs. (35 Nm). Turn the differential
flange until the mark made during removal aligns with the mark on the shaft
flange. Install the retaining bolts and tighten to 41 ft. lbs. (55 Nm).
- Reinstall the manual shifter assembly with new gaskets or reconnect the
automatic shift linkage.
- Connect the fuel, vacuum, breather and canister lines to their correct locations.
Make certain lines are not crimped or split. Route the lines clear of any
hot surfaces or moving parts.
- Use a new gasket with new nuts and connect the exhaust pipe to the manifold.
- Connect the brake booster vacuum hose.
- Using a new O-ring inside each line, connect the air conditioning lines
to the compressor. Tighten the fittings carefully to 18 ft. lbs. (25 Nm).
- Connect the power steering hoses to the pump. Tighten the retaining nut.
- Connect the accelerator cable.
- Connect the wiring to the transmission, the oxygen sensor, the alternator
and oil pressure sender.
- Connect the positive battery cable to the starter.
- Connect the other wiring to the starter. Connect the water temperature sender
and gauge wiring.
- Connect the coil wire to the distributor.
- Install the radiator and connect the hoses. The radiator retaining bolts
should be tightened only to 8 ft. lbs. (10 Nm).
- Install the fan shrouds.
- Connect the negative battery cable to the engine (not to the battery).
- Install the air cleaner assembly.
- Fill the cooling system with coolant. Make certain the draincocks on the
engine and radiator are closed before adding the fluid.
- Add the correct amount of oil to the engine and the correct amount to the
transmission.
- Double check all installation items, paying particular attention to loose
hoses or hanging wires, untightened nuts, poor routing of hoses and wires
(too tight or rubbing) and tools left in the engine area.
- Connect the negative battery cable.
- After making certain that the transmission is in Neutral (manual) or P (automatic),
start the engine, allowing it to run at idle. Check carefully for any leaks
of oil, fuel, vacuum or coolant.
- Shut the engine off. Top up fluids as necessary.
- Install the undercovers and splash shields. Lower the truck to the ground.
- Install the hood, taking care to align the seams and latch correctly.
- Perform final adjustments to the belts, throttle cable, idle speed etc.
as necessary.
- Take the vehicle back to the air conditioning mechanic and have the system
evacuated and recharged.
NOTE: All wires and hoses should be labeled at the time of
removal. The amount of time saved during reassembly makes the extra effort well
worthwhile.
- Disconnect the negative battery cable from the battery terminal.
- Raise and support the vehicle on jackstands, so that the vehicle can be
accessed from the top and the bottom.
- Drain the engine oil, transmission oil and coolant fluid.
CAUTION
Used motor oil may cause skin cancer if repeatedly left in contact with
the skin for prolonged periods. Although this is unlikely unless you handle
oil on a daily basis, it is wise to thoroughly wash your hands with soap
and water immediately after handling used motor oil.
- Matchmark around the hinges on the hood. Remove the hinge attaching bolts,
and remove the hood from the hinges and body.
- Remove the air cleaner duct.
- Remove the heater hoses.
- Disconnect the accelerator and throttle cable.
- Disconnect the fuel lines and disconnect the water level sensor connector.
- Remove the fuel filter.
- Remove the power steering oil pump, if so equipped. Secure the pump to the
side of the inner fender well or frame, disconnecting of the pump hoses is
not necessary.
- Disconnect the glow plug cable and unplug the gauge unit wiring harness
connector.
- Disconnect the engine ground strap.
- Disconnect the starter motor wiring harness at the starter.
- Remove the clutch release (slave) cylinder from the bell housing. Support
it out of the way with a piece of stiff wire or strong cord. It is not necessary
to remove the fluid hose.
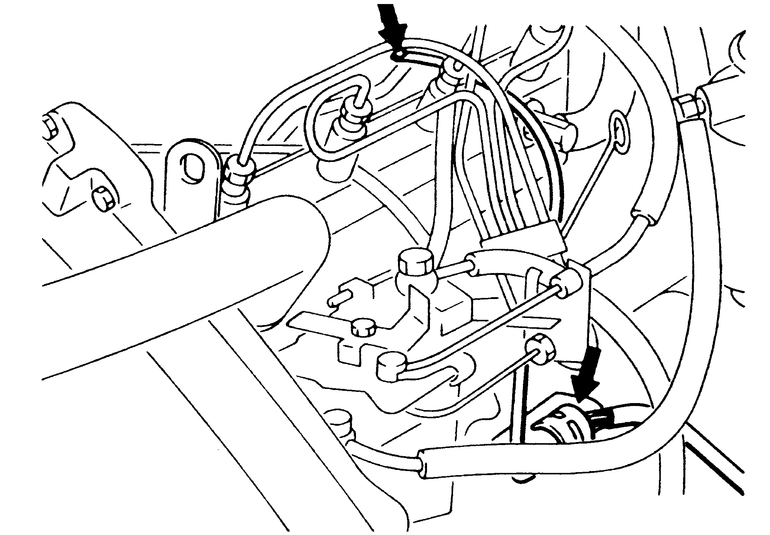
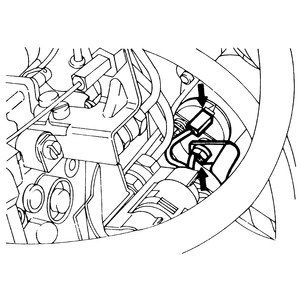
| Fig. 6: Removing the air cleaner duct
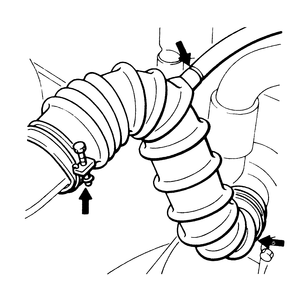
|
| Fig. 7: Heater hose, fuel hose and fuel filter location
and connections
|
| Fig. 8: Glow plug cable and gauge unit harness connectors
locations
|
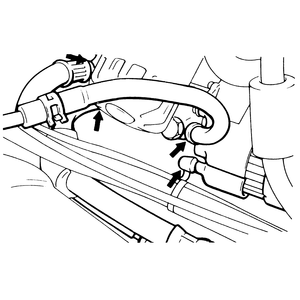
- Disconnect the hoses to the engine oil cooler.
- Disconnect the brake booster vacuum hose.
- Disconnect the alternator wiring harness from the alternator. Label the
wires carefully. Remove the alternator drive belt.
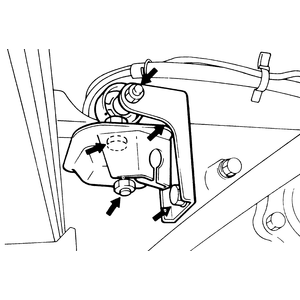
- Depending on equipment, remove the wiring to either the oil pressure switch
or the oil pressure gauge sending unit.
- Disconnect the radiator hoses from the engine and radiator.
- Remove the radiator assembly.
- Disconnect the exhaust pipe at the first joint under the truck. Support
the remainder of the system with wire. Remove the bolts holding the front
pipe to the turbocharger and remove the front pipe.
- Remove the undercovers. On 4-wheel drive vehicles, remove the protective
skid plates under the engine and transfer case.
- Disconnect the speedometer cable from the transmission.
- Disconnect the reverse light switch at the transmission. If 4-wheel drive,
disconnect the 4WD indicator switch harness also.
- Matchmark and remove the driveshafts:
- Make mating marks on the flange yoke and differential companion flange.
NOTE: For 4-wheel drive models, before proceeding with
the removal procedure, set the free-wheeling hubs to the unlocked position,
and also set the transfer case gear shift lever to the 2H position.
- Remove the bolts connecting the flange yoke to the differential companion
flange, and for rear-wheel drive models, remove the nuts attaching the
center bearing assembly.
- Remove the propeller (driveshaft) shaft by pulling it out.
NOTE: When the propeller shaft is pulled out of the
transmission extension housing or the transfer case, note that transmission
oil or transfer case oil may leak depending upon the vehicle position
and angle. When removing the propeller shaft, be careful not to damage
the oil seal lip and see that no foreign substance is present in the
lip area. Also use care to keep the oil seal clean and free of dust.
- Remove the gearshift lever assembly.
- Use a floor jack to support the transmission. Remove the rear insulator
(mount) from the transmission.
- Remove the crossmember.
- On 4-wheel drive models, the transfer case must be supported by a second
floor jack or adjustable stand. Remove the transfer case mounting bracket
and the insulator.
- Remove the plate from the side frame. Remove the mounting bracket from the
transfer case.
- Position and secure a chain or overhead engine hoist. Attach it to the lift
points and draw tension on the chain or cable to support the engine without
lifting it.
- Remove the engine mount nuts from the front engine mounts. Double check
completely around the motor (and below it) for any wire, cable, hose, or linkage
still running to the body. At this point, the engine should be completely
isolated from the vehicle.
- Elevate the hoist, raising the engine and transmission as a unit. Push downward
on the rear of the transmission; remove the engine/transmission diagonally.
- Once clear of the vehicle, the unit should be carefully lowered onto wooden
blocks. Once the transmission is removed, the engine should be mounted to
a secure stand, allowing it to be worked on.
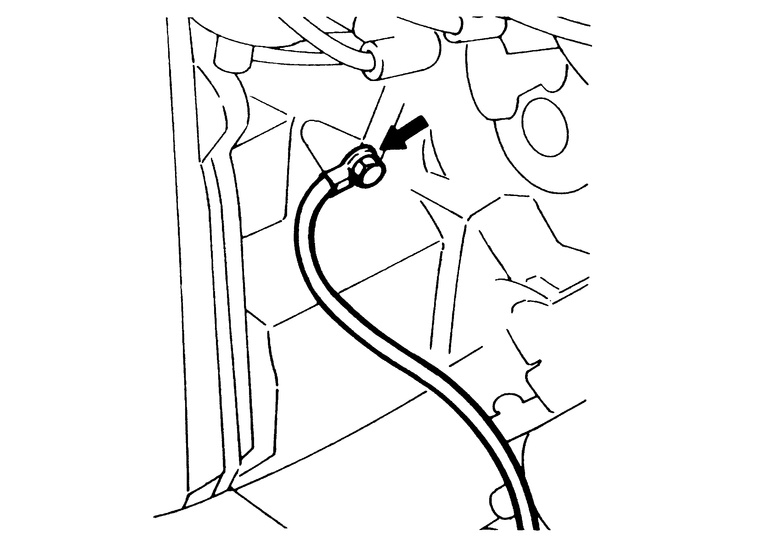
| Fig. 9: Disconnecting the engine ground cable from
the engine block
|
| Fig. 10: The starter motor wiring harness connections
and location
|
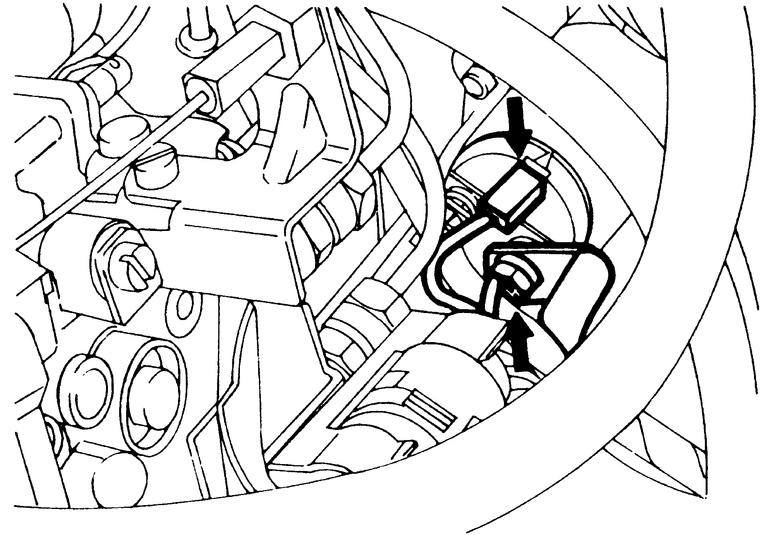
| Fig. 11: Disconnecting the engine oil cooler hoses,
the brake booster vacuum hose, and the alternator wiring harness
|
| Fig. 12: Disconnecting the oil pressure switch harness
|
| Fig. 13: Detaching the transfer case mounting bracket
|
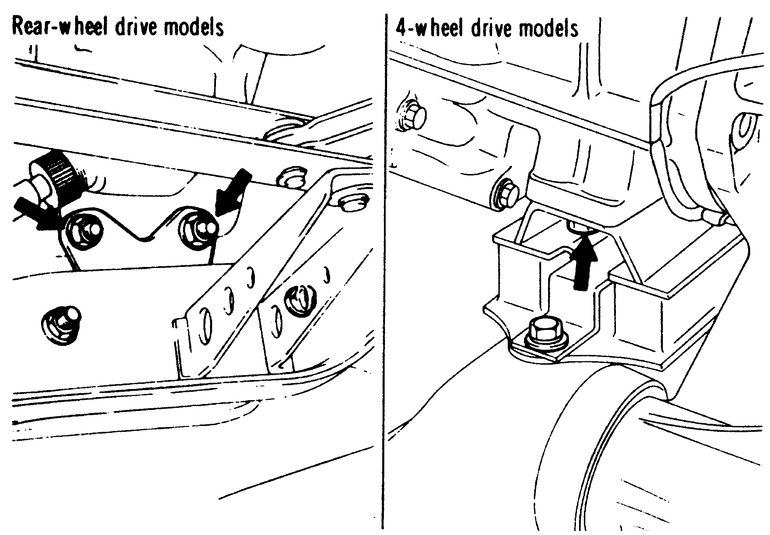
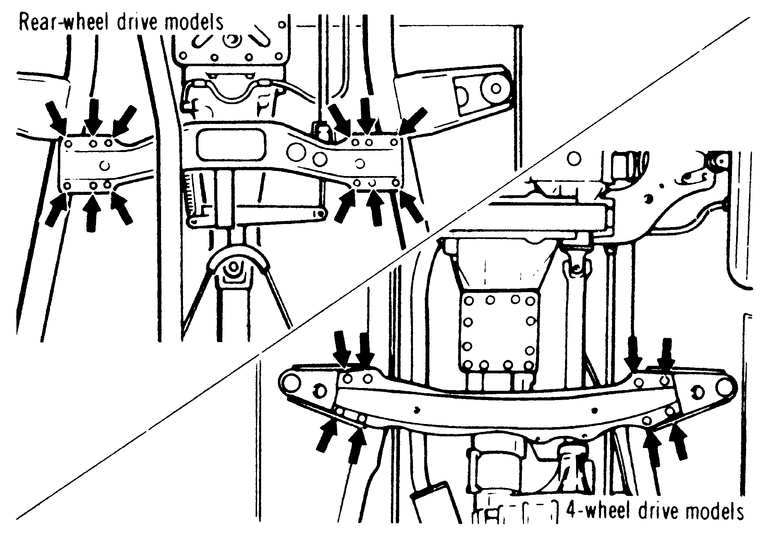
| Fig. 14: Rear insulation transmission mounts on both
2-wheel drive and 4-wheel drive models
|
| Fig. 15: Transmission crossmember mounts for both
2-wheel drive and 4-wheel drive vehicles
|
To install:
- Position the engine/transmission unit with the hoist and lower it into the
vehicle. The front mounts should engage and the transmission and/or transfer
case should rest on the jacks.
- Install the front mounts.
- On 4-wheel drive vehicles, install the mounting bracket to the transfer
case and tighten the bolts and nuts to 27 ft. lbs. (36 Nm).
- If 4-wheel drive, install the transfer case mounting bracket and insulator.
- Install the rear crossmember and the transmission mount (insulator). Tighten
the bolts holding the crossmember to the body to 36 ft. lbs. (48 Nm) The bolts
holding the transmission insulator to the crossmember should be tightened
to 13.5 ft. lbs. (18 Nm).
- When the transmission (and transfer case) is properly attached to the supports,
the jacks may be removed. The engine hoist chain may also be removed once
the engine and transmission is firmly mounted to the vehicle.
- Install the gearshift lever assembly.
- Install the driveshaft(s).
- Connect the wiring to the transmission. Make certain the connectors are
tight and the wiring is correctly routed out of the way of moving parts.
- Install the speedometer cable.
- Install the skid plates and/or undercovers.
- Use new gaskets and install the front exhaust pipe. It will be easier to
attach the pipe loosely to the system and then to the turbocharger. Tighten
the pipe–to–turbocharger nuts. Tighten the pipe–to–pipe
joint under the vehicle.
- Install the radiator assembly. Connect the hoses to the engine. Use new
clamps as necessary.
- Connect the wiring harnesses to the alternator, the oil pressure switch
and or the oil pressure gauge sender.
- Connect the brake booster vacuum hose.
- Connect the engine oil cooler lines.
- Install the clutch release cylinder. Adjust the clutch.
- Install the starter motor wiring harness; connect the engine ground harness
to the engine block.
- Install the power steering pump. Tighten the bolts to 14 ft. lbs. (18 Nm).
- Connect the fuel lines. Install the fuel filter and connect the water level
sensor connector.
- Connect the glow system harness and the gauge unit harness.
- Connect the throttle cable and adjust it.
- Connect the heater hoses. Install the air cleaner ductwork.
- Double check all installation items, paying particular attention to loose
hoses or hanging wires, untightened nuts, poor routing of hoses and wires
(too tight or rubbing) and tools left in the engine area.
- Fill the cooling system with the correct amount of coolant.
- Install the proper amount of engine oil. If not already done, replace the
oil filter.
- Bleed the fuel system.
- Connect the negative battery cable.
- Start the engine, following the correct starting procedures. The engine
may crank longer than usual; this is normal.
- Allow the engine to run at idle. While it is warming up, check carefully
for any leaks of oil, fuel, vacuum or coolant. Shut the engine off and attend
to any leaks immediately. Allow the engine to cool completely before working
on the cooling system.
- Reinstall the hood and align it with the marks made during removal. Close
the hood and check the alignment of the seams.
NOTE: When performing this procedure you will need a new fuel
line O-ring, a new exhaust manifold to front exhaust pipe gaskets, new oil,
transmission fluid, and antifreeze.
- If the vehicle is equipped with air conditioning, first have the A/C system
discharged by a trained and certified mechanic using a recovery/recycling
machine.
- Matchmark and remove the hood.
- Elevate and safely support the truck on jackstands. Remove the undercovers
and shields below the engine and transmission.
NOTE: The transmission assembly must be removed before
the engine can be removed. Please refer to Section 7 — Drive
Train for detailed instructions on the removal of these components.
- Depressurize the fuel system by adhering to the following steps:
- Disconnect and label the fuel pump harness wiring plug at the fuel tank
rear side.
- Start the engine and after it stops by itself, turn the ignition switch OFF.
- Disconnect the negative battery cable from the battery.
- Drain the cooling system.
NOTE: While removing or disconnecting any wires or hoses,
make sure to label them. This will make reassembly much easier.
- Drain the engine and transmission fluid.
- Disconnect the cooling system overflow, upper radiator, and lower radiator
hoses.
- Remove the upper and lower radiator shrouds.
- Disconnect the automatic transmission oil cooler hose from the radiator,
if the vehicle is so equipped.
- Remove the radiator from the engine compartment.
- Disconnect the exhaust pipe from the exhaust manifold.
- Remove the transmission assembly — refer to Section 7.
- Remove the air cleaner duct hose.
- Disengage the accelerator cable connection.
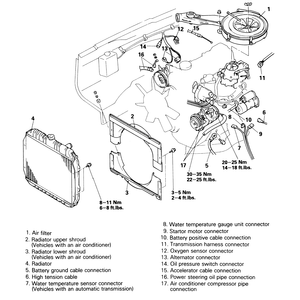
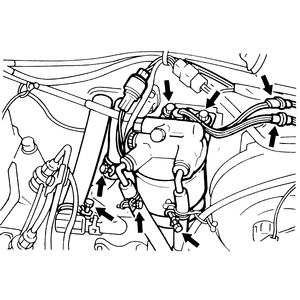
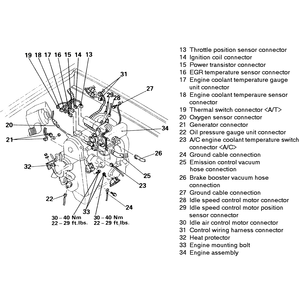
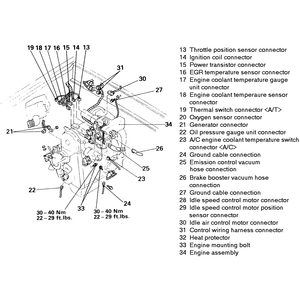
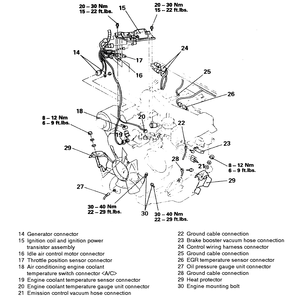
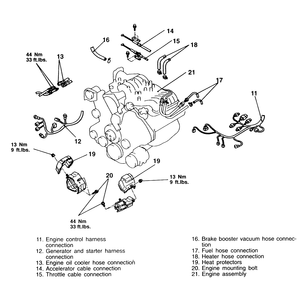
| Fig. 16: Component identification — 2.4L
Engines non-California models
|
| Fig. 17: Component identification — 2.4L
Engines California models
|
- Unfasten the throttle control cable connection, if the vehicle is equipped
with an automatic transmission.
- Disconnect and label the wiring connector to the compressor.
- Loosen the belt tension adjuster, the lockbolt and the pivot bolt. Remove
the belt, the lockbolt and the pivot bolt from the compressor. Support the
compressor and remove it from the bracket and hook it with wire or rope to
the body side. Move the compressor with the high-pressure hose and low-pressure
hose still connected.
- Loosen the power steering pump and remove the drive belt. Remove the power
steering oil pump from the bracket and fasten it to the body side with strong
wire or cord. Move the power steering oil pump with the pressure hose and
return hose still connected.
- Unfasten and label the cruise control vacuum hose connection, if so equipped.
- Disconnect and label the high pressure fuel hose and remove the O-ring.
Cover the fuel pipe line with rags after relieving the pressure, since fuel
pressure may still be present.
- Disconnect and label the fuel return hose connection.
- Remove the water hose connection.
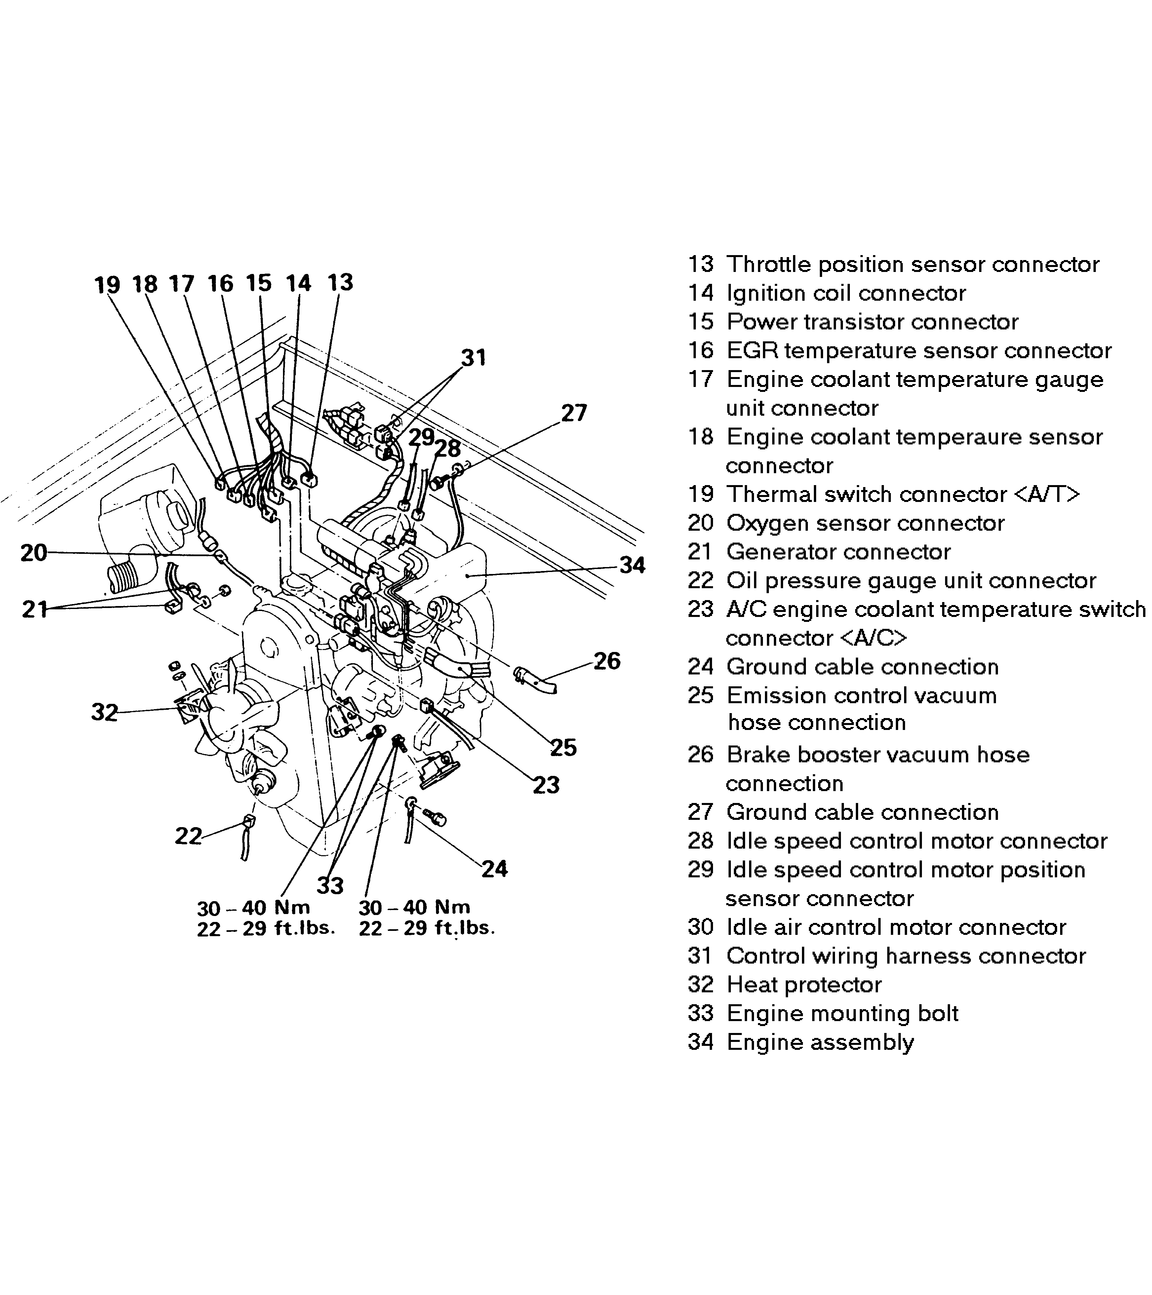
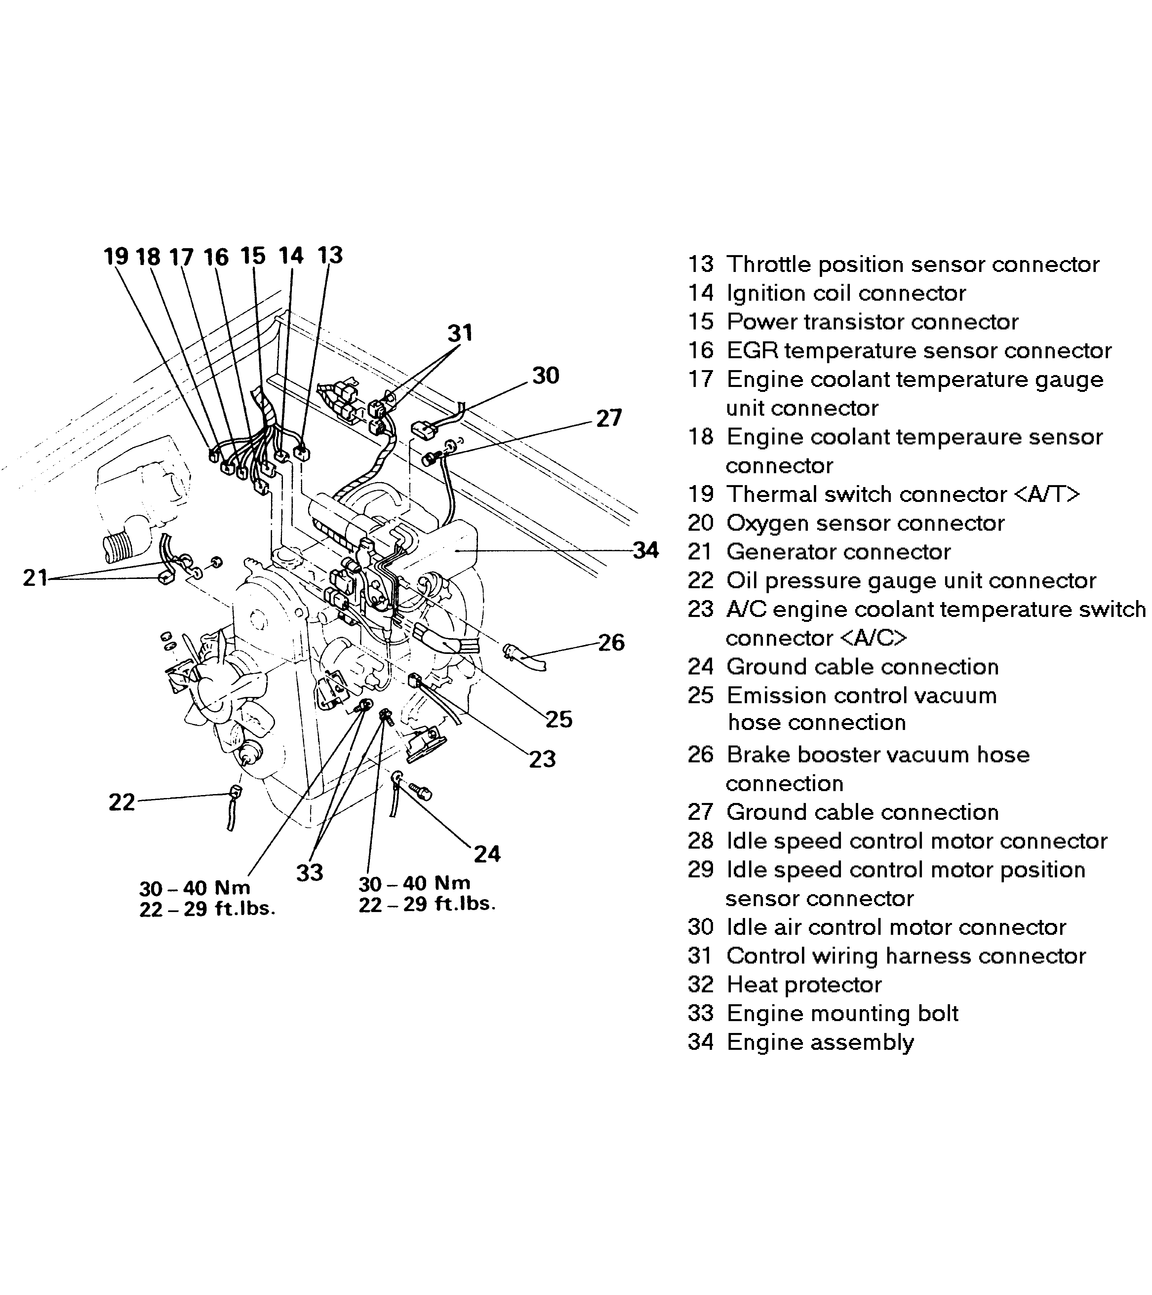
- Remove and label the throttle position sensor, ignition coil, power transistor,
EGR temperature sensor, engine coolant temperature gauge unit, engine coolant
temperature sensor, thermal switch (if equipped with an automatic transmission),
oxygen sensor, alternator, oil pressure gauge unit, and air conditioning engine
coolant temperature switch connectors.
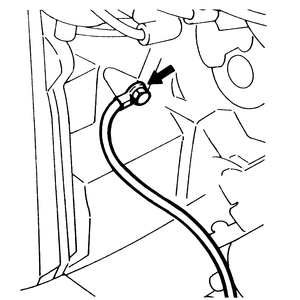
- Unscrew and label the ground cable connection from the lower left hand side
of the engine block.
- Disengage and label the emission control vacuum hose connection.
- Remove and label the brake booster vacuum hose connection.
- Disconnect and label the ground cable from the firewall above the back of
the engine.
- Disconnect and label the idle speed control motor and the idle speed control
motor position sensor wires.
- Remove and label the idle air control motor connector.
- Disconnect and label the control wiring harness.
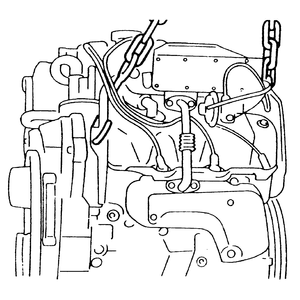
- Install the hoisting equipment and make sure it is securely fastened to
the engine. Draw tension on the hoist just enough to support the weight of
the motor without elevating it.
CAUTION
The truck is supported on stands. Tension the hoist slowly and do not disturb
the position of the truck on the supports.
- Remove the heat shield from the right motor mount.
- Double check for any remaining cables, hoses, wiring or lines still running
to the engine and remove them. Check that any item which was moved out of
the way is truly in a safe location.
- Double check the security of the lifting apparatus. Make certain the cables
or chains are tensioned properly. Remove the bolts holding the motor mounts
to the vehicle frame.
- Elevate the hoist slowly and raise the engine assembly out of the truck.
Take your time; clearances may be close and the unit is heavy. As soon as
the engine is clear, mount it on a stand or support it on wooden blocks. Do
not allow it to rest on the oil pan or lie on its side. Never leave an engine
hanging from a hoist.
To install:
- After repairs, make certain the engine is fully reassembled before installation.
All components removed when the engine was out of the truck should be in place
before reinstallation.
- Install the engine into the truck and lower it until the bolt holes for
the mounts align with the frame rails. Install the bolts and tighten them
to 22–29 ft. lbs. (30–40 Nm). Install the heat shield on the right
mount.
- Connect the control wiring harness, the idle air control motor wires, the
idle speed control motor position sensor wires, idle speed control motor wires,
and the ground cables at the lower left engine block and the firewall above
the back of the engine.
- Fasten the brake booster vacuum hose connection and the emission control
vacuum hose connection.
- Fasten the air conditioning engine coolant temperature switch connector,
the oil pressure gauge unit connector, the alternator connector, the oxygen
sensor connector, the thermal switch connector (if equipped with an automatic
transmission), the engine coolant temperature sensor connector, the engine
coolant temperature gauge unit connector, the EGR temperature sensor connector,
The power transistor connector, the ignition coil connector and the throttle
position sensor connector.
- Reconnect the water hose, the fuel return hose and the high pressure fuel
hose. Check the high pressure fuel hose O-ring for cracks or other damage,
replace if any is found. It may be best to replace this O-ring even if no
damage is found.
- Fasten the cruise control vacuum hose, if so equipped.
- Install the power steering pump and the power steering pump drive belt.
See Section 1 for adjusting procedures.
- Install the A/C compressor and drive belt. Refer to Section 1 for adjusting
procedures.
- Fasten the throttle control cable connection, if the vehicle is equipped
with an automatic transmission.
- Fasten the accelerator cable connection.
- Install the air cleaner duct hose.
- Install the radiator, tightening the mounting bolts to 6–8 ft. lbs.
(8–11 Nm). Install the fan shrouds.
- Reinstall the transmission adhering to the procedures given in Section 7.
- Connect the exhaust pipe to the exhaust manifold using a new exhaust gasket.
- Install the correct amounts and types of oil for the engine and transmission.
- Fill the cooling system with coolant.
- Double check all installation items, paying particular attention to loose
hoses or hanging wires, untightened nuts, poor routing of hoses and wires
(too tight or rubbing) and tools left in the engine area.
- Lower the vehicle to the ground. Connect the negative battery cable.
- After making certain that the transmission is in Neutral (manual) or P (automatic),
start the engine, allowing it to run at idle. Check carefully for any oil,
fuel, vacuum or coolant leaks.
- Shut the engine off. Top off fluids as necessary.
- Install the undercovers and splash shields.
- Install the hood, taking care to align the seams and latch correctly.
- Perform final adjustments to the belts, throttle cable, idle speed etc.
as necessary.
- Take the vehicle back to the air conditioning mechanic to have the system
evacuated and recharged as soon as possible.
NOTE: The transmission, transfer case and front driveshaft
must be removed before the engine can be removed. Please refer to Section 7
for detailed instructions on the removal of these components.
- If the vehicle is equipped with air conditioning, first have the A/C system
discharged by a trained and certified mechanic using a recovery/recycling
machine.
- Matchmark and remove the hood. Disconnect the negative battery cable.
| Fig. 18: Removal of 4-cylinder engine — Montero

|
- Elevate and safely support the truck on jackstands. Remove the undercovers
and shields below the engine and transmission.
- Drain the engine coolant.
CAUTION
When draining the coolant, keep in mind that cats and dogs are attracted
by ethylene glycol antifreeze, and are quite likely to drink any that is
left in an uncovered container or in puddles on the ground. This will prove
fatal in sufficient quantity. Always drain the coolant into a sealable container.
Coolant should be reused unless it is contaminated or several years old.
- Drain the engine oil and the transmission oil. Drain the transfer case and
the front axle lubricant.
CAUTION
Used motor oil may cause skin cancer if repeatedly left in contact with
the skin for prolonged periods. Although this is unlikely unless you handle
oil on a daily basis, it is wise to thoroughly wash your hands with soap
and water immediately after handling used motor oil.
- Remove the air cleaner assembly.
- Remove the transmission assembly, following procedures outlined in Section
7.
- Remove the upper and lower fan shrouds from the radiator.
- Disconnect the upper and lower hose from the radiator and remove the radiator.
- Disconnect the accelerator cable.
- Disconnect the heater hoses at the engine.
- Disconnect the brake booster vacuum hose.
- Disconnect the coolant by-pass hose, the small coolant hose and the upper
radiator hose from the engine.
- Disconnect the large multi-plug for the engine control harness.
- Disconnect the engine coolant temperature sensor wire; if the vehicle is
air conditioned, disconnect the coolant temperature switch wire.
- Disconnect the vacuum hose and the coolant temperature gauge sender.
- Disconnect the oxygen sensor (carefully) and the oil pressure sending unit
wire.
- Loosen the power steering pump and remove the belt.
- Remove the power steering pump with the hoses attached and undisturbed;
place or hang the pump out of the way. Do not disconnect the hoses.
- Loosen the air conditioning compressor and remove the belt.
- Remove the air conditioning compressor with the hoses attached and undisturbed;
place or hang the unit out of the way. Do not loosen or disconnect the hoses;
do not allow the hoses to become crimped or crushed when the unit is placed
aside.
WARNING
Do not allow the compressor to hang by the hoses.
- Disconnect the fuel hoses (on fuel injected models release the fuel pressure
first!). Label or identify them for correct reinstallation.
- Disconnect the 3 wiring connectors at the alternator.
- Remove the ground cable from the engine block.
- Disconnect the exhaust pipe from the bottom of the exhaust manifold. Use
wire or string to support the pipe to the side. Do not let the pipe hang of
its own weight.
- Carefully label and disconnect any breather, vacuum and canister lines running
to the firewall or body.
- Remove the clamp holding the fuel lines to the block.
- Install the hoisting equipment and make sure it is securely fastened to
the engine. Draw tension on the hoist just enough to support the weight of
the motor without elevating it.
CAUTION
The truck is supported on stands. Tension the hoist slowly and do not disturb
the position of the truck on the supports.
- Remove the heat shield from the right motor mount.
- Double check for any remaining cables, hoses, wiring or lines still running
to the engine and remove them. Check that any item which was moved out of
the way is truly in a safe location.
- Double check the security of the lifting apparatus. Make certain the cables
or chains are tensioned properly. Remove the bolts holding the motor mounts
to the vehicle frame.
- Elevate the hoist slowly and raise the engine and transmission assembly
out of the truck. The assembly may need to be lifted out on an angle. Take
your time; clearances may be close and the unit is heavy. As soon as the engine
is clear, mount it on a stand or support it on wooden blocks. Do not allow
it to rest on the oil pan or lie on its side. Never leave an engine hanging
from a hoist.
To install:
- After repairs, make certain the engine is fully reassembled before installation.
All components removed when the engine was out of the truck should be in place
before reinstallation.
- Install the engine into the truck and lower it until the bolt holes for
the mounts align with the frame rails. Install the bolts and tighten them
to 26 ft. lbs. (35 Nm). Install the heat shield on the right mount.
- Clamp the fuel lines into place.
- Connect the various vacuum lines and breather hoses running to the body
and firewall.
- Use a new gasket and new bolts to connect the exhaust pipe to the manifold.
- Connect the ground cable to the engine.
- Connect the wiring to the alternator.
- Connect the fuel hoses.
- Install the air conditioning compressor and install the belt. Tension the
belt by hand and tighten the compressor mounting bolts snug.
- Install the power steering pump and install the belt. Tension the belt by
hand and tighten the mounting bolts snug. Both belts will be final tightened
later.
- Connect the wiring to the oil pressure sender and the oxygen sensor.
- Connect the vacuum hose and the wiring to the coolant temperature gauge
sender.
- Connect the wiring to the coolant temperature sender and the coolant temperature
switch if equipped with air conditioning.
- Carefully connect the multi-pin connector for the engine control harness.
Make certain each pin is firmly seated.
- Connect the upper radiator hose to the engine. Install the coolant by-pass
hose and the small coolant hose.
- Connect the brake booster vacuum hose.
- Connect the two heater hoses.
- Install the accelerator cable and adjust it correctly.
- Install the radiator, tightening the mounting bolts to 5 ft. lbs. (7 Nm).
Install the fan shrouds.
- Reinstall the transmission, transfer case and drive shafts following procedures
given in Section 7.
- Install the air cleaner assembly.
- Install the correct amounts and types of oil for the engine, transmission,
transfer case and axle assemblies.
- Fill the cooling system with coolant.
- Double check all installation items, paying particular attention to loose
hoses or hanging wires, untightened nuts, poor routing of hoses and wires
(too tight or rubbing) and tools left in the engine area.
- Lower the vehicle to the ground. Connect the negative battery cable.
- After making certain that the transmission is in Neutral (manual) or P (automatic),
start the engine, allowing it to run at idle. Check carefully for any leaks
of oil, fuel, vacuum or coolant.
- Shut the engine off. Top up fluids as necessary.
- Install the undercovers and splash shields.
- Install the hood, taking care to align the seams and latch correctly.
- Recharge the air conditioning system if so equipped.
- Perform final adjustments to the belts, throttle cable, idle speed etc.
as necessary.
NOTE: When performing this procedure you will need a new fuel
line O-ring, two (2) new exhaust manifold to front exhaust pipe gaskets, new
oil, transmission fluid, and antifreeze.
- Matchmark and remove the hood.
- Elevate and safely support the truck on jackstands. Remove the undercovers
and shields below the engine and transmission.
NOTE: While removing or disconnecting any wires or hoses,
make sure to label them. This will make reassembly much easier.
- Depressurize the fuel system by adhering to the following steps:
- Disconnect and label the fuel pump harness wiring plug at the fuel tank
rear side.
- Start the engine and after it stops on its own, turn the ignition switch OFF.
- Disconnect the negative battery cable from the engine block.
- Drain the cooling system.
- Drain the engine and transmission fluid.
- Disconnect the cooling system overflow, upper radiator, and lower radiator
hoses.
- Remove the one piece radiator shroud.
- Remove the radiator from the engine compartment.
- Disconnect the front exhaust pipe from the exhaust manifolds.
- Remove the transmission assembly — refer to Section 7.
- Remove the air cleaner duct hose.
- Disengage the accelerator cable connection.
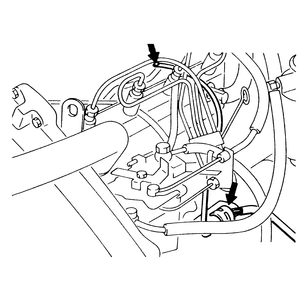
| Fig. 19: Component identification — 3.0L
(12 valve) Engines
|
| Fig. 20: When hoisting the engine, use the supplied
engine chain blocks
|
- Disconnect and label the wiring connector to the compressor.
- Loosen the belt tension adjuster, the lockbolt and the pivot bolt. Remove
the belt, the lockbolt and the pivot bolt from the compressor. Support the
compressor and remove it from the bracket and hook it with wire or rope to
the body side. Move the compressor with the high-pressure hose and low-pressure
hose still connected. DO NOT let the compressor hang by the high-pressure
hoses.
- Loosen the power steering pump and remove the drive belt. Remove the power
steering oil pump from the bracket and fasten it to the body side with strong
wire or cord. Move the power steering oil pump with the pressure hose and
return hose still connected. DO NOT let the pump hang by the pressure hoses.
- Unfasten and label the cruise control vacuum hose connection, if so equipped.
- Disconnect and label the high pressure fuel hose and remove the O-ring.
Cover the fuel pipe line with rags after relieving the pressure, since fuel
pressure may still be present.
- Disconnect and label the fuel return and vacuum hoses.
- Remove both water hose connections located at the top rear of the engine.
- Remove and label the throttle position sensor, ignition coil and ignition
power transistor assembly, EGR temperature sensor, engine coolant temperature
gauge unit, engine coolant temperature sensor, alternator, oil pressure gauge
unit, and air conditioning engine coolant temperature switch connectors.
- Unscrew and label the ground cable connections from the left hand side of
the intake plenum and the lower left hand side of the engine block.
- Disengage and label the emission control vacuum hose connection.
- Remove and label the brake booster vacuum hose connection.
- Disconnect and label the ground cable from the firewall above the back of
the engine.
- Remove and label the idle air control motor connector.
- Disconnect and label the control wiring harness.
- Install the hoisting equipment and make sure it is securely fastened to
the engine. Draw tension on the hoist just enough to support the weight of
the motor without elevating it.
CAUTION
The truck is supported on stands. Tension the hoist slowly and do not disturb
the position of the truck on the supports.
- Remove the heat protector from both motor mounts.
- Double check for any remaining cables, hoses, wiring or lines still running
to the engine and remove them. Check that any item which was moved out of
the way is truly in a safe location.
- Double check the security of the lifting apparatus. Make certain the cables
or chains are tensioned properly. Remove the bolts holding the motor mounts
to the vehicle frame.
- Elevate the hoist slowly and raise the engine assembly out of the truck.
Take your time; clearances may be close and the unit is heavy. As soon as
the engine is clear, mount it on a stand or support it on wooden blocks. Do
not allow it to rest on the oil pan or lie on its side. Never leave an engine
hanging from a hoist.
To install:
- After repairs, make certain the engine is fully reassembled before installation.
All components removed when the engine was out of the truck should be in place
before reinstallation.
- Install the engine into the truck and lower it until the bolt holes for
the mounts align with the frame rails. Install the bolts and tighten them
to 22–29 ft. lbs. (30–40 Nm). Install the heat shields on the
motor mounts.
- Connect the control wiring harness, the idle air control motor wires and
the three engine ground cables.
- Fasten the brake booster vacuum hose connection and the emission control
vacuum hose connection.
- Fasten the air conditioning engine coolant temperature switch connector,
the oil pressure gauge unit connector, the alternator connector, the engine
coolant temperature sensor connector, the engine coolant temperature gauge
unit connector, the EGR temperature sensor connector, the ignition coil and
ignition power transistor assembly, and the throttle position sensor connector.
- Reconnect both water hoses at the rear of the intake plenum, the fuel return
hose and the high pressure fuel hose. Check the high pressure fuel hose O-ring
for cracks or other damage, replace if any is found. It may be best to replace
this O-ring even if no damage is found.
- Reconnect the vacuum hose to the fuel return hose fixture.
- Fasten the cruise control vacuum hose, if so equipped.
- Install the power steering pump and the power steering pump drive belt.
See Section 1 for adjusting procedures.
- Install the A/C compressor and drive belt. Refer to Section 1 for adjusting
procedures.
- Fasten the throttle control cable connection, if the vehicle is equipped
with an automatic transmission.
- Fasten the accelerator cable connection.
- Install the air cleaner duct hose.
- Install the radiator, tightening the mounting bolts to 6–8 ft. lbs.
(8–11 Nm). Install the fan shroud.
- Reinstall the transmission adhering to the procedures given in Section 7.
- Connect the front exhaust pipe to the exhaust manifolds using a new gasket.
- Install the correct amounts and types of oil for the engine and transmission.
- Fill the cooling system with coolant.
- Double check all installation items, paying particular attention to loose
hoses or hanging wires, untightened nuts, poor routing of hoses and wires
(too tight or rubbing) and tools left in the engine area.
- Lower the vehicle to the ground. Reconnect the negative battery cable.
- After making certain that the transmission is in Neutral (manual) or P (automatic),
start the engine, allowing it to run at idle. Check carefully for any oil,
fuel, vacuum or coolant leaks.
- Shut the engine off. Top off all fluids as necessary.
- Install the undercovers and splash shields.
- Install the hood, taking care to align the seams and latch correctly.
- Perform final adjustments to the belts, throttle cable, idle speed etc.
as necessary.
NOTE: When performing this procedure you will need a new fuel
line O-ring, two (2) new exhaust manifold to front exhaust pipe gaskets, fresh
oil, transmission fluid, and antifreeze.
- Matchmark and remove the hood.
- Remove the battery and battery tray.
- Remove the cruise control intermediate link, which is mounted to the firewall
of the engine compartment.
- Remove the retaining bolt on the link protector and withdrawal the protector
from the assembly.
- Disconnect the accelerator cable, the throttle cable, and the cruise
control cable from the intermediate link. When loosening the adjusting
bolts and nuts on the throttle lever, do not remove the
adjusting bolts or nuts (just loosen).
- Remove the four retaining nuts holding the intermediate link to the
link bracket. Withdrawal the intermediate link from the bracket.
- Remove the link bracket. Make sure to keep all screws and bolts in labeled
bags or a similar container to keep from mixing them up.
- Elevate and safely support the truck on jackstands. Remove the undercovers
and shields below the engine and transmission.
- Disconnect the negative battery cable from the engine block and set aside.
- Drain the cooling system, refer to Section 1.
- Drain the engine and transmission fluid, refer to Section 1.
- Disconnect the cooling system overflow, upper radiator, and lower radiator
hoses.
- Remove the one piece radiator shroud.
- Remove the radiator from the engine compartment.
- Disconnect the front exhaust pipes from the exhaust manifolds. Tie them
up with strong cord or wire, do not let them hang of their own weight.
- Remove the transmission and transfer assembly — refer to
Section 7.
- Remove the air cleaner duct hose.
| Fig. 21: Component connection identification — 3.0L
(24 valve) engines
|
| Fig. 22: Use two wrenches to disconnect the oil cooler
hose
|
- Loosen the power steering pump and remove the drive belt. Remove the power
steering oil pump from the bracket and fasten it to the body side with strong
wire or cord. Move the power steering oil pump with the pressure hose and
return hose still connected. DO NOT let the pump hang by the pressure hoses.
- Loosen the alternator bolts and remove the drive belt.
- Disconnect and label the wiring connector to the compressor.
- Loosen the belt tension adjuster, the lockbolt and the pivot bolt. Remove
the belt, the lockbolt and the pivot bolt from the compressor. Support the
compressor and remove it from the bracket and hook it with wire or rope to
the body side. Move the compressor with the high-pressure hose and low-pressure
hose still connected. DO NOT let the compressor hang by the high-pressure
hoses.
- Remove the cooling fan and water pump pulley from the front of the engine.
- Disconnect and label the engine control wiring harness.
- Disconnect and label the alternator and starter wiring harness.
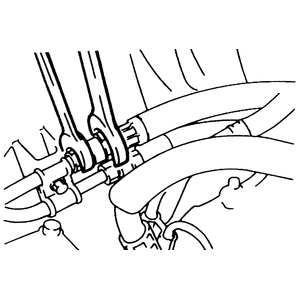
- Unfasten the engine oil cooler hose connection. To loosen these connectors,
use two wrenches, usually open end or flare nut, at the same time.
- Remove the brake booster vacuum hose connection.
- Remove the two heater hose connections, located at the back of the intake
manifold.
- Disconnect the fuel hose from the intake plenum. The O-ring inside of this
connection must be removed and replaced with a new one.
- Disconnect the fuel return hose.
- Unfasten the oil pressure switch harness connection.
- Install the hoisting equipment and make sure it is securely fastened to
the engine. Draw tension on the hoist just enough to support the weight of
the motor without elevating it.
CAUTION
The truck is supported on stands. Tension the hoist slowly and do not disturb
the position of the truck on the supports.
- Remove the heat protector from both motor mounts.
- Double check for any remaining cables, hoses, wiring or lines still running
to the engine and remove them. Check that any item which was moved out of
the way is truly in a safe location.
- Double check the security of the lifting apparatus. Make certain the cables
or chains are tensioned properly. Remove the bolts holding the motor mounts
to the vehicle frame.
- Elevate the hoist slowly and raise the engine assembly out of the truck.
Take your time; clearances may be close and the unit is heavy. As soon as
the engine is clear, mount it on a stand or support it on wooden blocks. Do
not allow it to rest on the oil pan or lie on its side. Never leave an engine
hanging from a hoist.
To install:
- After repairs, make certain the engine is fully reassembled before installation.
All components removed when the engine was out of the truck should be in place
before reinstallation.
- Install the engine into the truck and lower it until the bolt holes for
the mounts align with the frame rails. Install the bolts and tighten them
to 33 ft. lbs. (44 Nm). Install the heat shields on the motor mounts.
- Reconnect the oil pressure switch harness.
- Fasten the fuel return hose, the fuel hose, and the two heater hoses. Make
sure to replace the O-ring in the fuel hose connection with a new one.
- Fasten the brake booster vacuum hose connection.
- Reconnect the oil cooler hose.
- Reconnect the alternator and starter wiring harness, the engine control
harness and the lower, left-hand side engine block ground cable.
- Install the cooling fan and water pump pulley. Tighten the cooling fan mounting
bolts to 7–9 ft. lbs. (10–12 Nm).
- Install the power steering pump and power steering pump cover.
- Install the A/C compressor and drive belt. Refer to Section 1 for adjusting
procedures.
- Install the alternator drive belt. Refer to Section 1 for adjusting procedures.
- Install the power steering pump drive belt. See Section 1 for adjusting
procedures.
- Install the air cleaner duct hose.
- Install the radiator, tightening the mounting bolts to 6–8 ft. lbs.
(8–11 Nm). Install the fan shroud.
- Reattach the upper and lower radiator hoses, and the overflow hose.
- Reinstall the transmission and transfer assembly adhering to the procedures
given in Section 7.
- Reattach the front exhaust pipe, or three-way catalytic converter on California
models, to the exhaust manifolds. New gaskets are a necessity for this procedure.
- Install the cruise control intermediate link assembly.
- Reattach the link bracket with the center bolt.
- Install the intermediate link to the link bracket using the four nuts.
- Connect the accelerator cable, the throttle cable, and the cruise control
cable to the intermediate link.
- Adjust the accelerator cable, the throttle cable, and the cruise control
cable — refer to Section 5 for this procedure.
- Install the intermediate link unit's cover.
- Install the battery and battery tray.
- Reconnect the negative battery cable to the engine block.
- Install the correct amounts and types of oil for the engine and transmission.
- Fill the cooling system with coolant.
- Double check all installation items, paying particular attention to loose
hoses or hanging wires, untightened nuts, poor routing of hoses and wires
(too tight or rubbing) and tools left in the engine area.
- Lower the vehicle to the ground.
- Reconnect the positive and negative battery cables to the battery.
- After making certain that the transmission is in Neutral or Park, start
the engine, allowing it to run at idle. Check carefully for any oil, fuel,
vacuum or coolant leaks.
- Shut the engine off. Top off all fluids as necessary.
- Install the undercovers and splash shields.
- Install the hood, taking care to align the seams and latch correctly.
- Perform final adjustments to the belts, throttle cable, idle speed etc.
as necessary.
NOTE: When performing this procedure you will need two (2)
new exhaust manifold to front exhaust pipe gaskets, fresh oil, transmission
fluid, and antifreeze.
- Matchmark and remove the hood.
- Remove the battery and battery tray.
NOTE: While removing or disconnecting any wires or hoses,
make sure to label them. This will make reassembly much easier.
- Remove the cruise control intermediate link, which is mounted to the firewall
of the engine compartment.
- Remove the retaining bolt on the link protector and withdrawal the protector
from the assembly.
- Disconnect the accelerator cable, the throttle cable, and the cruise
control cable from the intermediate link. When loosening the adjusting
bolts and nuts on the throttle lever, do not remove the
adjusting bolts or nuts (just loosen).
- Remove the four retaining nuts holding the intermediate link to the
link bracket. Withdrawal the intermediate link from the bracket.
- Remove the link bracket. Make sure to keep all screws and bolts in labeled
bags or a similar container to keep from mixing them up.
- Elevate and safely support the truck on jackstands. Remove the undercovers
and shields below the engine and transmission.
- Disconnect the negative battery cable from the engine block and set aside.
- Drain the cooling system, refer to Section 1.
- Drain the engine and transmission fluid, refer to Section 1.
- Disconnect the cooling system overflow, upper radiator, and lower radiator
hoses.
- Remove the one piece radiator shroud.
- Remove the radiator from the engine compartment.
- Disconnect the front exhaust pipes, or warm up three-way catalytic converter
if California model, from the exhaust manifolds. Tie them up with strong cord
or wire, do not let them hang of their own weight.
- Remove the transmission and transfer assembly — refer to
Section 7.
- Remove the air cleaner duct hose.
- Remove the intake manifold plenum cover.
| Fig. 23: Component connection identification — 3.5L
engines
|
- Loosen the power steering pump and remove the drive belt. Remove the power
steering oil pump from the bracket and fasten it to the body side with strong
wire or cord. Move the power steering oil pump with the pressure hose and
return hose still connected. DO NOT let the pump hang by the pressure hoses.
- Loosen the alternator bolts and remove the alternator drive belt.
- Disconnect and label the wiring connector to the compressor.
- Loosen the belt tension adjuster, the lockbolt and the pivot bolt. Remove
the belt, the lockbolt and the pivot bolt from the compressor. Support the
compressor and remove it from the bracket and hook it with wire or rope to
the body side. Move the compressor with the high-pressure hose and low-pressure
hose still connected. DO NOT let the compressor hang by the high-pressure
hoses.
- Remove the cooling fan and water pump pulley from the front of the engine.
- Disconnect and label the engine control wiring harness.
- Disconnect and label the alternator and starter wiring harness.
- Unfasten the engine oil cooler hose connection. To loosen these connectors,
use two wrenches, usually open end or flare nut, at the same time.
- Remove the brake booster vacuum hose connection.
- Remove the two heater hose connections, located at the back of the intake
manifold.
- Disconnect the fuel hose and fuel return hose from the left-hand side of
the intake plenum.
- Install the hoisting equipment and make sure it is securely fastened to
the engine. Draw tension on the hoist just enough to support the weight of
the motor without elevating it.
CAUTION
The truck is supported on stands. Tension the hoist slowly and do not disturb
the position of the truck on the supports.
- Remove the heat protector from both motor mounts.
- Double check for any remaining cables, hoses, wiring or lines still running
to the engine, label and remove them. Check that any item which was moved
out of the way is truly in a safe location.
- Double check the security of the lifting apparatus. Make certain the cables
or chains are tensioned properly. Remove the bolts holding the motor mounts
to the vehicle frame.
- Elevate the hoist slowly and raise the engine assembly out of the truck.
Take your time; clearances may be close and the unit is heavy. As soon as
the engine is clear, mount it on a stand or support it on wooden blocks. Do
not allow it to rest on the oil pan or lie on its side. Never leave an engine
hanging from a hoist.
To install:
- After repairs, make certain the engine is fully reassembled before installation.
All components removed when the engine was out of the truck should be in place
before reinstallation.
- Install the engine into the truck and lower it until the bolt holes for
the mounts align with the frame rails. Install the bolts and tighten them
to 33 ft. lbs. (44 Nm). Install the heat shields on the motor mounts.
- Fasten the fuel return hose, the fuel hose, and the two heater hoses.
- Fasten the brake booster vacuum hose connection.
- Reconnect the oil cooler hose.
- Reconnect the alternator and starter wiring harness, the engine control
harness and the lower, left-hand side engine block ground cable.
- Install the cooling fan and water pump pulley. Tighten the cooling fan mounting
bolts to 7–9 ft. lbs. (10–12 Nm).
- Install the power steering pump and power steering pump cover.
- Install the A/C compressor and drive belt. Refer to Section 1 for adjusting
procedures.
- Install the alternator drive belt. Refer to Section 1 for adjusting procedures.
- Install the power steering pump drive belt. See Section 1 for adjusting
procedures.
- Install the air cleaner duct hose.
- Install the radiator, tightening the mounting bolts to 6–8 ft. lbs.
(8–11 Nm). Install the fan shroud.
- Reattach the upper and lower radiator hoses, and the overflow hose.
- Reinstall the transmission and transfer assembly adhering to the procedures
given in Section 7.
- Reattach the front exhaust pipe, or three-way catalytic converter on California
models, to the exhaust manifolds. New gaskets are a necessity for this procedure.
- Install the cruise control intermediate link assembly.
- Reattach the link bracket with the center bolt.
- Install the intermediate link to the link bracket using the four nuts.
- Connect the accelerator cable, the throttle cable, and the cruise control
cable to the intermediate link.
- Adjust the accelerator cable, the throttle cable, and the cruise control
cable — refer to Section 5 for this procedure.
- Install the intermediate link unit's cover.
- Install the battery and battery tray.
- Reconnect the negative battery cable to the engine block.
- Install the correct amounts and types of oil for the engine and transmission.
- Fill the cooling system with coolant.
- Reconnect the positive and negative battery cables to the battery.
- Double check all installation items, paying particular attention to loose
hoses or hanging wires, untightened nuts, poor routing of hoses and wires
(too tight or rubbing) and tools left in the engine area.
- Lower the vehicle to the ground.
- After making certain that the transmission is in Neutral or Park, start
the engine, allowing it to run at idle. Check carefully for any oil, fuel,
vacuum or coolant leaks.
- Shut the engine off. Top off all fluids as necessary.
- Install the undercovers and splash shields.
- Install the hood, taking care to align the seams and latch correctly.
- Perform final adjustments to the belts, throttle cable, idle speed etc.
as necessary.