NOTE: A vacuum pump capable of producing more than 10 in. Hg
(33.8 kPa) of vacuum will be needed to perform this test.
When disconnecting the vacuum hose, put a mark on the hose so that it may be
reconnected to the original position. The engine coolant temperature should
be 185–205°F (85–95°C).
- Connect a timing light to the engine.
- Remove the air filter.
- Disconnect the vacuum hoses (black, red stripe, black) from the carburetor
primary emulsion well bleed nipple, secondary emulsion well bleed nipple and
the jet air nipple; plug the nipples.
- Connect a hand vacuum pump to the vacuum hoses, one hose at a time, and
check air tightness (the vacuum should NOT leak) while running the engine
at idle.
- Connect the vacuum hoses back to their original positions.
- Run the engine at idle and check ignition timing. The timing should be 6–10°BTDC
for the 2.0L engines and 5–9°BTDC for the 2.6L engines.
- While the engine is idling, disconnect the vacuum hose (yellow stripe) from
the HAC and put a finger at the hose end to check that vacuum is felt.
- Connect everything back to its original position and remove the timing light.
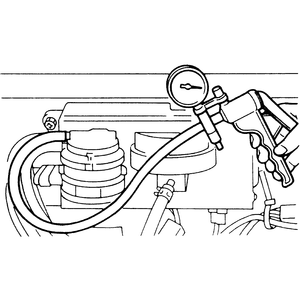
| Fig. 1: Check the HAC one hose at a time when below
3,900 ft. (1,200m)
|
| Fig. 2: When at an altitude of 3,900 ft. (1,200m)
or higher, use of two hand vacuum pumps is needed
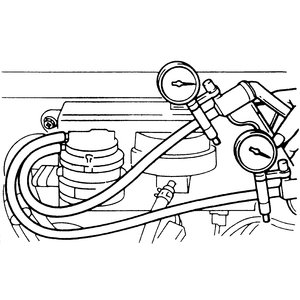
|
When disconnecting the vacuum hose, put a mark on the hose so that it may be
reconnected to the original position. The engine coolant temperature should
be 185–205°F (85–95°C).
- Connect a timing light to the engine.
- Remove the air filter.
- Disconnect the vacuum hoses (black, red stripe, black) from the carburetor
primary emulsion well bleed nipple, secondary emulsion well bleed nipple and
the jet air nipple; plug the nipples.
- Connect a hand vacuum pump to the vacuum hoses, one hose at a time, and
check the air tightness (the vacuum SHOULD leak) while running the engine
at idle.
- Connect the vacuum hoses back to their original positions.
- Run the engine at idle and check ignition timing. The timing should be 13°BTDC
for the 2.0L engines and 12°BTDC for the 2.6L engines.
- Connect everything back to its original position and remove the timing light.
NOTE: A vacuum pump capable of producing more than 10 in. Hg
(33.8 kPa) of vacuum will be needed to perform this test.
- Disconnect the vacuum hose (yellow stripe) from the HAC and connect a hand
vacuum pump to the HAC nipple.
- Apply vacuum and check that it leaks and does not hold steady.
- Disconnect the hand pump and plug the vacuum hose back onto its nipple.
- Disconnect the vacuum hose (red stripe) from the HAC and connect a hand
vacuum pump to the HAC nipple.
- Check to see that the vacuum holds steady.
- Disconnect the vacuum hose (yellow stripe) from the HAC and connect a hand
vacuum pump to the HAC nipple.
- Apply vacuum and check that it holds steady.
- Disconnect the vacuum hose (red stripe) from the HAC and connect a second
hand vacuum pump to the HAC nipple.
- Check to see that the vacuum leaks or does not hold steady.
- Reconnect the vacuum lines to the HAC.
NOTE: A vacuum pump capable of producing more than 10 in. Hg
(33.8 kPa) of vacuum will be needed to perform this test.
When disconnecting the vacuum hose, put a mark on the hose so that it may be
reconnected to its original position.
- Remove the vacuum switching valve.
- Connect a hand vacuum pump to the black vacuum nipple of the VSV.
- Apply a vacuum of 15.7 in. Hg (53 kPa) and check air tightness.
- Blow air lightly in from the carburetor air bleed side nipple. With the
applied vacuum at 8 in. Hg (27 kPa) or less, the air should NOT blow through
the valve. With the applied vacuum at 9.75 in. Hg (34 kPa) or more, the air
should blow through.
NOTE: A vacuum pump capable of producing more than 10 in. Hg
(33.8 kPa) of vacuum will be needed to perform this test.
When disconnecting the vacuum hose, put a mark on the hose so that it may be
reconnected to its original position.
- Remove the check valve.
- Connect a hand vacuum pump to the check valve and check the air tightness.
When the pump is attached to the dark blue nipple, the vacuum should leak.
With the pump attached to the white nipple, the vacuum should hold steady
and not leak.
- If the component fails either of these tests, it needs to be replaced.
NOTE: A vacuum pump capable of producing more than 10 in. Hg
(33.8 kPa) of vacuum will be needed to perform this test.
- Disconnect the vacuum hoses from the air nipple, the primary well bleed
nipple, and the secondary well bleed nipple and connect a hand vacuum pump
to the nipple.
- Apply vacuum to each nipple one after the other, to see that the vacuum
leaks and does not build up inside the carburetor. Plug the vacuum hoses which
are not being currently tested.
- If vacuum builds up, have the carburetor disassembled and checked.

