Previous Next

Vacuum System Components

TESTING

Pick-up
GENERAL OPERATION
  1. Check the vacuum circuit for leaks or clogging.
  2. Unplug the vacuum pump wiring harness connector.
  3. Disconnect the check valve vacuum hose at the actuator and vacuum pump side, and connect a vacuum gauge in its place.
  4. Connect a 12 volt battery's positive (+) terminal to the connector L terminal (power side) and the battery's negative (-) terminal to connector B terminal (GND side) and operate the motor to check the generated negative pressure (vacuum).

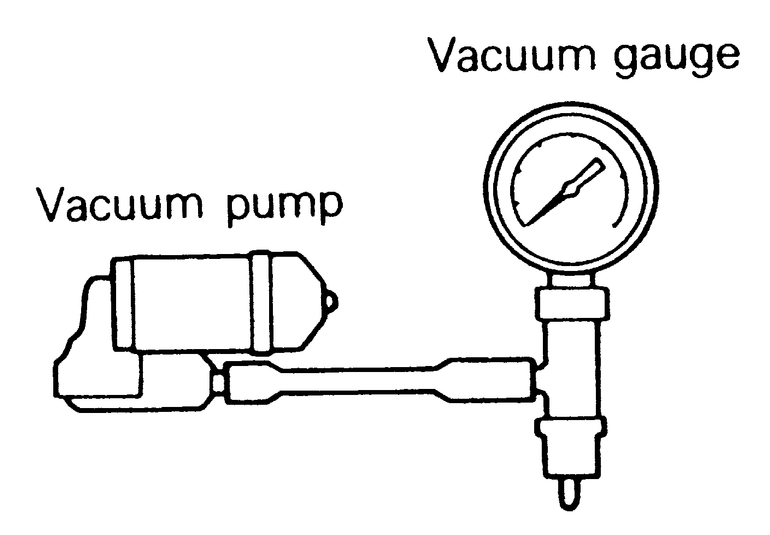
    Fig. 1: Attach a vacuum gauge to the pump to check the vacuum created — 1988–95 Pick-up

  5. The standard value of the negative pressure produced is 5.9 in. Hg/min. (9.3 kPa/min.) or more.
  6. After the release of the negative pressure, connect the battery again to generate negative pressure. Check that the disconnection of the battery to stop the motor does not cause a sudden loss of vacuum.
  7. If the pump does not meet the previously stated standards, it will need to be replaced by a new unit.
VACUUM SWITCH
  1. Unplug the wiring connector from the vacuum switch.
  2. Use a hand vacuum pump, connected to the negative pressure port of the switch, to apply a vacuum.
  3. Check for continuity between the switch terminals.
  4. Check that there is no sudden drop of vacuum.
  5. If the switch fails either of these tests, replace it with a new one.
VACUUM PUMP RELAY
  1. Unplug the wiring harness connector from the vacuum pump relay.
  2. Hook the battery (12 volt) positive terminal to terminal 1 (green wire) of the relay and the negative terminal to terminal 2 (blue and red wire). This will energize the relay coil.
  3. Check for continuity between terminals 3 and 4 when the coil is energized. There should be continuity present ( approximately. 0 ohms).

    Fig. 2: Connect a 12 volt battery's positive terminal to terminal 1 (green) and its negative terminal to terminal 2 (blue with red) to energize the relay coil — 1988–95 Pick-ups

  4. Disconnect the battery from the relay (this will de-energize the coil) and check terminals 3 and 4 again. There should be no continuity present.
  5. Check the continuity across terminals 1 and 2 with the coil de-energized. There should be approximately 70 ohms present.
  6. If the relay fails any of the preceding tests, replace it with a new unit.
VACUUM CHECK VALVE
  1. Remove the check valve from its vacuum lines.
  2. Blow into nipple B and check that air blows out from nipple A.
  3. If the air does not blow through, replace the check valve with a new unit.
  4. Install the check valve back between the vacuum lines. Make certain that the arrow on the check valve points toward the inlet manifold side.
1992–95 Montero
SOLENOID VALVE

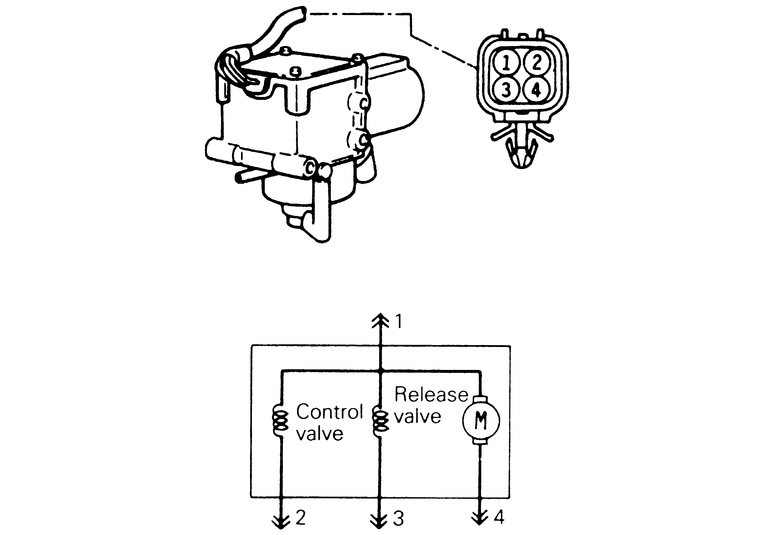
NOTE: A control valve and release valve are contained within the solenoid valve.

  1. Unplug the wiring harness connector from the cruise vacuum pump.
  2. Measure the resistance value between terminals 1 and 2, and also between terminals 1 and 3. The standard value should be 50–60 ohms.
  3. Check that the solenoid valve makes an operating noise when battery voltage is applied to terminals 1 and 2, as well as to terminals 1 and 3.
  4. If there is a malfunction of the solenoid valve, replace the cruise vacuum pump assembly.

    Fig. 3: Measure the solenoid valve resistance between terminals 1 and 2, and also between terminals 1 and 3 — 1992–95 Monteros

MOTOR
  1. Unplug the wiring harness to the cruise vacuum pump.
  2. Check that the motor revolves when battery positive voltage is applied between terminals 1 and 4.
  3. If the motor does not operate, replace it with a new unit.

Previous Next