Access to the underside of the vehicle will be needed throughout the procedure.
- Disconnect the negative battery cable from the battery.
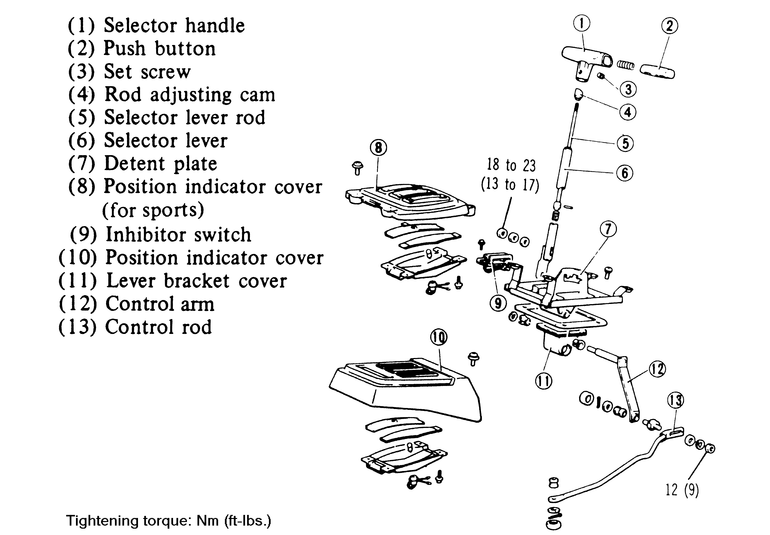
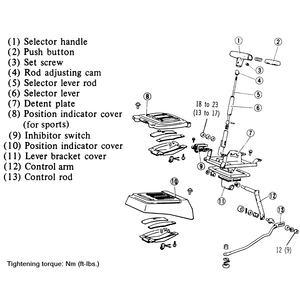
- Remove the selector handle assembly while pushing the button in from the
selector lever by loosening the set screw.
- Remove the console box, then remove the position indicator assembly upward
and out by loosening the attaching screws.
- Disconnect the indicator light and inhibitor switch wiring.
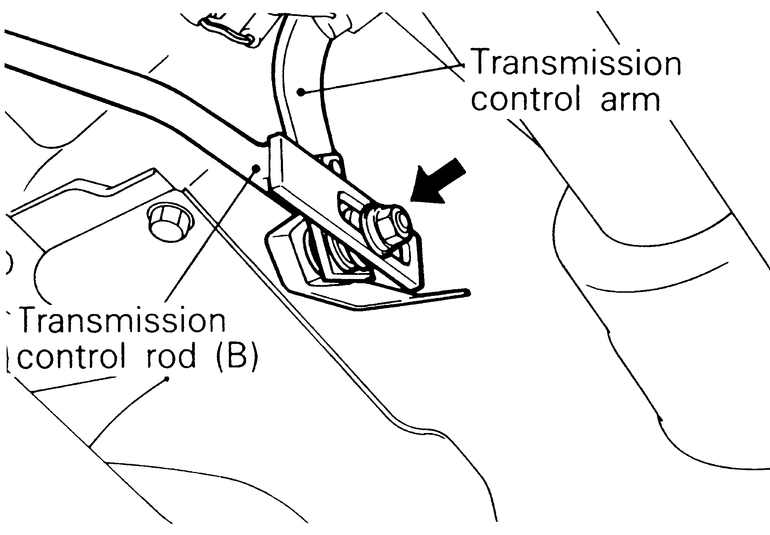
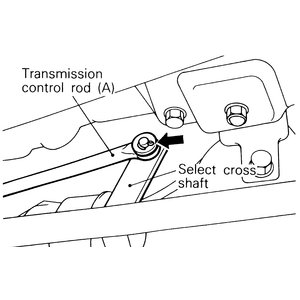
- Disconnect the control rod from the control arm by loosening the nut from
under the floor.
- Remove the lever bracket assembly by loosening the attaching screws.
| Fig. 1: Shifter linkage removal and installation — MA
904A transmissions
|
| Fig. 2: Grease the transmission control arm in the
position shown before installing it to the selector lever — MA
904A transmissions
|
To install:
- Install the lever bracket assembly and tighten the mounting screws until
snug.
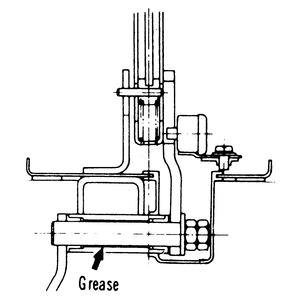
- Before installing the transmission control arm to the selector lever, apply
a suitable quantity of multipurpose grease (SAE J310a, NLGI grade #3) to the
sliding part.
- Tighten the attaching nut.
- Check that the control arm moves smoothly without looseness. Replace the
bushing if the arm is loose.
- Attach the inhibitor switch and position indicator light wiring.
- Adjust the inhibitor switch — refer to the previous procedures
for this.
- Set the position indicator assembly into position, then secure it in place
with the mounting screws.
- Install the console box.
- Push the selector handle back onto the selector lever and secure it in place
with the set screw.
- If the control rod was removed from the control arm, set the selector lever
to the N position. Then move the control rod to place the transmission in
the neutral position.
CAUTION
Before moving the transmission into the Neutral position make sure that
the wheels are chocked to keep the vehicle from rolling.
NOTE: Tighten the rod to the lever locknut. When attaching
the control rod to the arm, apply as much multipurpose grease as required
to allow the parts to slide easily.
- Make certain that the selector lever moves smoothly and that the lever on
the transmission side moves properly to each selector position.
- Pull the parking brake lever. Fasten the seat belt. Depress the brake pedal,
then confirm that the engine does not start while the selector lever is in
the D, L, 2 or R positions. Make sure the engine starts when the lever is
in the P or N position.
- Place the selector lever in the R position and confirm that the back up
light is illuminated in this position (but not in any other position).
- Use the following procedure to adjust the rod adjusting cam.
- Set the selector lever to N.
- Turn the rod adjusting cam to adjust the distance from the end of the
selector lever to the end of the rod adjusting cam (the distance should
be 0.45–0.49 in. (11.3–12.7mm).
- After adjustment, move the selector lever through all the ranges to
confirm that it moves smoothly and operates correctly.
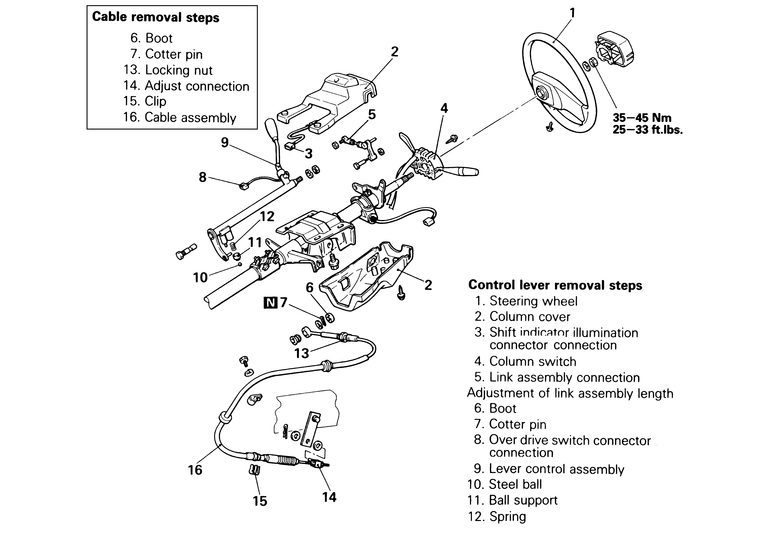
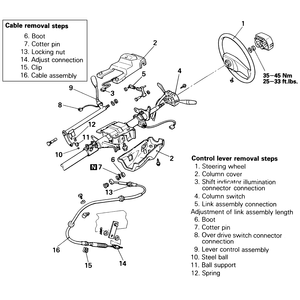
- Disconnect the negative battery cable from the battery.
- Move the transmission selector lever to the Park position.
- Remove the screw fitted to the horn pad and pull the lower part of the horn
pad out to remove.
- Unscrew the retaining screws, then lift the column covers up and down off
of the column assembly.
- Unplug the shift indicator illumination harness connector.
- Remove the retaining screws from the column switch and unplug the column
switch harness connectors, then slide the column switch off of the column.
- Remove the link assembly connection from the column bracket.
- Remove the boot covering the cable-to-lever control assembly connecting
cotter pin.
- Remove the cotter pin and slide the cable end off of the lower end of the
lever control assembly.
- Unplug the over drive switch harness connector.
- To remove the lever control assembly:
- Remove the change lever guide attaching nut (located on the upper end
of the control lever rod).
- Remove the bottom guide bolt from the control lever rod.
- Push the change lever guide and remove the control rod assembly so that
the control rod assembly does not catch the detent plate portion. Make
sure to account for the steel ball, the ball support and the spring.
- Loosen the locking nut from the upper end of the control cable, then slide
the cable out of the column mounting bracket.
- Using a pair of needle-nose pliers, remove the cotter pin from the transmission
lever. Disconnect the lower end of the selector cable.
- Remove the retaining clip near the bottom of the cable.
- Remove the selector cable from the vehicle.
- If neither the selector lever nor the transmission lever is moved, the selector
cable linkage should not need to be adjusted. However, the linkage should
be checked and adjusted if not correct.
| Fig. 3: Shifter linkage removal and installation — AW372
transmissions
|
| Fig. 4: Install the clip so that the opening faces
the direction shown — AW372 transmissions

|
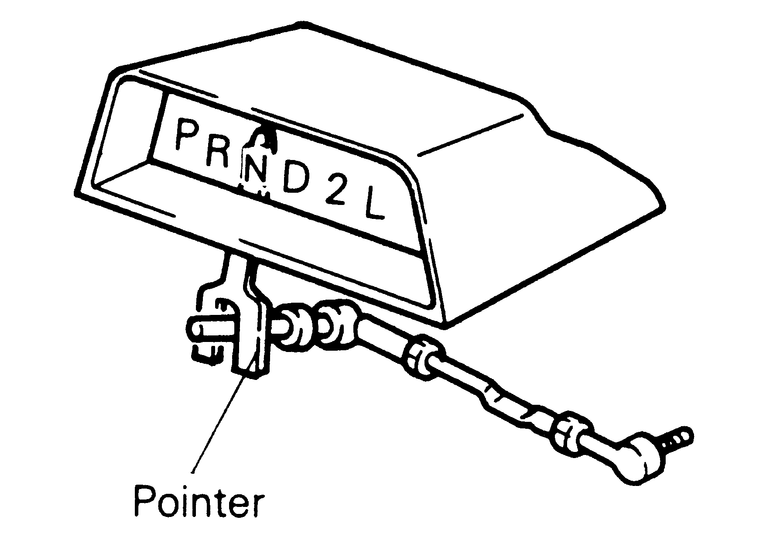
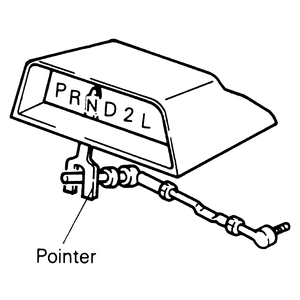
| Fig. 5: When installing the upper column cover, make
sure that the pointer engages the linkage correctly
|
To install:
- To install, route the cable in the vehicle the same way it was before it
was removed.
- Install the retaining clip to the retaining bracket in such a way so that
the opening in the retaining clip is facing the opposite direction than the
opening in the retaining bracket. Make sure before installing the clip, that
the indent on the cable is set into the retaining bracket.
- If the selector lever or transmission lever was moved during repairs, then
set the control lever (when installed) and the transmission lever to the N
position.
- Install the adjusting nuts loosely; adjusting will need to be performed
once the control lever assembly is installed.
- Slide the upper end of the cable into the column retaining bracket and tighten
the locknut.
- Apply Multipurpose grease SAE J310, NLGI No.2 to the following areas of
the control lever assembly before installation: The guide bolt shaft, the
outside edge of the lower control lever assembly bracket (right around the
edge where the guide bolt is inserted), the upper cable mounting pin, bottom
face of the tang next to the steel ball assembly.
- Slide the control lever assembly back into the vehicle, install the guide
bolt, set the upper stud through the column bracket, then tighten the upper
change lever guide attaching nut until tight.
- Plug the over drive switch harness connector together.
- Install the upper cable end to the control lever assembly, using a new cotter
pin.
- Push the boot back over the cable connection.
- Adjustment of the link assembly may be needed. Measure the adjustable rod
(not the short one) from the center of the stud to the center of the pivot
shaft. The distance should be 2.098–2.114 in. (53.3–53.7mm). If
it is not this length, adjust by loosening the nut and rotating the rod so
that the dimension of the link assembly matches the standard.
- Install the link assembly to the column bracket and the control lever assembly.
- Slide and mount the column switch in place; secure it there with the mounting
screws. Plug the harness connectors back together.
- Plug the shift indicator illumination harness connector together.
- Install the upper and lower column covers. When installing the upper column
cover, make sure that the link assembly and the pointer of the select indicator
are securely connected.
- Install the steering wheel and the horn cover.
- Connect the negative battery cable to the battery.
- If the transmission lever was moved during repairs, set the control lever
assembly and the control lever sub assembly in the N position and install
the adjuster locknuts so that each position of the control lever assembly
matches with each position of the control lever sub assembly and they operate
normally.
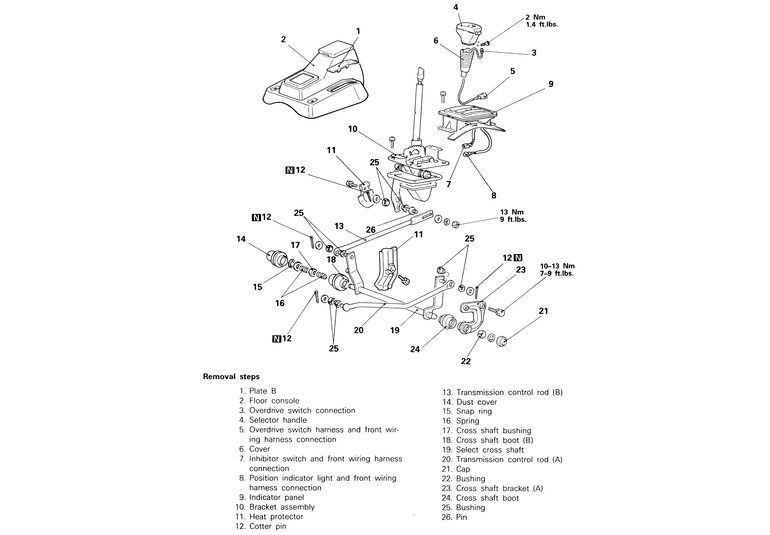
Access to the underside of the vehicle will be needed throughout this procedure.
- Disconnect the negative battery cable from the battery.
- Press the selector lever cover downward.
- Unplug the overdrive switch harness connector from the selector handle.
- Unscrew the handle retaining screw, then lift the handle off of the shift
lever.
- Unplug the lower end of the shift handle over drive harness connector.
- Pull the shift lever cover up and off of the lever.
- Unscrew the indicator panel retaining screws, lift the panel up high enough
to unplug the inhibitor switch and position indicator light harness connectors,
then remove the indicator panel from the shift assembly.
- Remove the bracket assembly, which consists of the shift lever mechanism.
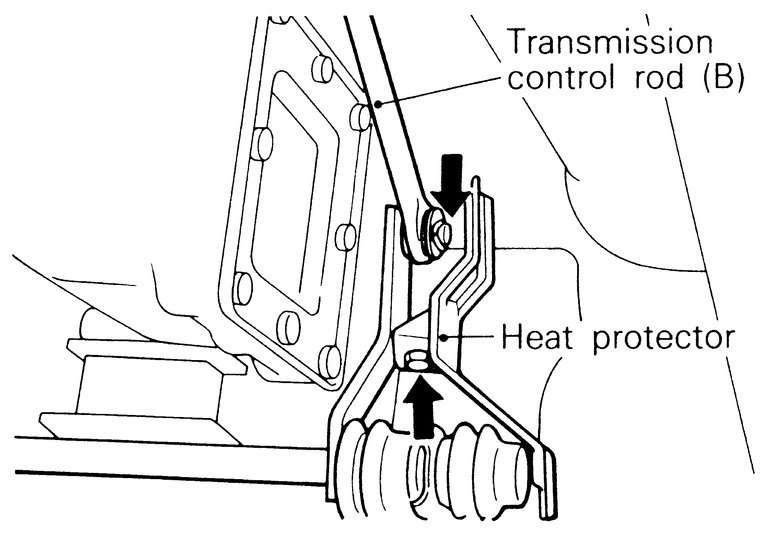
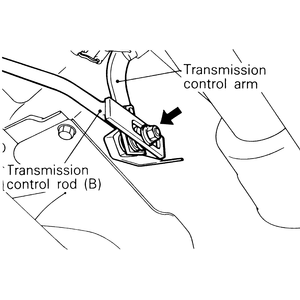
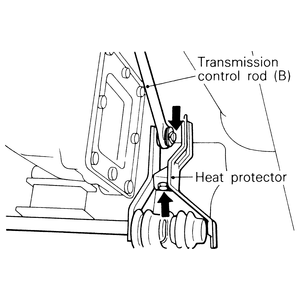
From under the vehicle, remove the transmission control rod from the transmission
control arm by loosening the nut. Disconnect the select cross shaft from the
heat protector, then from the control rod. Make sure to retain the nut, lockwasher,
flat washer, connecting pin and bushings, flat washer and the heat shield.
- Remove the dust cover from the end of the select cross shaft. Using snap
ring pliers remove the snap ring (located under the just removed dust cap),
then slide the two springs, the two cross shaft bushings and the cross shaft
boot off of the end of the select cross shaft.
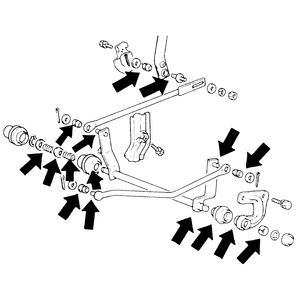
- Remove the cross shaft bracket bolts from the transfer case.
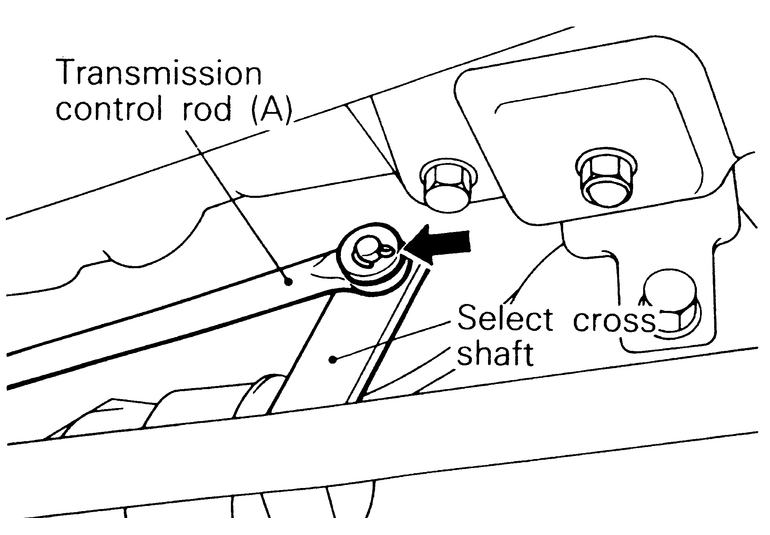
- Disconnect both ends of the select cross shaft from the transmission control
rod A and transmission control rod B by removing the cotter pin. Remove the
two bushings and the flat washer and remove the rods.
- Remove the select cross shaft from the vehicle.
- Disconnect transmission control rod A from the transmission connection also,
by first removing the cotter pin, then by removing the two bushings and the
flat washer.
| Fig. 6: Shifter linkage removal and installation — KM148
transmissions
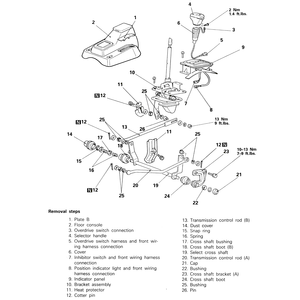
|
| Fig. 7: Make sure, when installing the transmission
control rod B, that the washers and bushings are in the correct order — KM148
transmissions
|
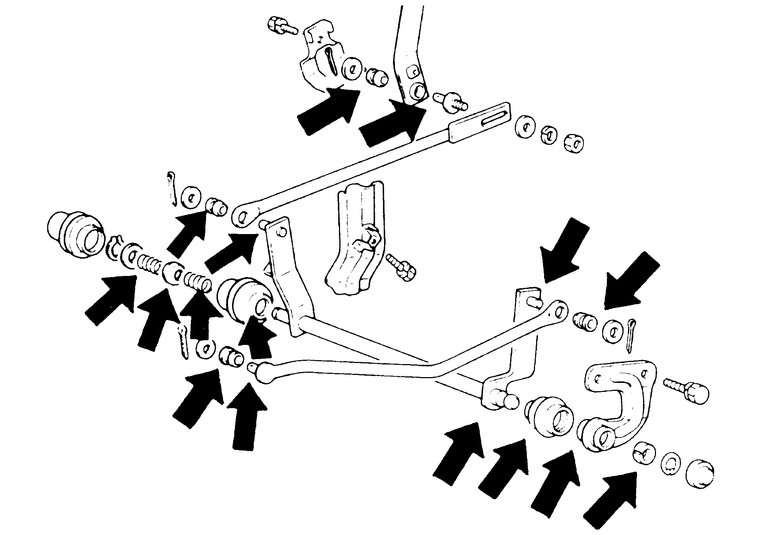
To install:
- Before or during installation apply grease to all of the points shown in
the illustration. The grease should be applied to the bushing inner surfaces
and the sliding parts shown in the figure. Use multipurpose grease SAE J310,
NLGI No.2.
- Using a new cotter pin, connect the transmission control rod (A) to the
transmission lever. Make sure the bushings and flat washer are used.
- Attach the select cross shaft to the vehicle with the bracket bolts. Tighten
the bracket bolts to 7–9 ft. lbs. (10–13 Nm). Attach the cross
select shaft to transmission rod (A). Use the bushings and the flat washer,
and make sure to use a new cotter pin.
- Install the transmission control rod (B) to the other end of the select
cross shaft.
- Install the components to the end of the select cross shaft in the following
order: cross shaft boot, spring, bushing, spring, flat washer, snapring, dust
cover.
- Install the lever pin to the removed bracket and shift lever assembly. Insert
the pin into the lever, slide the bushing and washer over the pin. Secure
with a new cotter pin. Mount the heat shield over the pin end and secure with
the mounting screw.
- Install the bracket and shift lever assembly, then secure it in place with
the mounting brackets. Move the shift lever to the Neutral position.
- Once again from under the vehicle, move the transmission to the Neutral
position, and then connect the transmission control arm and transmission control
rod B together.
- Set the indicator panel over the shifter lever, then plug the inhibitor
and the indicator light harness connectors together. Mount the indicator panel
to the bracket and shift lever assembly.
- Slide the shifter cover over the shifter lever.
| Fig. 8: After installing the select cross lever,
install the heat shield to cover the ends of the two rods — KM148
transmissions
|
| Fig. 9: Always use new cotter pins when reassembling
the rod junctions — all transmissions
|
| Fig. 10: Before reassembly, grease the pivot points
and sliding components (arrows) with multipurpose grease — KM148
transmissions
|
- Hook the lower end of the over drive wire to the connector.
- Plug the upper end of the over drive harness connector into the shifter
handle, then install the shifter handle to the shifter lever. Secure it in
place with the retaining screw.
- Install the floor console.
- Connect the negative battery cable to the battery.
- Check, while driving, to be sure that the transmission is set to each range
when the selector lever is shifted to each position. Make sure the over drive
is activated and cancelled correctly when the over drive switch is activated.
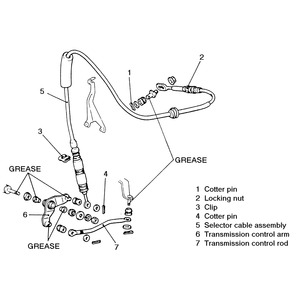
- Remove the cotter pin at the upper end of the transmission cable. Remove
the flat washer, the bushing and then pull the cable end off of the selector
lever attachment.
- Loosen the locking nut and then pull the cable out of the column bracket.
- Pull the retaining clip off of the lower retaining bracket, located by the
transmission.
- Remove the cotter pin holding the lower cable end onto the transmission
control arm.
- Remove the flat washer, the cable end and the bushing from the control arm.
At this point the transmission cable can be removed from the vehicle.
- The transmission control arm and rod can be removed at this time.
| Fig. 11: Shifter linkage removal and installation — R4AC1
transmissions
|
| Fig. 12: Install the transmission control rod with
the marked section as shown — R4AC1 transmissions
|
To install:
- Before reassembly, grease the pivot points and sliding parts.
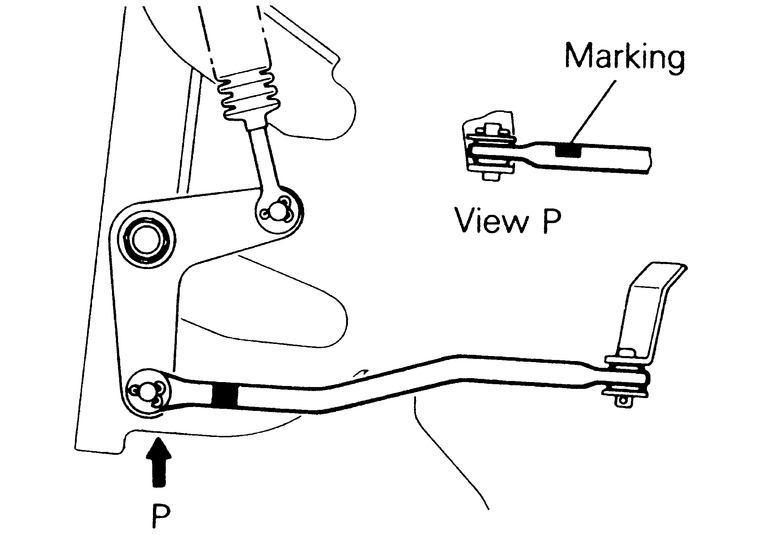
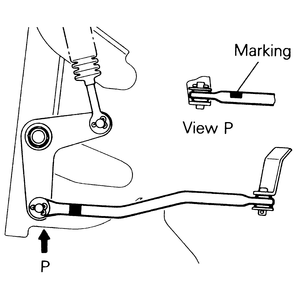
- Install the control arm and rod to the transmission. Install the transmission
control rod with the marked position upward.
- Route the transmission control cable in the same position as it was when
removed.
- Attach the lower end of the cable to the control arm, making sure to use
a new cotter pin. Use the bushing and the flat washer.
- Slide the cable into the lower retaining bracket, then install the clip
to hold it in place.
- Slide the cable into the upper bracket and retain it there with the locknut.
Tighten the locknut to 12–19 ft. lbs. (17–26 Nm).
- Insert the upper cable pin through the selector control lever assembly bracket.
Secure the pin with the bushing, the flat washer and the new cotter pin.
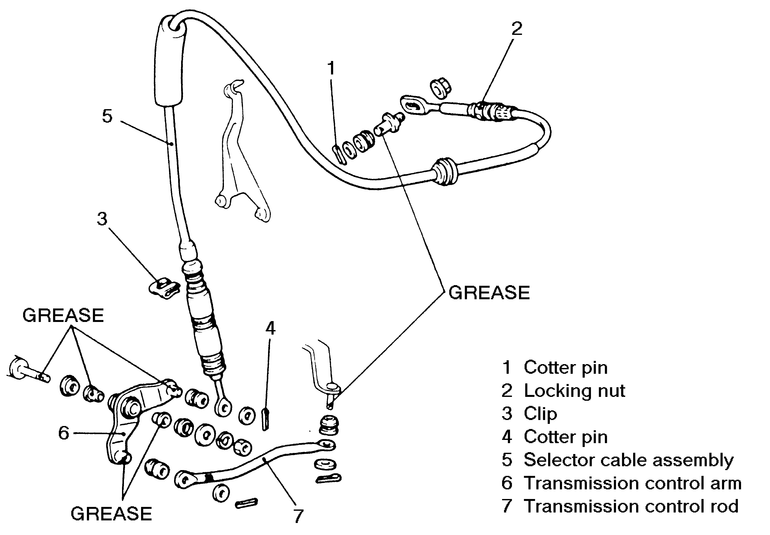
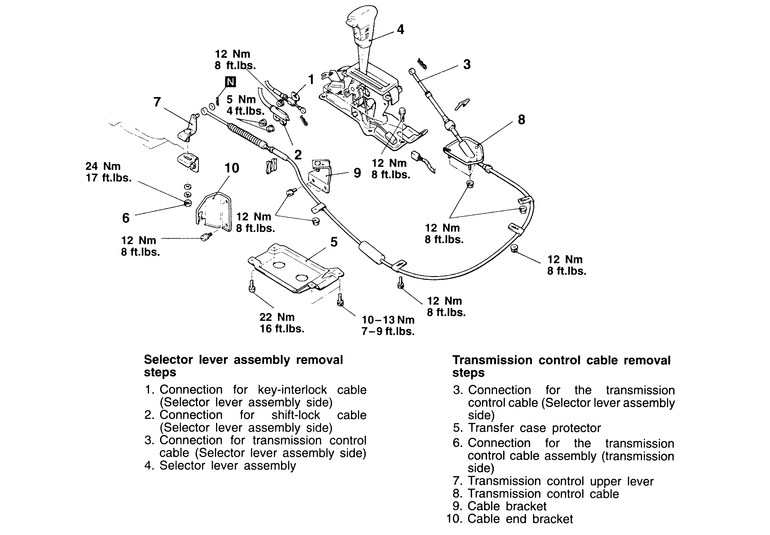
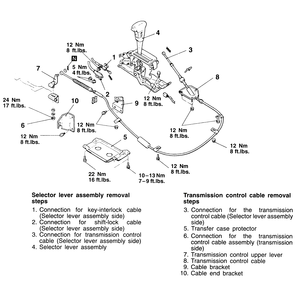
- Disconnect the negative battery cable from the battery.
- Disconnect the key-interlock cable, the shift-lock cable and the transmission
control cable from the selector lever assembly.
- Unscrew the mounting bolts, then remove the selector lever assembly from
the vehicle.
- From under the vehicle, remove the four retaining bolts and the transfer
case protector.
- Remove the nut and washers holding the transmission control upper lever
to the bracket on the transmission. Pull the cotter pin out of the end of
the transmission end of the cable, then remove the washer and the transmission
control upper lever from the cable.
- Remove the transmission cable bracket nuts/bolts. This usually consists
of 6–8 nuts/bolts along the length of the cable and at the end bracket
(shifter end of cable). Remove the cable bracket and the cable end bracket,
both located near the transmission end of the cable.
- Remove the cable from the vehicle.
| Fig. 13: Shifter linkage removal and installation — V4AW2
(V4AW3) transmissions
|
| Fig. 14: Gently pull the cable in the direction shown
to adjust the shifter cable — V4AW2 (V4AW3) transmissions
|
To install:
- To install, install the cable end bracket and the cable brackets to the
body of the vehicle.
- Route the transmission control cable in the vehicle, then attach to the
body with the brackets and various mounting screws along its length.
- Attach the transmission end of the cable to the transmission control upper
lever. Make sure to use the flat washer and a new cotter pin. Grease any pivot
points with multipurpose grease.
- Connect the transmission upper control lever to the bracket, using the flat
washer, the lockwasher and the nut. Tighten the nut to 17 ft. lbs. (24 Nm).
- Install the transfer case protector.
- Install the selector lever assembly with the retaining bolts. Tighten the
bolts to 8 ft. lbs. (12 Nm).
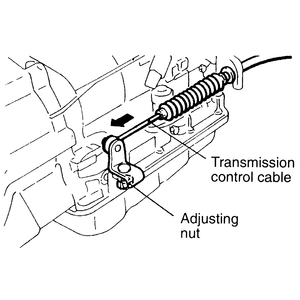
- Install the transmission control cable. Move the selector lever to the N
position. Loosen the adjusting nut (from under the vehicle), gently pull the
end of the transmission control cable in the direction toward the front of
the transmission. Tighten the adjusting nut until tight.
| Fig. 15: The shift lock cable adjusting mechanism — V4AW2
(V4AW3) transmissions
|
| Fig. 16: Install the components as shown in the illustration — V4AW2
(V4AW3) transmissions
|
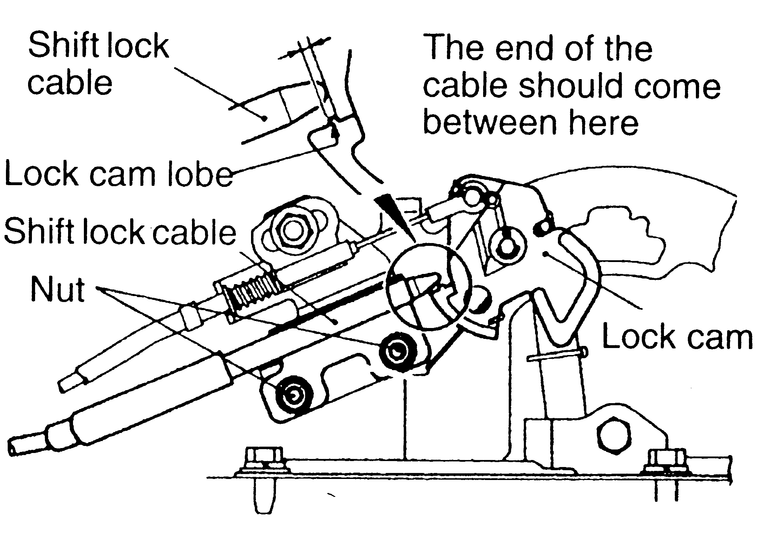
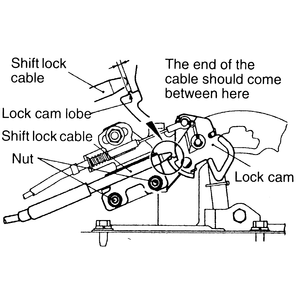
- Install the shift-lock cable. Move the selector lever to the P position.
Adjust the shift-lock cable so that the end of the cable (red mark) is at
the position shown in the illustration, and then tighten the nut until tight
to clamp the shift lock cable.
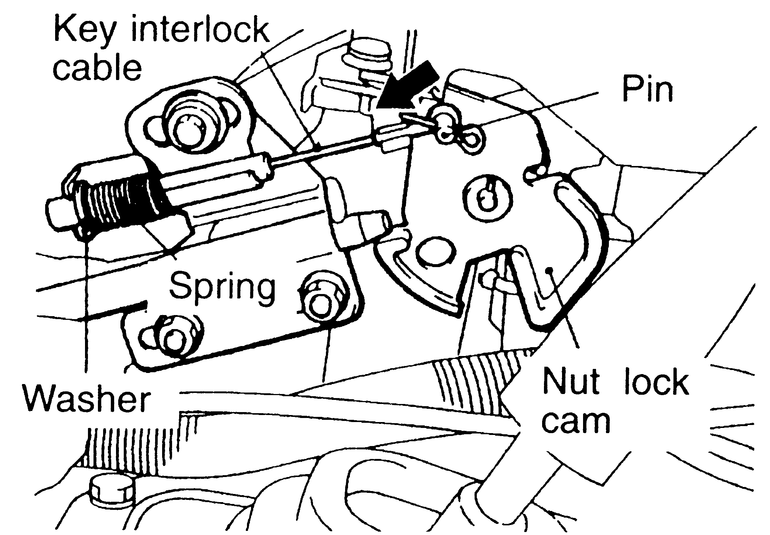
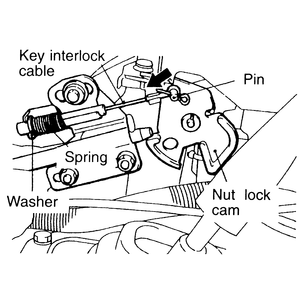
- Install the key interlock cable. With the selector lever still in the P
position, install the spring and washer that are inserted onto the key interlock
cable as shown in the illustration. Gently push the lock cam until the pin
stops in the direction of the arrow, and then tighten the nut to clamp the
key interlock cable.