Previous Next

Stabilizer Bar (Sway Bar)

REMOVAL & INSTALLATION

1983–95 Pick-up and 1983–91 Montero
  1. Raise the vehicle and support safely on jackstands.
  2. Remove the front wheels. Remove the under cover or splash shield.
  3. Disconnect the bracket or clamp holding the sway bar to the crossmember. On 4WD Pick-ups and 1983–91 Monteros, the sway bar holding link may be removed from the crossmember; the retaining nut is on top of the crossmember.
  4. Remove the sway bar support brackets and bushings from the lower control arm. Take careful note of the order and placement of the washers, bushings and spacers. They must be reinstalled correctly.
  5. Remove the sway bar from the vehicle.
  6. Inspect the bar for cracking or bending. Check the bushings for cracking or deformation. If any fault is found, replace components. It is recommended to replace the rubber bushings any time they are removed.
  7. Install the bar into place and attach all the hardware and brackets loosely. Make sure the washers and bushings are correctly installed.

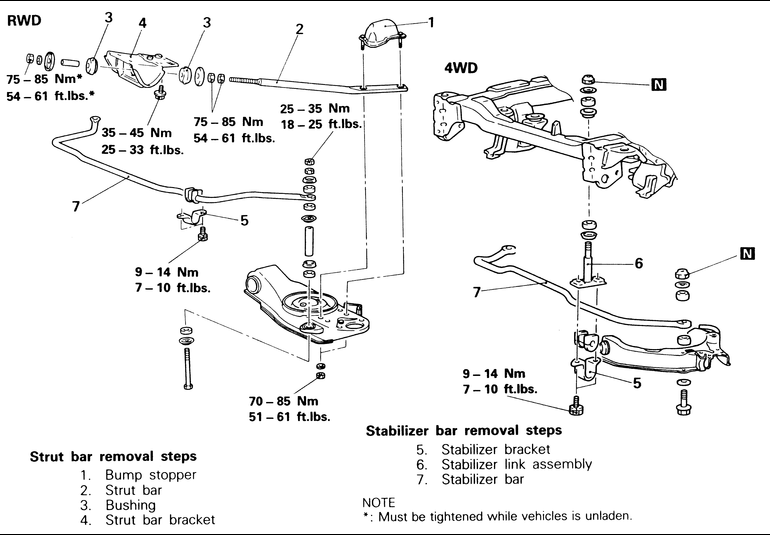
    Fig. 1: Stabilizer bar and strut bar removal and installation components — 1983–95 Pick-ups and 1983–91 Monteros

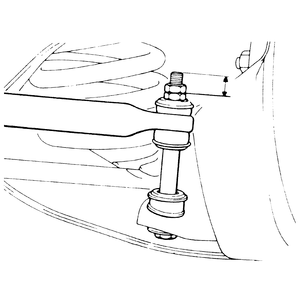
    Fig. 2: When installing the stabilizer end links, make sure that the measurement is correct — 1983–95 Pick-ups and 1983–91 Monteros

  8. For 1983–91 Monteros and all 4WD Pick-ups, use a new nut on the upper link mount (above the crossmember) and tighten it until 0.24–0.31 in. (6–8mm) of threads projects through the nut.
  9. Tighten the bracket or clamp bolts to 8 ft. lbs. (10 Nm).
  10. Install new nuts at each lower control arm. Refer to the following directions for each vehicle:
  11. Install the under cover or splash shield.
  12. Install the wheels and lower the vehicle to the ground.
1992–95 Montero
  1. Raise the vehicle and support safely on jackstands.
  2. Remove the front wheels. Remove the under cover or splash shield.
  3. Remove the stabilizer link assembly from the lower control arms. Loosen and remove the nut and washers holding the sway bar to the stabilizer link assembly.
  4. loosen and remove the sway bar clamp bolts, remove the clamps from the vehicle. Removal of the sway bar bushings is easier with the sway bar removed.
  5. Remove the sway bar from the vehicle.

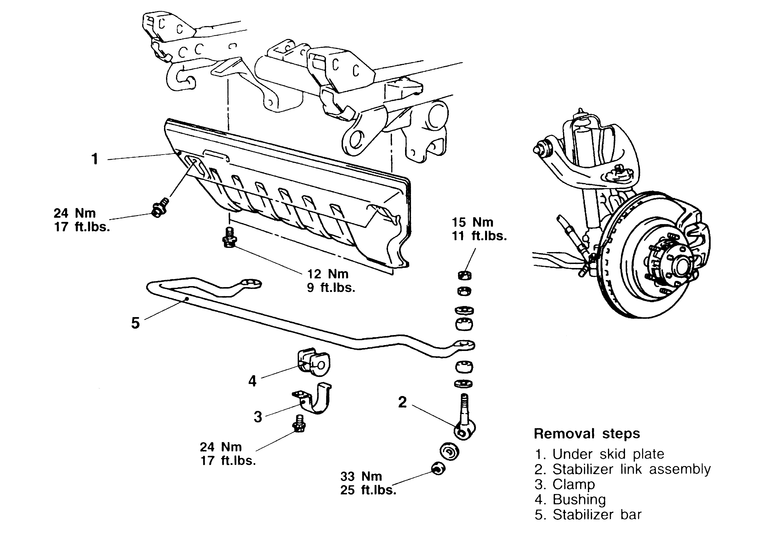
    Fig. 3: Stabilizer bar removal and installation components — 1992–93 Monteros

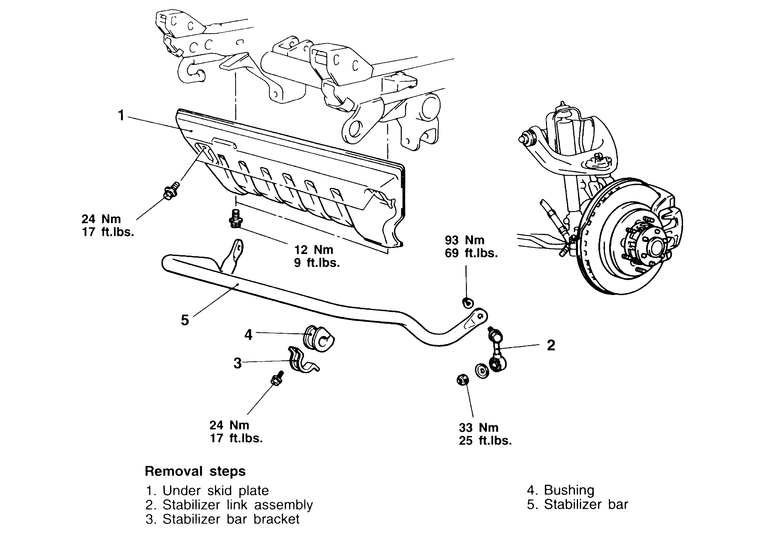
    Fig. 4: Stabilizer bar removal and installation components — 1994–95 Monteros

  6. Remove the sway bar bushings from the sway bar.
  7. Inspect the bar for cracking or bending. Check the bushings for cracking or deformation. If any fault is found, replace components. It is recommended to replace the rubber bushings any time they are removed.
  8. Install the bar into place and attach all the hardware and brackets loosely. Make sure the washers and bushings are correctly installed.
  9. Tighten the bracket or clamp bolts to 17 ft. lbs. (24 Nm).
  10. Attach the sway bar ends to the stabilizer link assemblies and the stabilizer link assemblies to the lower control arms. Tighten the stabilizer link assemblies' lower-control-arm-mounting nuts to 25 ft. lbs. (33 Nm). Tighten the sway bar-to-stabilizer link assembly mounting nuts to 11 ft. lbs. (15 Nm) on 1992–93 Monteros, and to 69 ft. lbs. (93 Nm) on 1994–95 Monteros.
  11. Install the under cover or splash shield.
  12. Install the wheels and lower the vehicle to the ground.

Previous Next