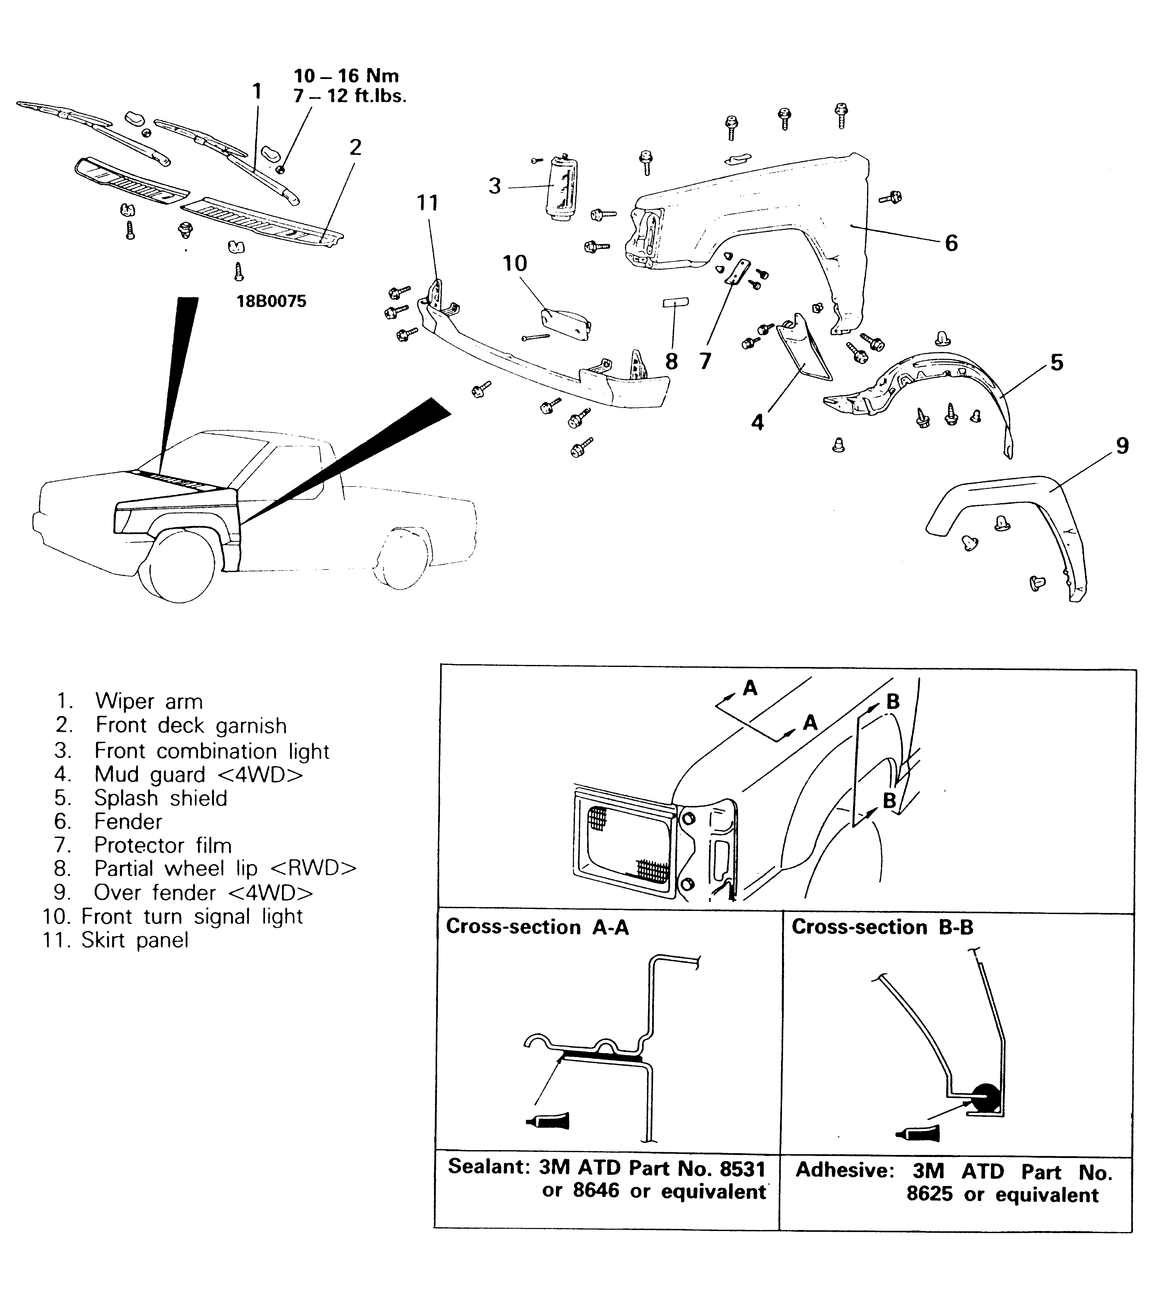
If the right fender is to be removed, removal of the antenna is first required.
- Remove the wiper blade cover boots from the bottom of the wiper arms, then
remove the retaining nuts and pull the wiper arms off of the shafts.
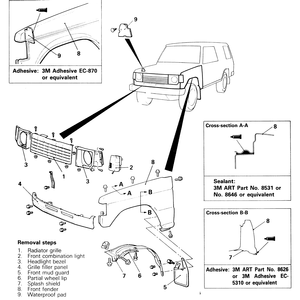
| Fig. 1: Front fender removal and installation components — 1983–95
Pick-ups
|
- Remove the front deck garnishes from the cowl area of the Pick-up.
- Remove the front combination lights — refer to Section 6
for this procedure.
- On 4WD Pick-ups, remove the front mud flap from the lower fender.
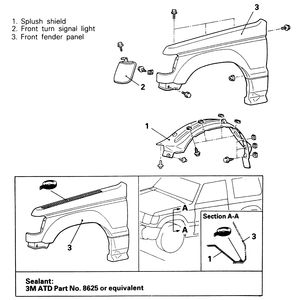
- Remove the mounting body screws from the splash shield (inner fender cover),
then remove the splash shield from under the fender.
- Remove all of the mounting body screws holding the front fender in place,
then remove the fender from the Pick-up.
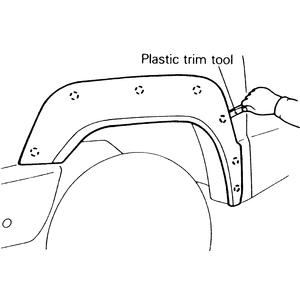
- Once the fender is removed from the vehicle, the protector film and partial
wheel lip (2WD) or over fender (4WD) can be removed from the fender. To remove
the over fender, use a plastic trim tool to pull out the clips by prying on
the edges of the over fender.
| Fig. 2: Use a plastic trim tool to pry the clips
lose — do not use a metal tool, the paint or the moulding
could become damaged
|
To install:
- Install the wheel lip or over fender to the fender.
- Before the fender is reinstalled, affix the protector film to the bumper
cushion contacting surface.
- Fasten the fender temporarily in position on the vehicle, make sure that
clearance is uniform at all points, then tighten the mounting bolts. If the
Pick-up was equipped with fender seal, make certain to reinstall the seal.
- Install the splash shield to the under side of the fender, then secure it
in place with the mounting screws. Apply 3M® ATD Part No. 8625 or
the equivalent adhesive to the splash shield and fender lip contact area.
- Screw the mud flap back onto the fender and splash shield.
- Install the front combination light — refer to Section 6.
- Install the front garnishes to the cowl area of the Pick-up with the mounting
screws.
- Install the windshield wiper arms onto the shafts and tighten the mounting
nuts to 7–12 ft. lbs. (10–16 Nm).
- Affix the wiper arm nut covers back onto the arms.
- Install the antenna if the right fender was removed.
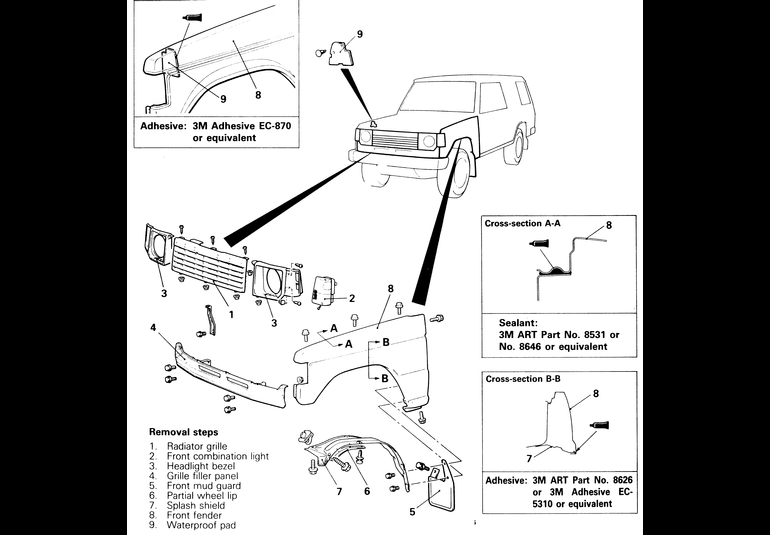
- If the right fender is to be removed, remove the radio antenna.
- Remove the radiator grille from the front of the Montero. It is held in
place with six mounting screws.
| Fig. 3: Front fender removal and installation components — 1983–91
Monteros
|
- Remove the front combination lights — refer to Section 6.
- Unscrew the retaining screws from the headlight bezels, then remove the
bezels from the vehicle.
- Loosen and remove the four grille filler panel mounting bolts, then remove
the filler panel.
- Remove the front fender mud flaps.
- Remove the splash shield from under the front fender.
- Loosen and remove the mounting bolts from the fender, then remove the fender
from the vehicle.
- Make sure to retain the small waterproof pad in the front of the fenders.
To install:
- Install the waterproof pad to the front of the fender using 3M® Adhesive
EC-870 or the equivalent.
- Fasten the fender temporarily in position on the vehicle, make sure that
clearance is uniform at all points, then tighten the mounting bolts.
- Install the splash shield to the under side of the fender, then secure it
in place with the mounting screws. Apply 3M® ATD Part No. 8625 or
the equivalent adhesive to both the inner and outer splash shield and fender
lip contact areas.
- Install the mud flap to the fender and splash shield.
- Install the grille filler panel by securing it in place with the four retaining
bolts.
- Install the headlight bezels.
- Install the front combination light — refer to Section 6.
- Install the front grille and retain with the mounting screws.
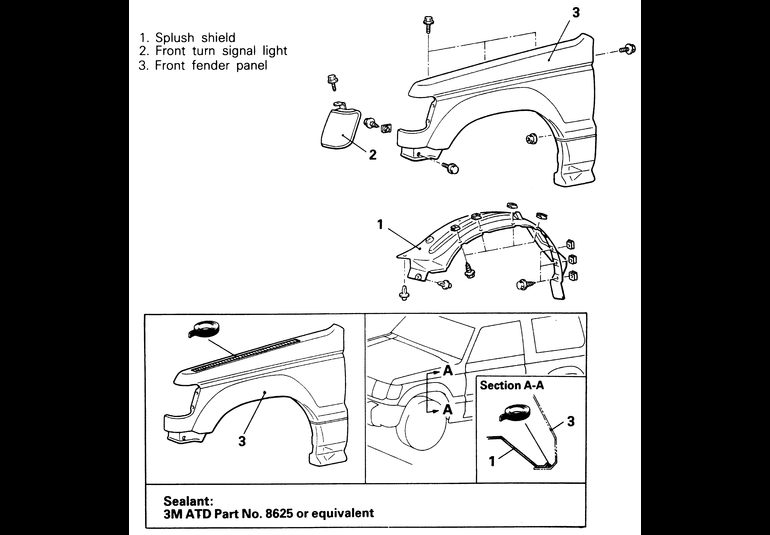
If the right fender is to be removed, removal of the antenna is required.
| Fig. 4: Front fender removal and installation components — 1992–95
Monteros
|
- For Monteros equipped with wide fender flare mouldings, removal of the wheel
flares is necessary. Follow this procedure:
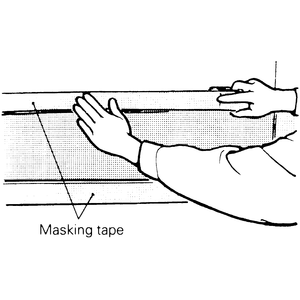
- Apply masking tape to the outside circumference of each side garnish.
- Insert a fishing line 0.03 in. (0.8mm) thick in between the body and
the side garnish, and pull both ends alternately to cut the adhesive section.
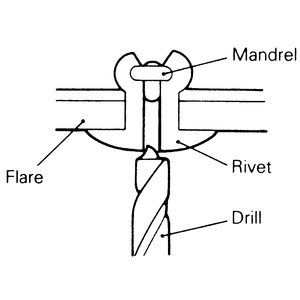
- Use a drill 0.16–0.22 in. (4.0–5.5mm) thick to break the
rivet by drilling a hole, then remove the blind rivet.
- Pull the section of the side garnish with the clips toward you to remove
the clips.
NOTE: When reusing the side garnish, remove by pulling
the fishing line along the edge of the body so as not to damage the
edge of the side garnish. If the adhesive is difficult to remove, heat
it to 104°F (40°C).
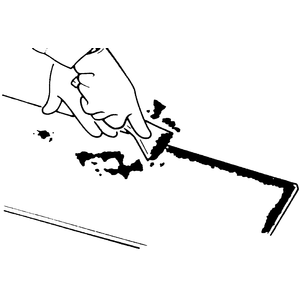
- Scrape off the double-sided adhesive tape with a resin spatula.
- Tear off the masking tape.
- Wipe off the application surface of the body with a clean cloth dampened
with degreaser (3M® ATD Part No. 8906 or the equivalent).
| Fig. 5: Apply masking tape to either edge of
the piece of molding which will be removed (wheel flare) — the
tape is to protect the paint during removal
|
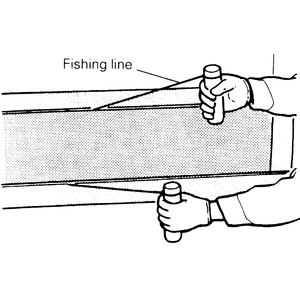
| Fig. 6: Use a piece of fishing line attached
to two pieces of wood to pull under the piece of molding, which
will cut the adhesive tape
|
NOTE: After wiping the surface, leave the surface as
it is to volatize the degreaser.
- Remove the front combination lights — refer to Section 6
for this procedure.
| Fig. 7: Drill a hole into the rivet to hollow it
out, then remove what is left of the rivet
|
| Fig. 8: Use a plastic resin spatula to scrape the
old adhesive tape off of the vehicle body and wheel flare
|
- Remove the mounting body screws from the splash shield (inner fender cover),
then remove the splash shield from under the fender.
- Remove all of the mounting body screws holding the front fender in place,
then remove the fender from the Pick-up.
| Fig. 9: To pull the backing paper off of the double-sided
tape, use another piece of tape to grip the paper

|
| Fig. 10: Install new rivets into the rivet holes
upon installation
|
To install:
- Fasten the fender temporarily in position on the vehicle, make sure that
clearance is uniform at all points, then tighten the mounting bolts.
- Install the splash shield to the under side of the fender, then secure it
in place with the mounting screws. Apply 3M® ATD Part No. 8625 or
the equivalent adhesive to both the inner and outer splash shield and fender
lip contact areas.
- Install the front combination light — refer to Section 6.
- On Monteros with the wide wheel flares, install the flares using the following
procedure:
- Scrape off the double-sided adhesive tape with a resin spatula or gasket
scraper from the wheel flare.
- Use cloth moistened with degreaser (3M® ATD Part No. 8906
or the equivalent) to wipe the side wheel flare clean.
- Attach the specified double-sided adhesive tape (3M® ATD Part
No. 6382 or the equivalent) to each wheel flare.
- Heat the adhesive surface of the double-sided tape on the wheel flare
to about 104–140°F (40–60°C).
- Tear the backing paper off of the double-sided tape.
NOTE: If you attach a part of another piece of the
adhesive tape to the edge of the backing paper, it will be easy to tear
off.
- Install the wheel flare so that the clips match the body holes.
NOTE: If the double-sided adhesive tape is difficult
to affix during the winter, warm the bonding surfaces of the body and
the wheel flare to 104–140°F (40–60°C) before
affixing the tape.
- Firmly press in the wheel flare.
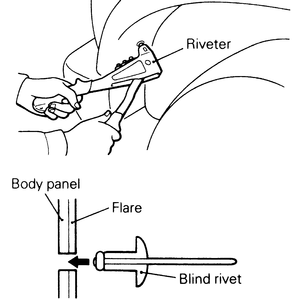
- Use a riveter to install new rivets into the rivet holes.
- Install the antenna if the right fender was removed.