- Disconnect the negative battery cable.
- Unfasten the distributor wire harness.
- Remove the high tension wire from the coil.
- If any vacuum lines are attached to the distributor, tag, then disconnect
them.
- Tag then remove each individual spark plug wire at the spark plug.
- Remove the distributor cap from the distributor body, by loosening the retaining
screws.
- Paint alignment marks on the rotor, distributor body and cylinder head at
the base of the distributor.
- Loosen and remove the retaining bolts which secure the distributor to the
cylinder head.
- Carefully lift the distributor out of the cylinder head. Remove the gasket
at the base of the distributor and discard.
To install:
- Before installing the distributor into the cylinder head, place a new gasket
on the base of the distributor.
- Align the paint marks on the rotor and distributor body.
- Align the paint marks on the distributor body and cylinder head, then carefully
insert the distributor into the hole in the cylinder head. The remainder of
installation is the reverse of removal. Tighten each component to specifications.
- Start the engine and allow it to reach normal operating temperature, then
check the ignition timing. Adjust the timing if needed. Refer to the procedure
in Section 1.
| Fig. 1: Align the matchmarks on the distributor body
|
If the engine has been cranked, disassembled, or the timing otherwise lost,
proceed as follows:
- Remove the plastic dust cover from the timing port on the flywheel housing.
- Remove the No. 1 spark plug. Use a wrench on the crankshaft pulley bolt
(on manual transmission cars place transmission in NEUTRAL) and slowly rotate
the engine until the TDC 0 mark on the flywheel aligns with the pointer on
the transaxle/transmission. While turning the engine place your finger over
the No. 1 spark plug hole, when you feel air escaping past your finger the
piston is on the compression stroke and when the marks align the piston is
at TDC (top dead center).
- An alternate method is to remove the bolts that hold the valve cover to
expose the valves on No. 1 cylinder. Rotate the engine so that the valves
in No. 1 cylinder are closed and the TDC 0 mark on the flywheel lines up with
the pointer.
- Align the small depression on the distributor drive pinion with the mark
on the distributor body. This will align the rotor with the No. 1 spark plug
terminal on the distributor cap. Make sure the base gasket is located in the
proper position.
- Align the matchmarks you have made on the distributor body with those on
the engine block and install the distributor in the engine. Make sure the
drive is engaged.
- Install the hold-down bolt(s) finger-tight.
- Connect the negative battery cable.
- Start the engine and adjust the ignition timing.
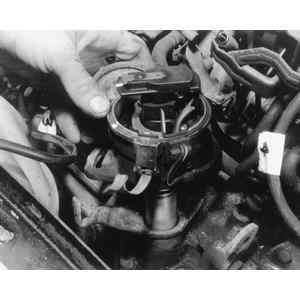
| Fig. 2: Remove the distributor cap — 1.8L
engine shown

|
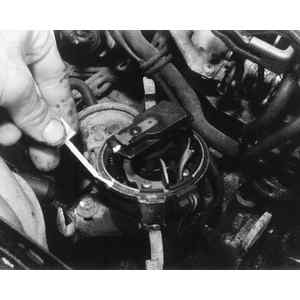
| Fig. 3: Paint alignment marks on the distributor body,
rotor and cylinder head
|
| Fig. 4: With the hold-down bolt removed, lift out the
distributor
|
- Disconnect the negative battery cable.
- Unfasten the distributor wire harness.
- Remove the high tension wire from the coil.
- If any vacuum lines are attached to the distributor, tag, then disconnect
them.
- Tag then remove each individual spark plug wire at the spark plug.
- Remove the distributor cap from the distributor body by loosening the retainer
screws or unfastening the two clips.
- Paint alignment marks on the rotor, distributor body and cylinder head at
the base of the distributor.
- Loosen and remove the retaining bolt , or bolts depending on model which
secure the distributor to the cylinder head.
- Carefully lift the distributor out of the cylinder head. Remove the gasket
at the base of the distributor and discard.
To install:
- Before installing the distributor into the cylinder head, place a new gasket
on the base of the distributor.
- Align the paint marks on the rotor and distributor body.
- Align the paint marks on the distributor body and cylinder head, then carefully
insert the distributor into the hole in the cylinder head.
- The remainder of installation is the reverse of removal. Tighten each component
to specifications.
- Start the engine and allow it to reach normal operating temperature, then
check the ignition timing. Adjust the timing if needed. Refer to the procedure
in Section 1.
If the engine has been cranked, disassembled, or the timing otherwise lost,
proceed as follows:
- Remove the plastic dust cover from the timing port on the flywheel housing.
- Remove the No. 1 spark plug. Use a wrench on the crankshaft pulley bolt
(on manual transmission cars place transmission in NEUTRAL) and slowly rotate
the engine until the TDC 0 mark on the flywheel aligns with the pointer. While
turning the engine place your finger over the No. 1 spark plug hole, when
you feel air escaping past your finger the piston is on the compression stroke
and when the marks align the piston is at TDC (top dead center).
- An alternate method is to remove the bolts that hold the right (passenger's)
side valve cover and remove the cover to expose the valves on No. 1 cylinder.
Rotate the engine so that the valves in No. 1 cylinder are closed and the
TDC 0 mark on the flywheel lines up with the pointer.
- Align the small depression on the distributor drive pinion with the mark
on the distributor body. This will align the rotor with the No. 1 spark plug
terminal on the distributor cap. Make sure the O-ring is located in the proper
position.
- Align the matchmarks you have made on the distributor body with those on
the engine block and install the distributor in the engine. Make sure the
drive is engaged.
- Install the hold-down bolt(s) finger-tight.
- Connect the negative battery cable.
- Start the engine and adjust the ignition timing.
The 2.2L, 2.5L and 3.3L engines do not use a distributor.