CAUTION
When draining the coolant, keep in mind that cats and dogs are attracted to
ethylene glycol antifreeze, and could drink any that is left in an uncovered
container or in puddles on the ground. This will prove fatal in sufficient quantity.
Always drain the coolant into a sealable container. Coolant should be reused
unless it is contaminated or several years old.
| Fig. 1: Cylinder head bolt loosening sequence — 1.2L
engine

|
| Fig. 2: Cylinder head bolt tightening sequence — 1.2L
engine

|
- Disconnect the negative battery cable.
- Drain the engine oil and coolant into suitable containers.
- Remove the timing belt cover. Align the timing marks, then remove the timing
belt and related components.
- Remove the rocker arm cover.
- Scribe alignment marks on the distributor and cylinder head, then remove
the distributor.
- Remove the exhaust manifold mounting bolts and separate the manifold from
the cylinder head. Refer to the exhaust manifold procedure in this section.
- Tag and disconnect the electrical harnesses and vacuum hoses attached to
the intake manifold.
- Remove the air suction valve and pipe, if equipped.
- Remove the intake manifold assembly. Refer to the intake manifold procedure
in this section.
- Loosen the cylinder head mounting bolts in the correct sequence. DO NOT
remove any of the bolts until all the bolts have been loosened.
- Remove the cylinder head bolts.
- Lift off the cylinder head and gasket from the engine block.
- Clean all gasket material from both mating surfaces.
To install:
- Install the cylinder head and gasket on the engine block.
- Install the cylinder head bolts and tighten in three steps as follows:
- Tighten in sequence to 29 ft. lbs. (39 Nm).
- Tighten in sequence to 43 ft. lbs. (59 Nm).
- Tighten in sequence to 51 ft. lbs. (69 Nm).
- Install the remaining components in the reverse order of removal.
- Connect the negative battery cable.
- Change the oil filter and fill the engine with clean oil. Fill the cooling
system and bleed.
- Start the vehicle and check for leaks. Adjust the ignition timing, if needed.
| Fig. 3: Cylinder head bolt loosening sequence — 1.6L
and 1.8L engines
|
| Fig. 4: Cylinder head bolt tightening sequence — 1.6L
and 1.8L engines
|
| Fig. 5: Cylinder head bolt loosening sequence — 2.7L
engine
|
| Fig. 6: Cylinder head bolt tightening sequence — 2.7L
engine
|
| Fig. 7: Cylinder head assembly — 1.6L
and 1.8L engines
|
| Fig. 8: Cylinder head assembly — 2.7L
engine
|
- Disconnect the negative battery cable.
- Remove the timing belt, belt cover and related components.
- On turbocharged engines, remove the turbo cooling pipe together with the
union screws and gaskets from the cylinder head.
- Remove the camshaft cases, lash adjusters and related components.
- On turbocharged engines, remove the EGR pipe.
- Remove the plug attaching the EGR pipe to the cylinder head.
- Remove the accessory drive belts, alternator and air conditioner compressor,
if equipped. Remove the bolt attaching the alternator bracket to the cylinder
head.
- On vehicles without A/C, remove the bolt securing the adjusting bar to the
cylinder.
- On fuel injected engines, relieve the fuel system pressure.
- Remove the bolts attaching the intake manifold to the cylinder head and
remove the manifold.
- Remove the bolt attaching the water bypass pipe bracket to the cylinder
head.
- Remove the spark plugs.
NOTE: On 2.7L engines, there are two types of cylinder
head bolts used. Take note of cylinder head bolt arrangement as the bolts
must be placed in their proper locations. Bolts number 1, 2, 9 and 13 measure
4.665 inch (118.5mm). All other bolts measure 5.217 inch (132.5mm).
- Loosen the cylinder head bolts in the proper sequence. Remove the cylinder
heads from the block.
- Clean all gasket material from the mating surfaces.
To install:
- Inspect the cylinder head for warpage. Warpage should not exceed 0.0020
inch (0.05mm).
- Install the cylinder head using a new gasket.
- On the 1.6L and 1.8L engines, tighten the all cylinder head bolts squence
in three steps as follows:
- 22 ft. lbs. (29 Nm)
- 43 ft. lbs. (59 Nm)
- 47 ft. lbs. (64 Nm)
- On the 2.7L engine, tighten the cylinder head bolts in four steps as follows:
- Tighten all bolts in sequence to 29 ft. lbs. (39 Nm).
- Tighten all bolts in sequence to 47 ft. lbs. (64 Nm).
- Loosen all bolts at least 90°in the reverse order of the tightening
sequence.
- Tighten all bolts in sequence to 44–50 ft. lbs. (60–68 Nm).
- Installation all remaining components in the reverse order of removal.
- Intake manifold bolts — 13–16 ft. lbs. (18–22
Nm).
- Turbocharged engines with EGR pipe — 23–27 ft.
lbs. (31–37 Nm).
- Turbo cooling pipe bolts — 16–18 ft. lbs. (21–24
Nm).
- Adjust the valve lash, as required. Start the engine and allow it to reach
operating temperature. Adjust the ignition timing.
- Check for leaks, then test drive the vehicle.
| Fig. 9: Cylinder head assembly — 2.2L
engine
|
| Fig. 10: Cylinder head bolt loosening sequence — 2.2L
engine

|
| Fig. 11: Cylinder head bolt tightening sequence — 2.2L
engine
|
| Fig. 12: Cover the intake manifold ports to keep out
debris, then loosen the head bolts in order
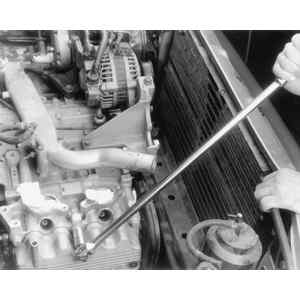
|
| Fig. 13: Carefully remove the cylinder head. Notice how
close it is to the side of the engine compartment
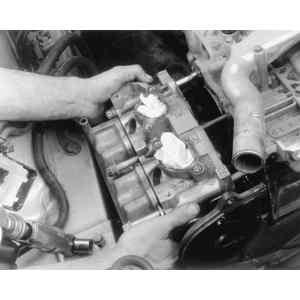
|
| Fig. 14: Remove the cylinder head gasket
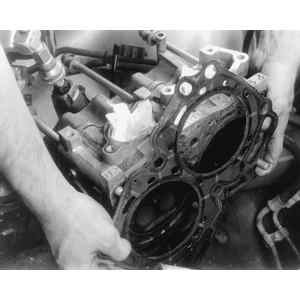
|
| Fig. 15: Clean both mating surfaces with a suitable gasket
scraper
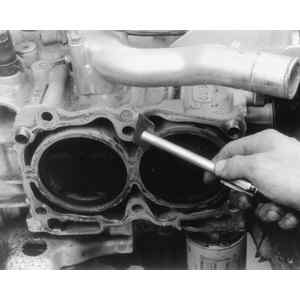
|
- Disconnect the negative battery cable.
- Remove the drive belt.
- Remove the power steering pump, alternator and bracket.
- Remove the valve rocker cover.
- Tag and disconnect the PCV hose and spark plug wires.
- Remove the connector bracket attaching bolt.
- Remove the crank angle and cam angle sensors.
- Disconnect the oil pressure switch. Remove the knock sensor.
- Disconnect the blow-by hose.
- Relieve the fuel system pressure and disconnect the fuel pipes.
- Remove the intake manifold and gasket. Remove the water pipe.
- Remove the timing belt, camshaft sprocket and related components.
- Remove the oil level gauge guide attaching bolt on the left cylinder head.
- Remove the cylinder head bolts in the proper sequence. Leave bolts 1 and
3 installed loosely to prevent the cylinder head from falling.
- Separate the cylinder head from the block, Use a plastic-faced hammer, if
needed, to separate the head from the cylinder block.
- Remove bolts 1 and 3. Remove the cylinder head and gasket.
- Clean all gasket material from both mating surfaces.
To install:
- Inspect the cylinder head for warpage. Warpage should not exceed 0.0020
inch (0.05mm).
- Install the cylinder head on the block using a new gasket. Secure in place
with the mounting bolts. Coat each bolts with clean engine oil, and hand-tighten.
- Tighten the cylinder head bolts to the following specifications:
- Tighten all bolts in sequence to 22 ft. lbs. (29 Nm).
- Tighten all bolts in sequence to 51 ft. lbs. (69 Nm).
- Loosen all bolts by 180°, then loosen an additional 180°.
- Tighten bolts 1 and 2 to 25 ft. lbs. (24 Nm) for non-turbo engines and
27 ft. lbs. (37 Nm) for turbo engines.
- Tighten bolts 3, 4, 5 and 6 to 11 ft. lbs. (15 Nm) for non-turbo engines
and 14 ft. lbs. (20 Nm) for turbo engines.
- Tighten all bolts in sequence 80–90°.
- Tighten all bolts in sequence an additional 80–90°.
NOTE: Do not exceed 180°total tightening.
- Install all remaining components in the reverse order of removal and tighten
to specifications.
- Install the drive belt(s).
- Connect the negative battery cable. Start the engine and allow it to reach
operating temperature. Check for leaks.
| Fig. 16: Cylinder head bolt loosening sequence — 2.5L
engine
|
| Fig. 17: Cylinder head bolt tightening sequence — 2.5L
engine
|
- Disconnect the negative battery cable.
- Remove the V-belt, power steering pump, alternator and bracket.
- Remove the valve rocker cover.
- Remove the connector bracket attaching bolt.
- Remove the crank angle and cam angle sensors.
- Remove the coolant filler tank.
- Relieve the fuel system pressure and disconnect the fuel pipes.
- Remove the intake manifold and gasket. Remove the water pipe.
- Remove the timing belt, camshaft sprocket and related components.
- Remove the oil level gauge guide attaching bolt on the left cylinder head.
- Remove the cylinder head bolts in the proper sequence. Leave bolts 1 and
3 installed loosely to prevent the cylinder head from falling.
- Separate the cylinder head from the block, Use a plastic-faced hammer, if
needed.
- Remove bolts 1 and 3. Remove the cylinder head and gasket.
- Clean all gasket material from both mating surfaces.
To install:
- Inspect the cylinder head for warpage. Warpage should not exceed 0.0020
inch (0.05mm).
- Install the cylinder heads on the block using new gaskets. Secure in place
with the mounting bolts. Coat each bolts with clean engine oil, and hand-tighten.
- Tighten the cylinder head bolts to the following specifications:
- Tighten all bolts in sequence to 22 ft. lbs. (29 Nm).
- Tighten all bolts in sequence to 51 ft. lbs. (69 Nm).
- Loosen all bolts by 180°, then loosen an additional 180°.
- Tighten bolts 1 and 2 to 25 ft. lbs. (24 Nm).
- Tighten bolts 3, 4, 5 and 6 to 11 ft. lbs. (15 Nm).
- Tighten all bolts in sequence by 80–90°.
- Tighten all bolts in sequence an additional 80–90°.
NOTE: Do not exceed 180°total tightening.
- Install all remaining components in the reverse order of removal and tighten
to specifications.
- Install the alternator, power steering pump and accessory drive belt.
- Connect the negative battery cable. Start the engine and allow it to reach
operating temperature. Check for leaks.
| Fig. 18: Cylinder head assembly — 3.3L
engine
|
| Fig. 19: Cylinder head bolt loosening sequence — 3.3L
engine
|
| Fig. 20: Cylinder head bolt tightening sequence — 3.3L
engine
|
CAUTION
Fuel injection systems remain under pressure after the engine has been turned
OFF. Properly relieve fuel pressure before disconnecting any fuel lines. Failure
to do so may result in fire or personal injury.
- Disconnect the negative battery cable.
- Remove the intake and exhaust manifolds from the cylinder head. Refer to
the needed procedures in this section.
- Remove the timing belt and sprockets.
- Remove both the camshafts.
- Remove the oil dipstick and tube.
- Remove the heater pipe.
- Remove the cylinder head bolts in the proper sequence. DO NOT fully remove
bolt number 5 or 8. One of these bolts should remain three of four threads
into the block to prevent the cylinder head from falling.
- Free the cylinder head from the block then remove the bolt left loosely
in place. If the cylinder head will not come free easily, then tap the side
of the head with a plastic-faced hammer.
- Remove the cylinder head and gasket.
- Clean all gasket material from both mating surfaces.
To install:
- Install the cylinder head using a new gasket. Loosely install the cylinder
head mounting bolts, coating each with clean engine oil.
- Tighten the mounting bolts as follows:
- Tighten the bolts in sequence to 22 ft. lbs. (29 Nm).
- Tighten the bolts in sequence to 51 ft. lbs. (69 Nm).
- Back off all the bolts 180°.
- Back off all bolts an additional 180°.
- Tighten the bolts in sequence to 20 ft. lbs. (27 Nm).
- Tighten bolts 1, 2, 3 and 4 an additional 90°.
- Tighten bolts 5, 6, 7, and 8 to 33 ft. lbs. (44 Nm).
- Tighten all bolts in sequence an additional 90°.
- Install the camshafts.
- Install the heater pipe.
- Install the oil dipstick and tube.
- Connect the intake and exhaust manifolds to the cylinder head.
- Install the timing belt and sprockets.
- Connect the negative battery cable.