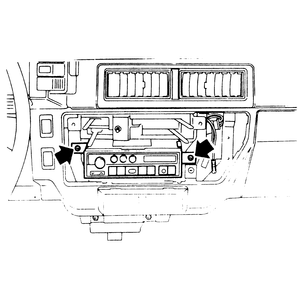
| Fig. 1: Radio retainer screws — Justy
|
NOTE: A factory installed CD player was not an available
option on the Justy.
- Disconnect the negative battery cable.
- Remove the radio trim panel.
- Remove the radio attaching screws and pull the radio body forward out
of the dash assembly.
- Disconnect the power and speaker harness and the antenna cable from the
rear of the radio assembly.
- Remove the radio from the vehicle.
- Installation is the reverse of removal. Secure all components.
- Check the operation of the radio and speakers.
NOTE: A factory installed CD player was not an available
option on the Sedan, sedan, coupe, XT, Loyale, Wagon or Brat.
- Disconnect the negative battery cable.
- Remove the clock assembly from the dash panel on XT models.
- Remove the trim panel that surrounds the radio and pocket assembly.
- Remove the radio attaching screws and pull the radio body out enough to
access the wire harness and antenna cable at the back of the assembly.
- Disconnect the wire harnesses and antenna cable.
- Remove the radio from the vehicle.
- Install all components in the reverse of removal.
- Check the operation of the radio and speakers.
- Disconnect the negative battery cable.
- Remove the cup holder above the radio.
- Remove the ashtray holder retainer screws from below the radio, and lower
the holder.
- Remove the center panel around the radio.
- Remove the radio attaching screws and pull the radio body forward to access
the antenna and wire harnesses.
- Disconnect the wire harnesses and antenna cable from the radio.
- Remove the radio from the vehicle.
- To separate the CD player, if equipped, from the radio, remove the retainer
screws from both sides of the radio and CD assemblies securing the brackets
to the radio case, and separate the CD player from the radio. Disconnect
the DIN cable from the rear of the radio, and remove the CD player.
- If equipped, and if removed, place the CD player beneath the radio assembly,
and attach the brackets to the sides of the radio and CD player using the
retainer screws. Attach the DIN cable from the CD player to the rear of
the radio.
- The remainder of installation is the reverse of removal. Tighten each
component to specifications.
- Check the operation of the radio, speakers and CD player if equipped.
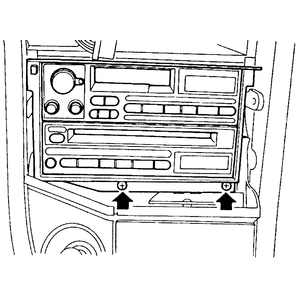
| Fig. 2: Radio lower retainer screws — SVX
|
| Fig. 3: Radio upper retainer screws — SVX

|
- Disconnect the negative battery cable.
- Place the steering wheel in the lowest position.
- Remove the lower instrument cluster trim panel.
- Remove the instrument cluster visor retaining screws and remove the visor.
Disconnect the clock when removing the visor.
- Remove the center ventilation grille from above the radio housing.
- Remove the ventilation control panel. Open the radio housing cover and
carefully pry its back panel off with a small prybar.
- Remove the center trim panel. Remove the left console panel and disconnect
the antenna cables.
- Remove the ashtray and holder.
- Remove the radio mounting screws, close the radio cover door and remove
the radio body.
- Disconnect the wire harnesses from the rear of the radio.
- To separate the CD player, if equipped, from the radio, remove the retainer
screws from both sides of the radio and CD assemblies securing the brackets
to the radio case, and separate the CD player from the radio. Disconnect
the DIN cable from the rear of the radio, and remove the CD player.
To install:
- If equipped, and if removed, place the CD player beneath the radio assembly,
and attach the brackets to the sides of the radio and CD player using the
retainer screws. Attach the DIN cable from the CD player to the rear of
the radio.
- The remainder of installation is the reverse of removal. Tighten each
component to specifications.
- Connect the negative battery cable. Check the operation of the audio system,
including all the speakers and CD player, if equipped.

