NOTE: While the instrument panel removal procedures here are
specific for each vehicle, they should be used only as an outline. Manufacturers
production changes and year-to-year trim level changes are not covered in these
procedures.
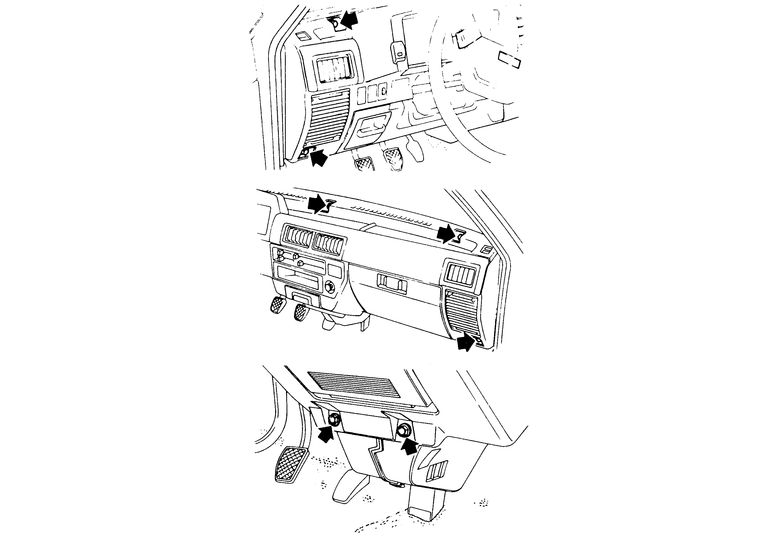
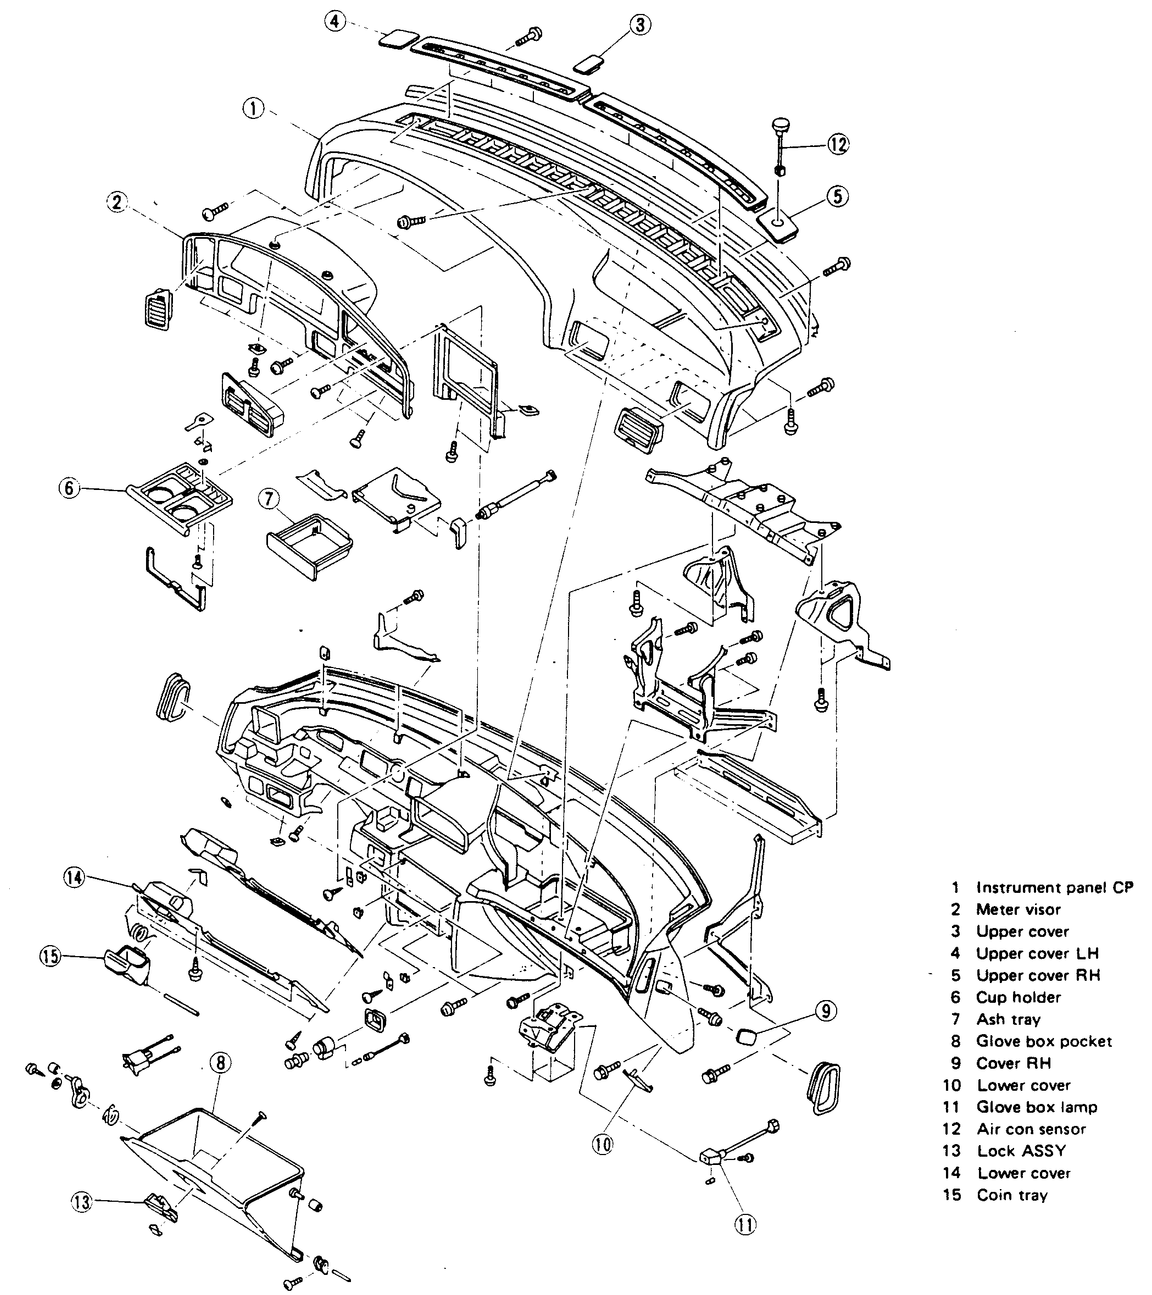
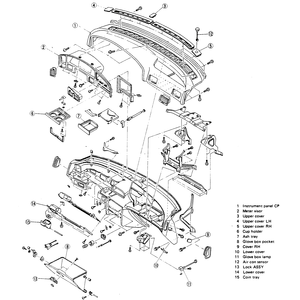
| Fig. 1: Instrument panel mounting bolt locations — Justy
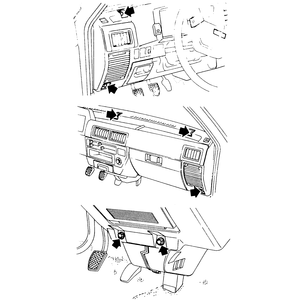
|
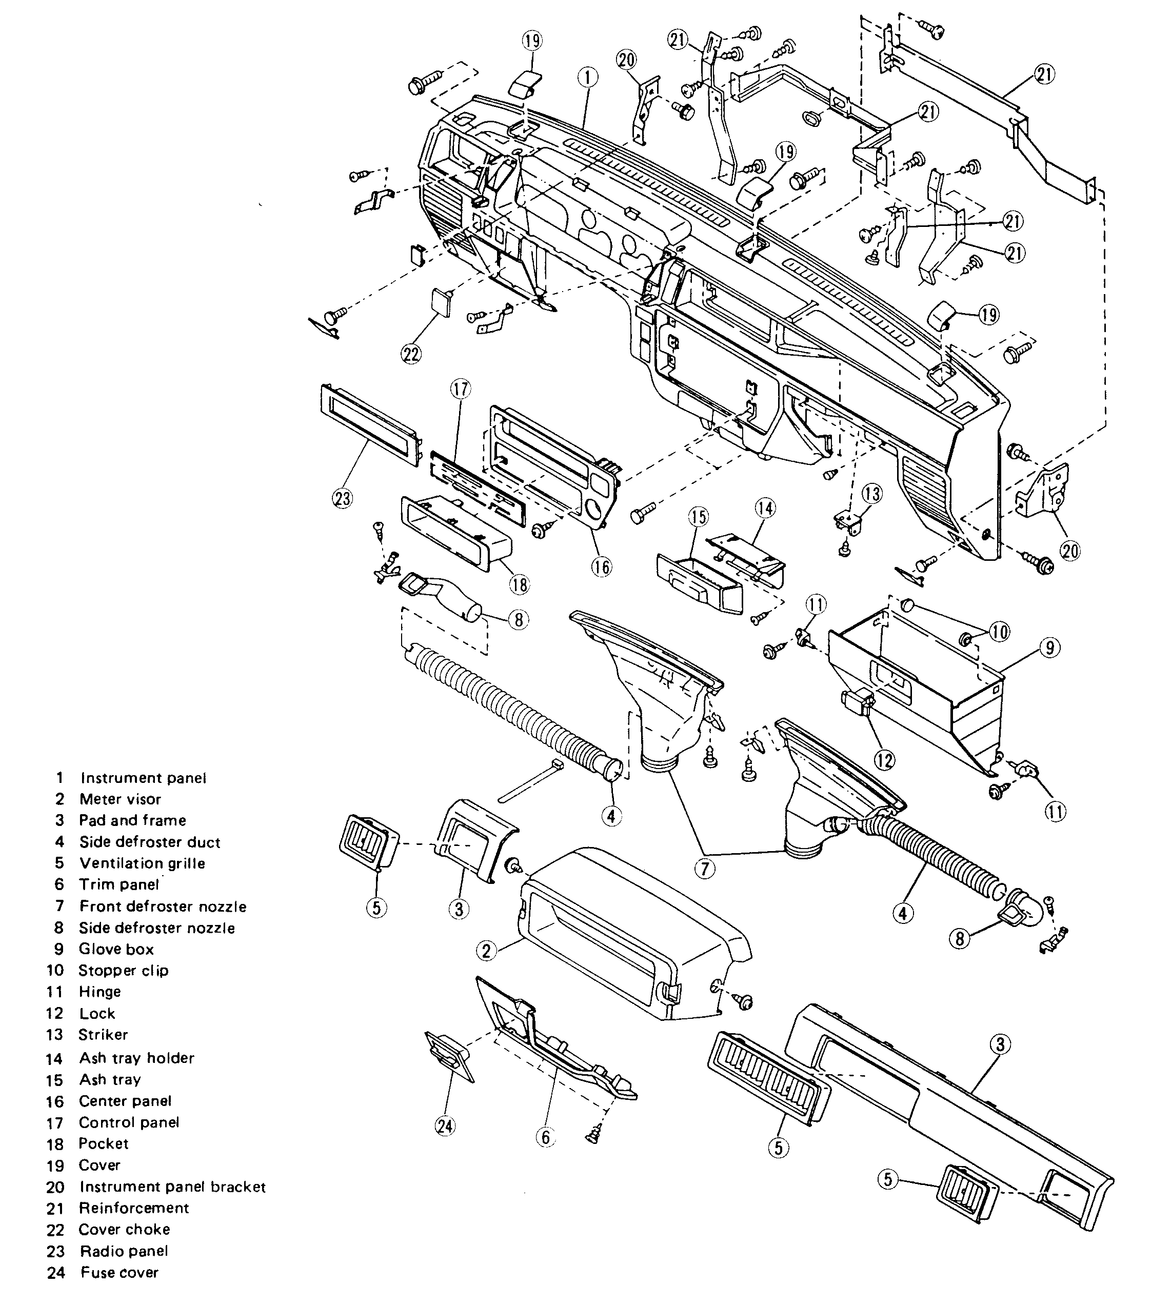
| Fig. 2: Exploded view of the instrument panel — Justy
|
- Disconnect the negative battery cable.
- Matchmark and remove the steering wheel.
- Remove the glove box assembly and disconnect the defroster ducts.
- Disconnect the heater control cables from the heater unit.
- Remove the plastic bolt covers from the around the instrument panel.
- Remove the instrument cluster, disconnecting the speedometer cable.
- Remove the bolts that retain the instrument panel to the firewall and with
the help of an assistant, lift the instrument panel away from the firewall.
Disconnect any electrical leads at this point.
- Remove the instrument panel from the vehicle through the passenger's side
door.
NOTE: Use care not to damage the instrument panel trim
or the vehicle interior trim when removing the instrument panel.
- Remove any components from the instrument panel that are going to be replaced.
To install:
- Install the instrument panel in position with the help of an assistant.
Connect all electrical leads.
- Install the instrument panel retaining bolts. Attach the removed components
on the instrument panel.
- Install the heater duct and the glove box assembly.
- Install the instrument cluster, connecting the speedometer cable and electrical
leads.
- Install any remaining components. Install the steering wheel on the column
in the same position as removed. Tighten the center nut to 36–43 ft.
lbs. (49–59 Nm).
- Connect the negative battery cable. Check the operation of all accessories.
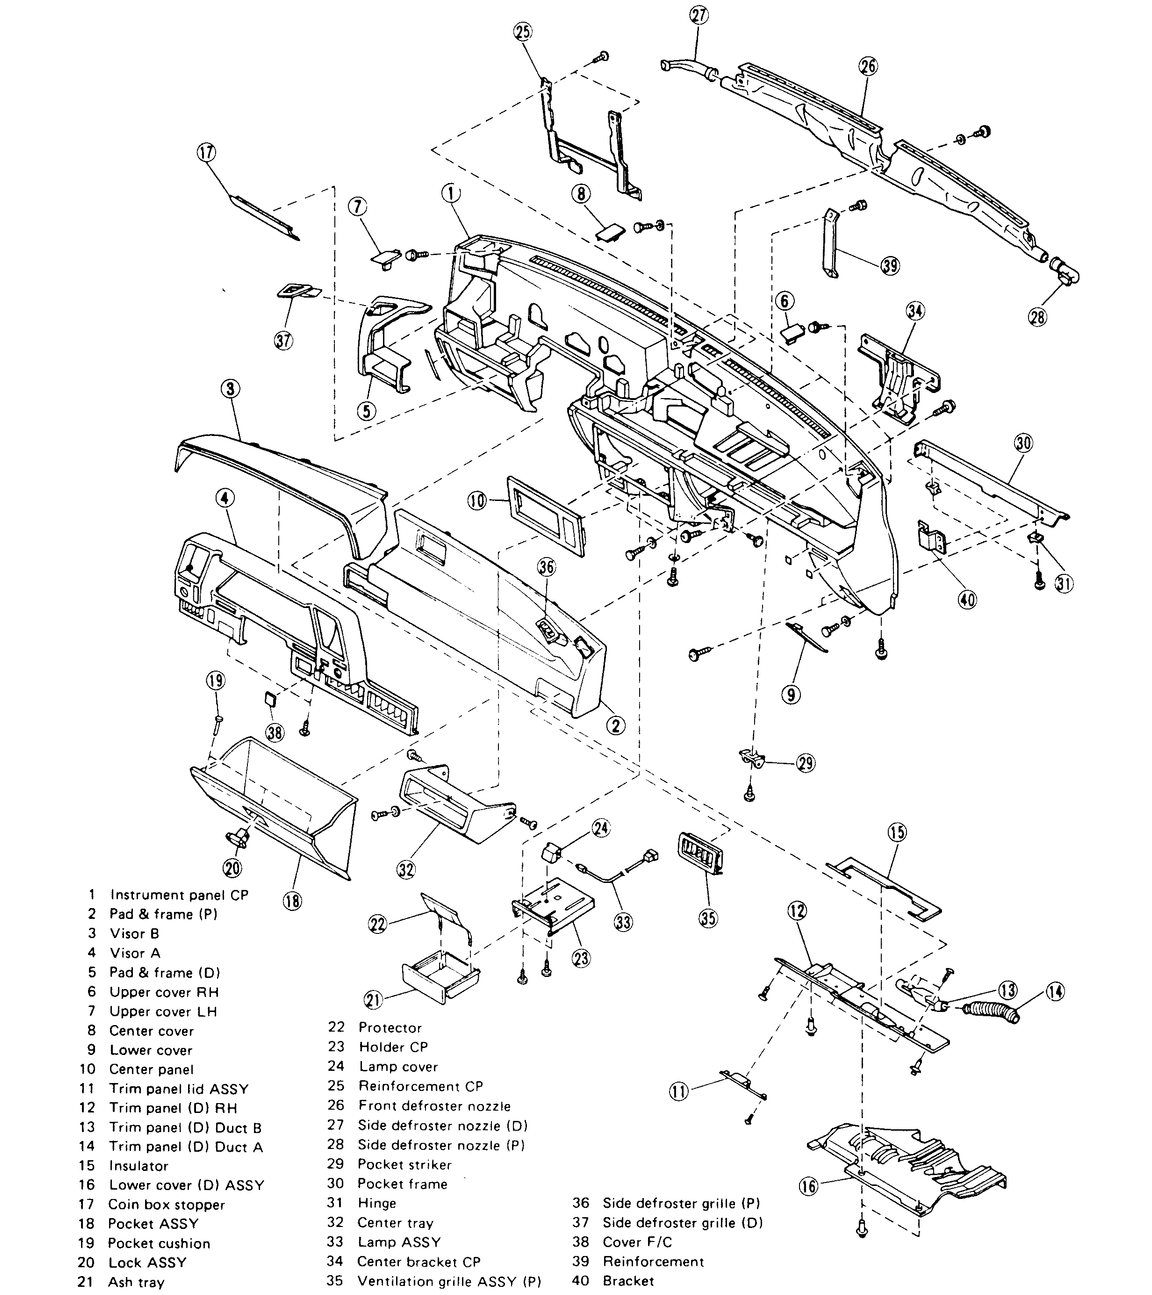
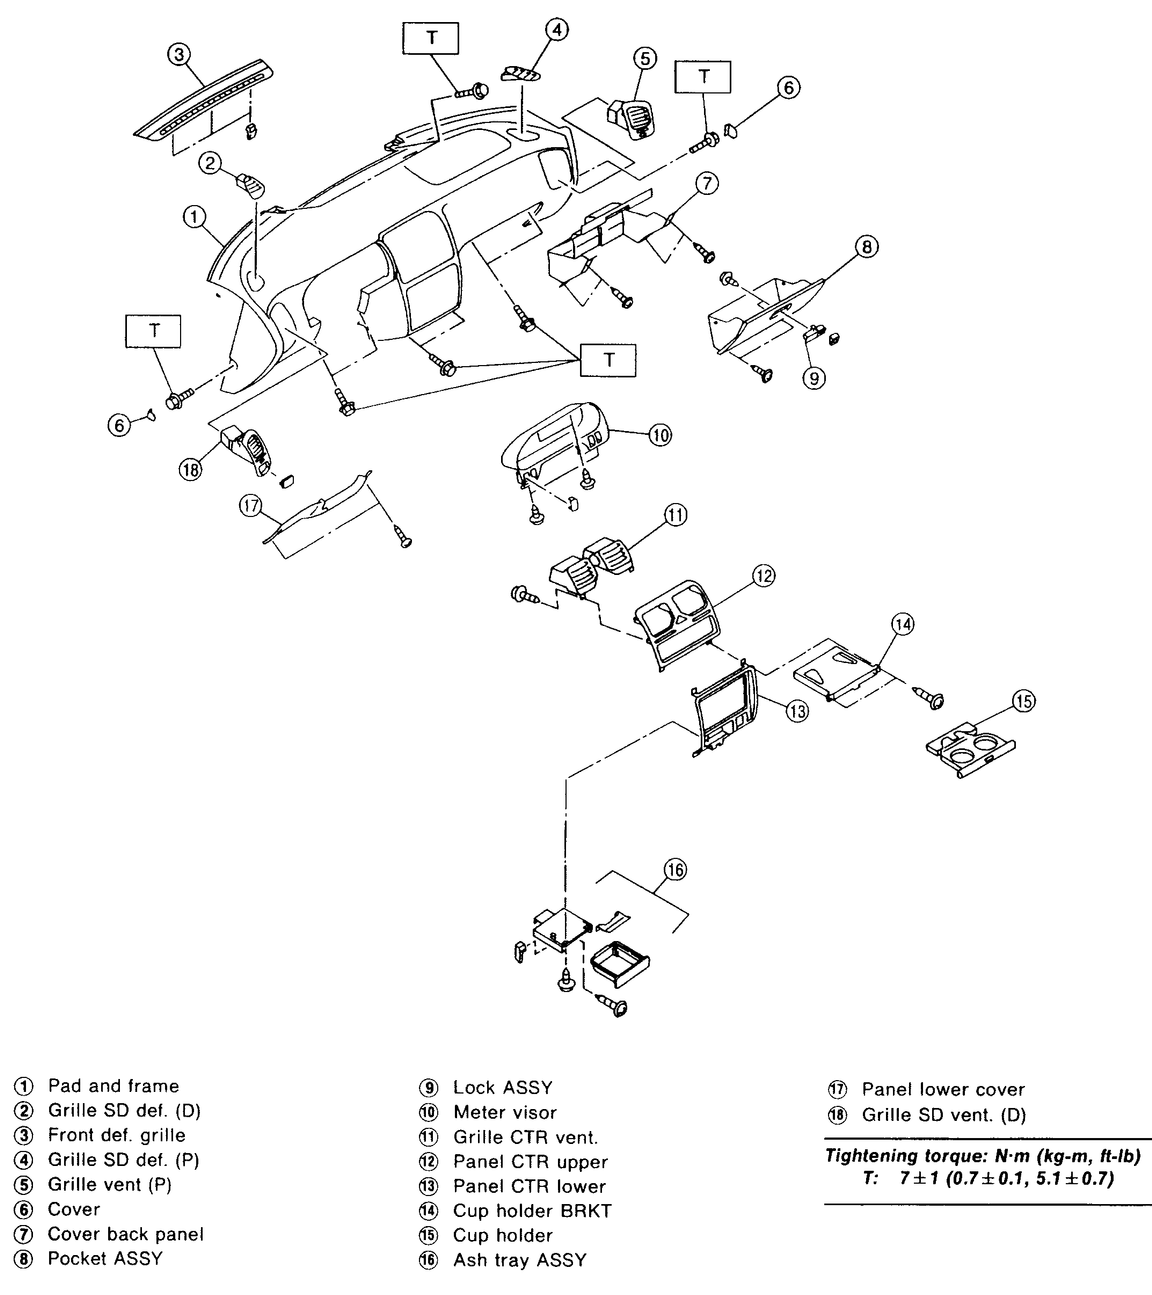
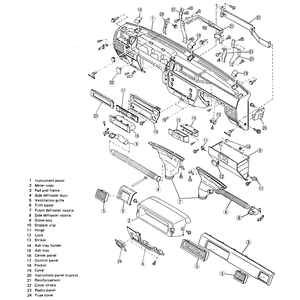
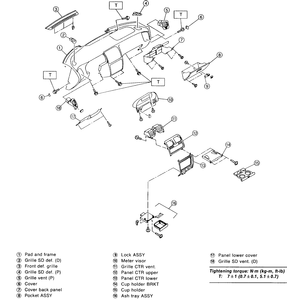
| Fig. 3: Exploded view of the instrument panel — Loyale
|
- Disconnect the negative battery cable.
- Remove the lower trim panel on the driver's side (underneath steering column).
The panel is held in place by 3 screws and trim clips.
- Remove the bolts retaining the main fuse box assembly, allow the assembly
to hang by the wires.
- Remove the lower steering column cover and disconnect the ventilation duct
from under the instrument panel.
- Disconnect the cable from the air vent in the driver's side kick panel where
it attaches to the control lever in the instrument panel.
- Disconnect the temperature control cables at the heater unit.
- Disconnect the vacuum lines at the heater case.
- Disconnect the wiring harnesses on the driver's side.
- Extract the instrument cluster an disconnect the speedometer cable.
- Remove the steering wheel assembly.
- Remove the center tray and console from between the seats.
- Remove the lower trim panel from the passenger's side. Remove the glove
box assembly.
- Disconnect the wiring harness connectors on the passenger's side.
- Remove the instrument panel retaining bolt covers from the panel. They can
be pried gently upward.
- Remove the instrument panel bolts in the following places; 2 bolts at the
lower ends of the instrument panel, 2 bolts at the lower center of the panel,
2 bolts at the upper ends of the panel and 2 bolts at the upper center of
the panel.
NOTE: When removing the instrument panel, check that all
wiring and cables are disconnected before pulling it completely away from
the firewall.
- With the help of an assistant, lift the panel and remove it from the vehicle.
Use care not to damage the panel or the interior trim when removing it.
- Installation is the reverse of removal. With the help of an assistant, install
the instrument panel into position at the firewall.
NOTE: Be sure that no wires are caught between the panel
and its mounting. Make sure that the panel is on top of the weatherstrip
along the windshield and the strip is not folded along the windshield.
- Connect the negative battery cable and check the operation of all electrical
components.
NOTE: When checking electrical components, if any of the
fuses should blow, check that there are no wires pinched by the instrument
panel and correct it if there are.
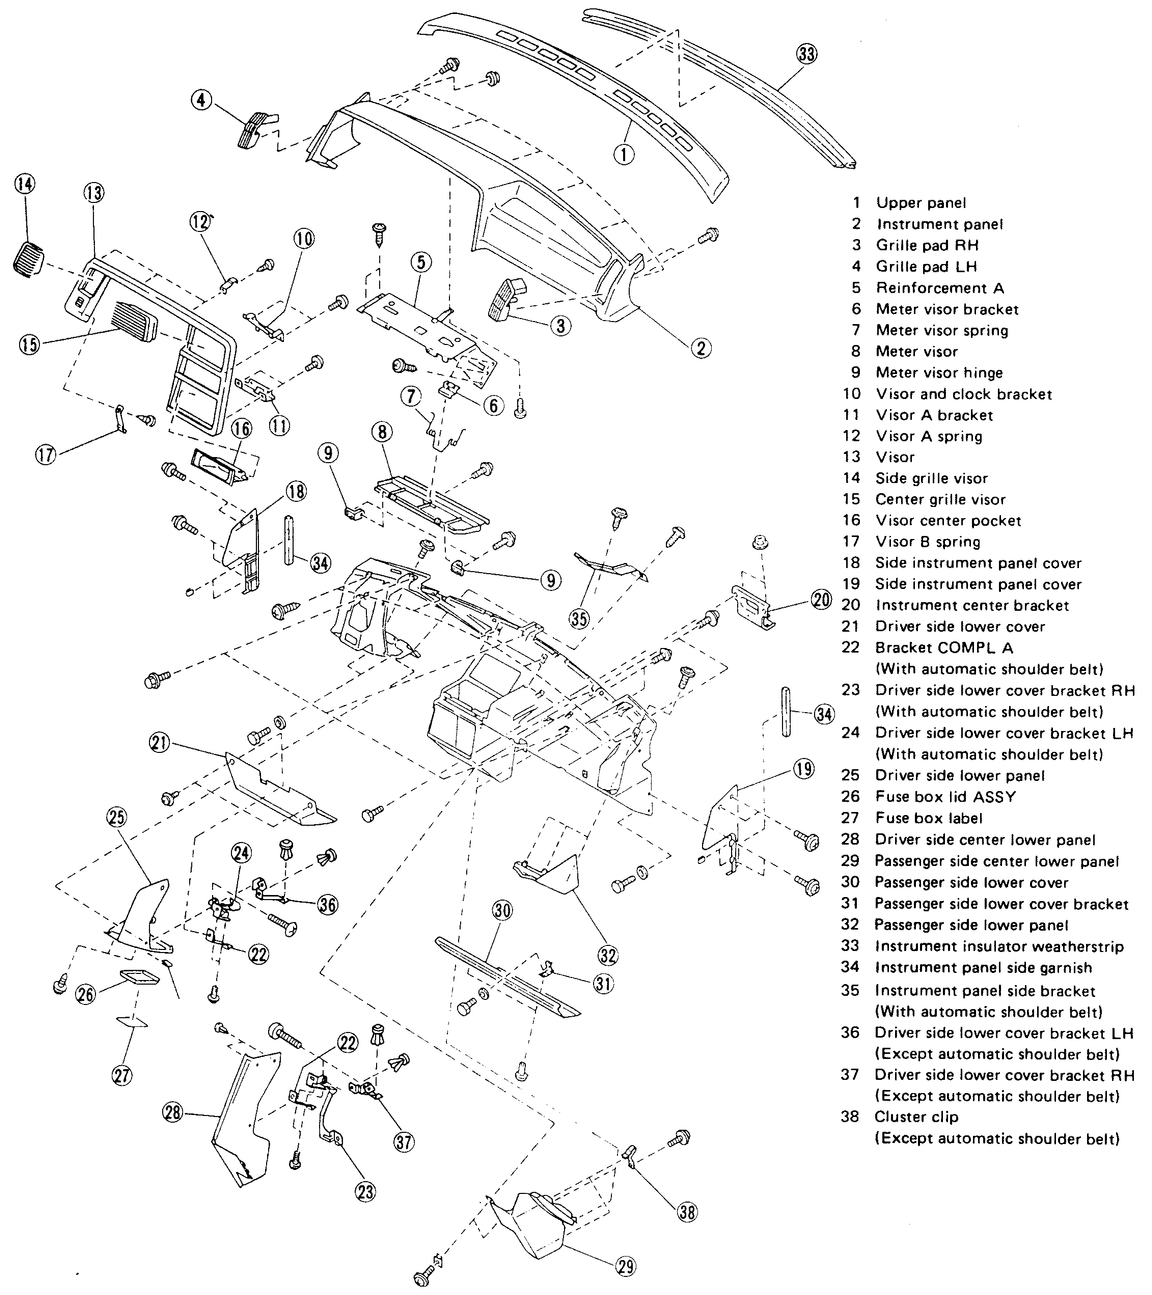
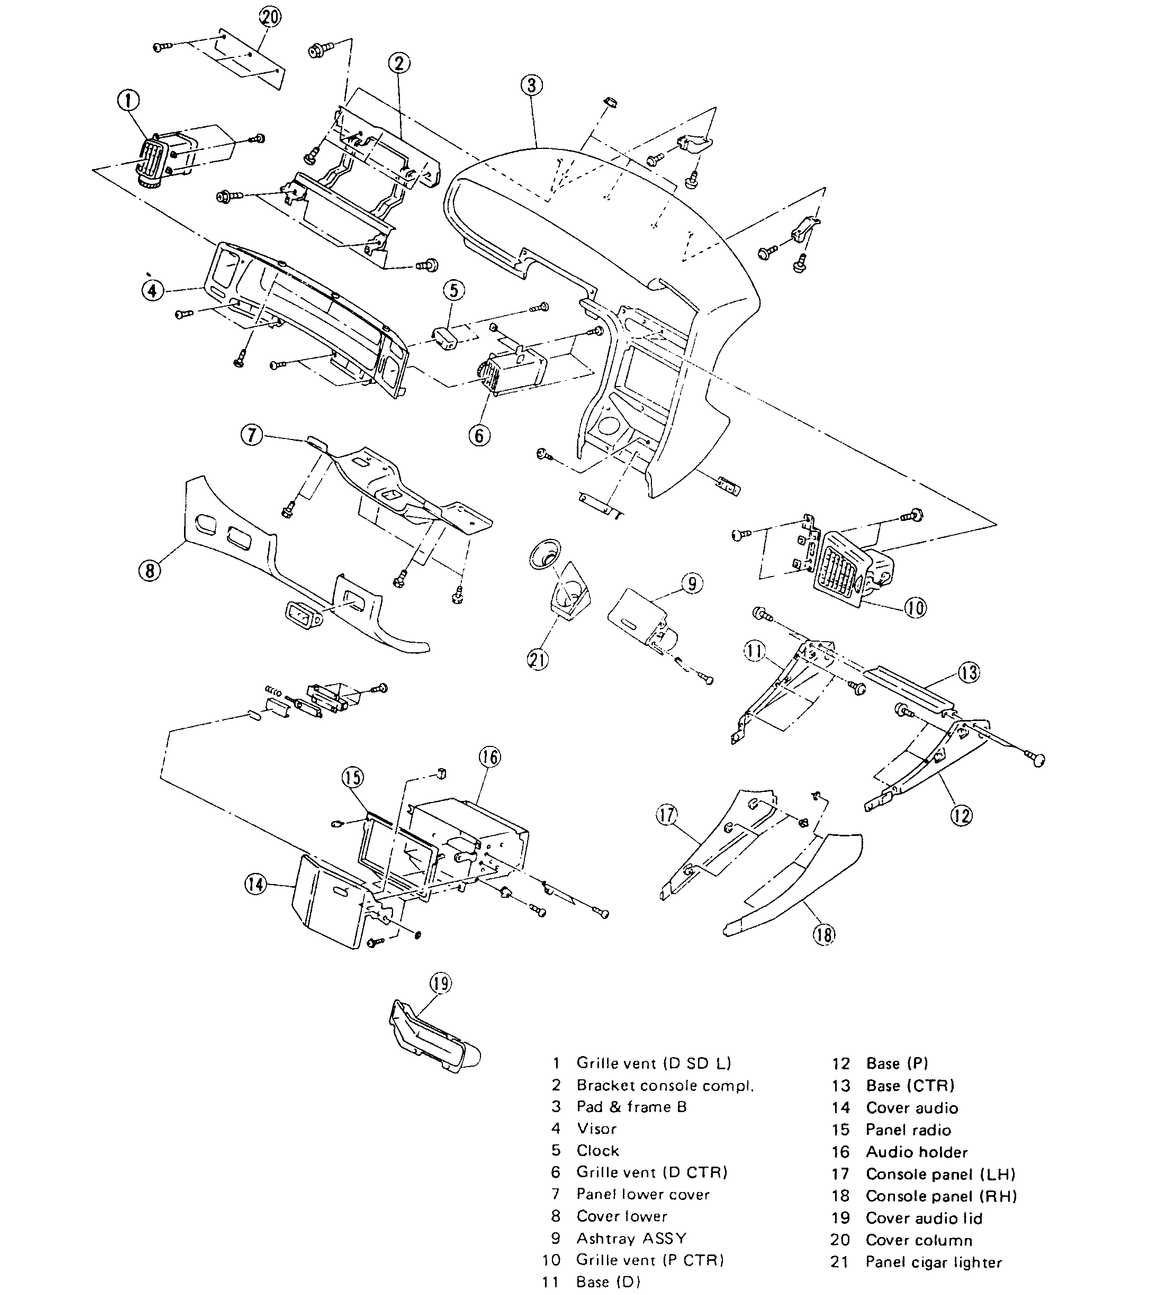
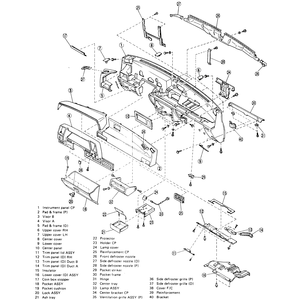
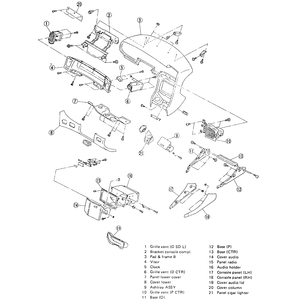
| Fig. 4: Exploded view of the instrument panel — XT
|
NOTE: When removing the instrument panel on the XT models,
the steering shaft and column assembly are removed with the control wings as
an assembly.
- Disconnect the negative battery cable.
- Remove the steering wheel.
- Remove the lower trim panel from the driver's side.
- Remove the ventilation duct from the driver's side, it can be pulled out
by hand.
- Open the fuse box lid and remove the screws that retain the fuse box. Push
the fuse box back and allow it to hang by the wires.
- Remove the lower cover on the passenger's side. Remove the glove box door
assembly.
- Remove the trim panel from the top of the instrument panel by prying it
gently at both ends and in the middle. You will have to pull it upward with
your hands to release the clips, be careful not to bend or break it.
- Remove the center console assembly. Be sure to remove the control knobs
for the ventilation controls.
- Remove the radio assembly.
- Disconnect the steering shaft coupler at the floor. Remove the steering
column covers. Remove the column-to-instrument panel support bolts and remove
the column, control wings and shaft as an assembly.
- Disconnect the wiring harnesses on the drivers and passenger's side.
- Remove the 8 bolts that retain the instrument panel. With the help of an
assistant, lift and remove the instrument panel.
NOTE: When removing the instrument panel, check that all
wiring and cables are disconnected before pulling it completely away from
the firewall.
- With the help of an assistant, install the panel into position.
NOTE: Be sure that no wires are caught between the panel
and its mounting. Make sure that the panel is on top of the weatherstrip
along the windshield and the strip is not folded along the windshield.
- Reconnect all electrical harnesses on the drivers and passenger's side of
the vehicle. Install the remainder of the components in the reverse of removal.
Tighten each component to specifications.
- Connect the negative battery cable and check the operation of all electrical
accessories.
NOTE: When checking electrical components, if any of the
fuses should blow, check that there are no wires pinched by the instrument
panel and correct it if there are.
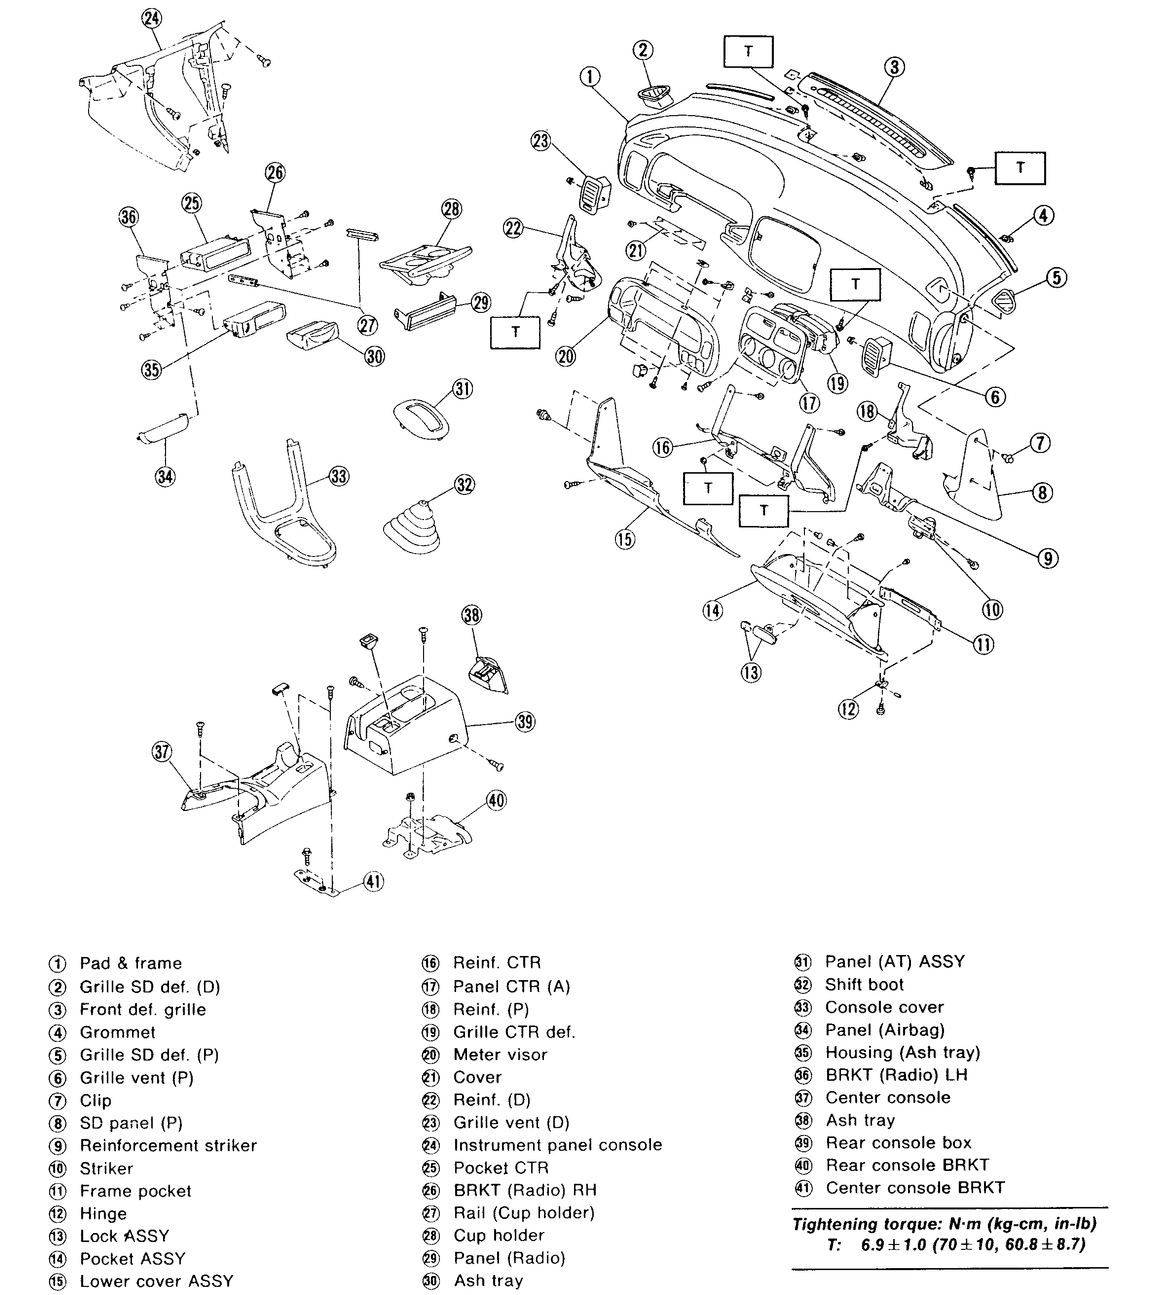
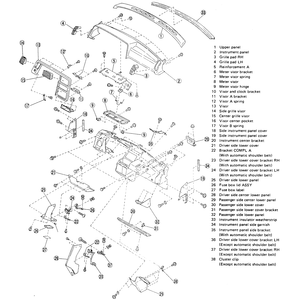
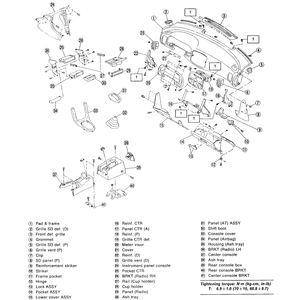
| Fig. 5: Exploded view of the instrument panel — 1990–94
Legacy
|
| Fig. 6: Exploded view of the instrument panel — 1995–96
Legacy
|
CAUTION
Properly disarm the air bag on vehicles equipped with the SRS system. Failure
to do so can cause serious injury. The procedure can be found in Section 6 of
this manual under the heading "Supplemental Restraint System''.
- Properly disarm the air bag system. Disconnect the negative battery cable.
- Remove the center console retaining screws and remove the center console
assembly.
- Remove the instrument panel retaining bolt covers by prying them from the
panel.
- Remove the lower part of the front A pillar trim. Remove the instrument
panel under covers from the drivers and passenger's sides.
- Remove the hood release cable from the hood release lever.
- Disconnect the wiring harness connectors under the instrument panel.
- Remove the instrument cluster assembly. Remove the glove box assembly
- Disconnect the ventilation control cables and electrical connectors at the
heater unit. Disconnect the vacuum line at the blower housing.
- Disconnect the radio antenna feeder wire. Disconnect the main harness connector
at the fuse box.
- Remove the lower steering column covers. Remove the steering column retaining
bolts and allow the column to hang down.
- Remove the instrument panel retaining bolts.
NOTE: When removing the instrument panel, check that all
wiring and cables are disconnected before pulling it completely away from
the firewall.
- With the help of an assistant, lift and remove the instrument panel from
the vehicle.
- Installation is the reverse of removal. Secure all components. Connect the
negative battery cable and check the operation of all electrical accessories.
NOTE: When checking electrical components, if any of the
fuses should blow, check that there are no wires pinched by the instrument
panel and correct it if there are.
| Fig. 7: Exploded view of the instrument panel — 1992
SVX shown
|
CAUTION
Properly disarm the air bag on vehicles equipped with the SRS system. Failure
to do so can cause serious injury. The procedure can be found in Section 6 of
this manual under the heading "Supplemental Restraint System''.
- Properly disarm the air bag system. Disconnect the negative battery cable.
- Remove the center console assembly retaining screws and remove the center
console.
- Remove the front A pillar upper trim pieces.
- Remove the radio grounding wire, which is screwed to the floor just behind
the shifter assembly.
- Remove the power mirror switch and remove the bolt located behind it.
- Remove the lower driver's side instrument panel cover by removing the 6
clips and disconnecting the 3 connectors.
- Remove the instrument cluster lower cover by removing the retaining bolts.
- Disconnect the air bag assembly connector (YELLOW coated wires) at the bottom
of the steering column.
- Remove the lower steering column cover. Remove the steering column-to-bracket
bolts and lower the column.
- Remove the small bolt caps from both ends of the instrument panel and remove
the bolts.
- Remove the 2 sets of instrument panel switches by pulling them from their
mountings. Disconnect the electrical leads from the switches.
- Remove the instrument cluster visor assembly and remove the instrument cluster.
- Remove the 4 bolts from behind where the instrument cluster was. Remove
the 5 bolts from inside the glove box.
- Disconnect the main harness connectors under the driver's side (6 connectors).
Disconnect the 2 radio antenna leads.
NOTE: When removing the instrument panel, check that all
wiring and cables are disconnected before pulling it completely away from
the firewall.
- With the help of an assistant, remove the instrument panel by pulling it
sharply forward, this will release the retaining pins from the top of the
panel. Remove the panel from the vehicle.
- With the help of an assistant, install the panel into position in the vehicle.
Align the pins at the top of the panel, with the grommets in the firewall
and push the panel into position. Install the 4 screws in the instrument cluster
opening and the 5 screws in the glove box opening.
NOTE: Be sure that no wires are caught between the panel
and its mounting. Make sure that the panel is on top of the weatherstrip
along the windshield and the strip is not folded along the windshield.
- Connect the main wiring harness connectors. Connect the antenna leads. The
remainder of installation is the reverse of removal. Tighten each component
to specifications.
- Connect the negative battery cable and check the operation of all electrical
accessories.
NOTE: When checking electrical components, if any of the
fuses should blow, check that there are no wires pinched by the instrument
panel and correct it if there are.
| Fig. 8: Exploded view of the instrument panel and center
console — Impreza
|
WARNING
When removing the instrument panel on air bag equipped models, use care to avoid
damaging the air bag system wiring harness, which is routed near the combination
meter. All air bag wiring and connectors are colored yellow.
CAUTION
Properly disarm the air bag on vehicles equipped with the SRS system. Failure
to do so can cause serious injury. The procedure can be found in Section 6 of
this manual under the heading "Supplemental Restraint System''.
- Properly disarm the air bag systems and disconnect the negative battery
cable.
- Remove the rear console box.
- Pull the cup holder.
- Turn over the shift lever boot (manual transaxle models) or remove select
lever cover (automatic transaxle models).
- Remove the console cover.
- Remove the audio assembly and disconnect the antenna cable and connectors.
- Remove the lower cover and then disconnect the seat belt timer connector.
- Remove the glove box.
- Remove the instrument panel console.
- Remove the two bolts and lower the steering column.
- Remove the column cover.
- Remove the hood opening lever.
- Set the temperature control switch to MAX. COLD, and mode selector switch
to the defroster position.
- Disconnect both the temperature control cable and the mode selector cable
from the link.
NOTE: Do not move the switch and link when installing.
- Tag or match mark the wiring connectors, then disconnect by holding the
connectors and not the wiring.
- Remove the six instrument panel retaining bolts and nuts.
- Remove the front defroster grille and two bolts.
- Carefully remove the instrument panel from the body and then disconnect
the speedometer cable from the back of the combination meter.
- With the help of an assistant, install the panel into position in the vehicle.
Align the three pins at the top of the panel, with the grommets in the firewall
and push the panel into position.
NOTE: Be sure that no wires are caught between the panel
and its mounting.
- The remainder of installation is the reverse of removal. Tighten each component
to specifications.