- Before servicing the vehicle, refer to the precautions
in the beginning of this section.
- On automatic transmission vehicles, drain the automatic
transmission fluid and the front differential.
-
Remove or disconnect the following:
- Negative battery cable
- Air intake and chamber, then the chamber stays
- Air cleaner case stay
- Front and rear Oxygen (O2S) sensor connectors,
if equipped
- Transmission harness connector, if equipped with
an automatic transmission
- Transmission ground terminal
- Neutral position switch connector, if equipped
with a manual transmission
- Backup light switch connector, if equipped with
a manual transmission
- 2 Vehicle Speed (VSS) sensor connectors
- Starter
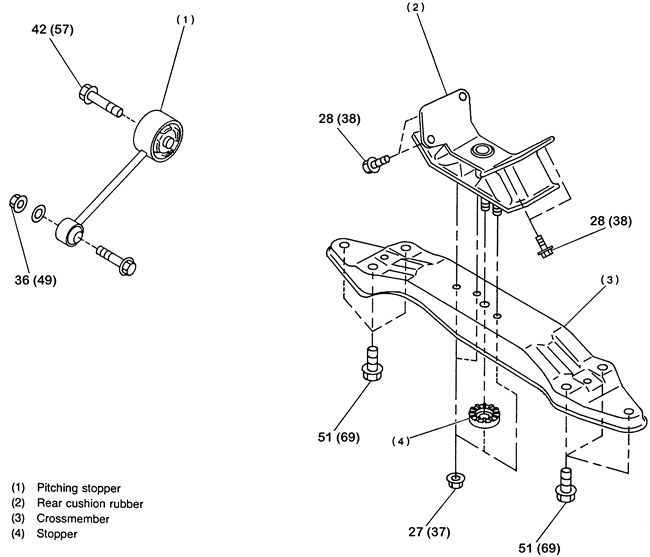
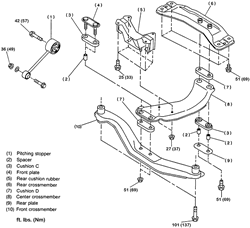
- Pitching stopper
- On automatic transmission vehicles, remove the timing
hole inspection plug. Matchmark the torque converter-to-driveplate and
remove the 4 bolts which hold torque converter to driveplate.
-
Remove or disconnect the following:
- Automatic transmission fluid dipstick and tube
- Clutch slave cylinder, on manual transmission
vehicles
- Install Engine Support Assembly ST 41099AA020. (Also
available as part no. 927670000).
-
Remove or disconnect the following:
- Bolt securing the right upper side of the transmission
to the engine
- Engine undercover
- Front Y-pipe
- Disconnect connector from rear O2S sensor
-
Remove or disconnect the following:
- Center exhaust pipe from rear pipe and hanger
bolt
- Rear exhaust pipe and heat shield cover
- Hanger bracket from the right side of the transmission
- Transmission cooler lines
- Rear driveshaft, matchmark for reassembly
- Center bearing bracket
NOTE: Plug the opening at the rear of the extension
housing to prevent oil from flowing out.
- Shifter stay and rod from the transmission, on manual
transmission
- Gear shift cable from the transmission select lever,
on automatic transmission
- Swaybar from the transverse link
- Parking brake cable bracket from the transverse link
and bolt holding the transverse link to the crossmember on each side,
lower the transverse link
- Lower ball joint from knuckle
-
Spring pin and separate the halfshaft from the transmission on each
side
NOTE: Use a small punch to remove the spring pin.
Discard old spring pin and always install a new pin.
- Disconnect the halfshaft from transmission on each
side. Be sure to remove the axle shaft from the transmission by pushing
the rear of the tire outward.
- Remove the engine-to-transmission mounting nuts
-
Support the transmission with a jack.
NOTE: Do not place jack under the transmission oil
pan, otherwise the oil pan may be damaged.
-
Remove or disconnect the following:
- Rear transmission crossmember
- Transmission
To install:
-
Install or connect the following:
- Special tool 498277200 to torque converter clutch
case
- Transmission to the engine
- Transmission crossmember. Torque the front nuts/bolts
to 51 ft. lbs. (69 Nm) and the rear nuts to 101 ft. lbs. (137 Nm), on
manual transmissions
-
Transmission crossmember. Torque the inner nuts/bolts to 25 ft.
lbs. (34 Nm) and the rear nuts to 51 ft. lbs. (69 Nm), on automatic transmissions
| Fig. 1: Exploded view of the manual transmission
mounting
|
| Fig. 2: Exploded view of the automatic transmission
mounting

|
- Remove the transmission jack.
-
Install or connect the following:
- Transmission-to-engine mounting nuts. Torque
the nuts/bolts to 37 ft. lbs. (50 Nm).
- Torque converter-to-driveplate bolts on automatic
transmission vehicles. Torque the bolts to 18 ft. lbs. (25 Nm).
- Clutch slave cylinder on manual transmission
vehicles. Torque the mounting bolts to 27 ft. lbs. (37 Nm).
- Remove special tool 927670000.
-
Install or connect the following:
- Pitching stopper
- Halfshaft to transmission and spring pin into
place
NOTE: Always use new spring pin. Be sure to align
the axle shaft and shaft from the transmission at chamfered holes and
install shaft splines correctly.
- Lower ball joint to knuckle
- Sway bar to the crossmember. Torque the clamp
bolts to 18 ft. lbs. (25 Nm).
- Shift control rod, shifter stay to the transmission
and the spring, on manual transmission vehicles
- Gear shift cable to the select lever, on automatic
transmission vehicles
- Fluid cooler lines
- Driveshaft. Tighten the bolts to 23 ft. lbs.
(31 Nm).
- Center bearing bracket. Torque the bolt to 38
ft. lbs. (52 Nm).
- Heat shield cover, if removed
- Center exhaust pipe from rear pipe and hanger
bolt
- Rear exhaust pipe and heat shield cover
- Hanger bracket from the right side of the transmission
- Y-pipe with new gaskets and nuts
- Rear O2S sensor connector
- Automatic transmission fluid dipstick tube
- Transmission connector bracket
- Starter. Torque the mounting bolts to 37 ft.
lbs. (50 Nm).
- Front and rear O2S sensor connectors
- Transmission harness connector, on automatic
transmission vehicles
- Transmission ground terminal
- Neutral position switch connector, on manual
transmission vehicles
- Backup light switch connector, on manual transmission
vehicles
- 2 VSS connectors
- Air intake and chamber, and the camber stays
- Negative battery cable
- On automatic transmission vehicles, fill the automatic
transmission fluid with Dexron® II or III or equivalent.
- On manual transmission vehicles, check and fill the
transmission with 75W-90 gear oil.
- Road test the vehicle.