To Remove:
CAUTION
If external force is applied from above when brake booster is placed in this position, the resin portion as indicated by "P", may be damaged.
- Before servicing the vehicle, refer to the precautions at the beginning of this section.
- Remove or disconnect the following:
- Brake fluid level indicator connector
- Lines from master cylinder
- Master cylinder
- Vacuum hose from brake booster
- Snap pin and clevis pin
- Four brake booster installing nuts
- Brake booster
CAUTION
Be careful not to drop brake booster. Brake booster should be discarded if it has been dropped. Use special care when handling operating rod. If excessive force is applied to operating rod, sufficient to cause a change in the angle in excess of ±3°, it may result in damage to the power piston cylinder. Use care when placing brake booster on the floor.
Do not change the push rod length. If it has been changed, reset the projected length to the standard length: without VDC 10mm; with VDC 1.8mm
To Install:
- Install or connect the following:
- Brake booster in position
- Operating rod to brake pedal with clevis pin and snap pin
- Vacuum hose to brake booster
- Master cylinder onto brake booster
- Brake lines to master cylinder
- Brake fluid level indicator connector
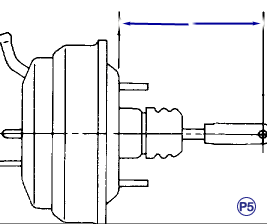
- Adjust operating rod of brake booster
- Specification: 145.3 mm (5.72 inch)
- Measure the clearance between threaded end of stop light switch and stopper and adjust it by adjusting position of stop light switch
- Stop light switch clearance: 0.3 mm (0.012 inch)
CAUTION
Be careful not to rotate stop light switch.
- Apply grease to operating rod connecting pin to prevent it from wearing.
- Bleed air from brake system.
- Conduct road tests to ensure brakes do not drag.