DTC P083F
Precautions: Precautions for Diagnosing Trouble · Precautions for Servicing ENG A-STOP System · Precautions for Replacing ENG A-STOP Control Module · Precautions for Control Systems · General safety (00)
DTC Detecting Condition and Trouble Area
| DTC detecting condition | Trouble area |
|---|---|
|
P083F: Clutch Pedal Switch “A” / “B” Correlation This DTC is detected if all of the following conditions are met.
•ON signal of CPP No.1 switch is input for specified time continuously.
•OFF signal of CPP No.2 switch is input for specified time continuously. |
•CPP No.1 switch circuit / connector
•CPP No.1 switch •CPP No.2 switch circuit / connector •CPP No.2 switch •ENG A-STOP control module |
Circuit Diagram
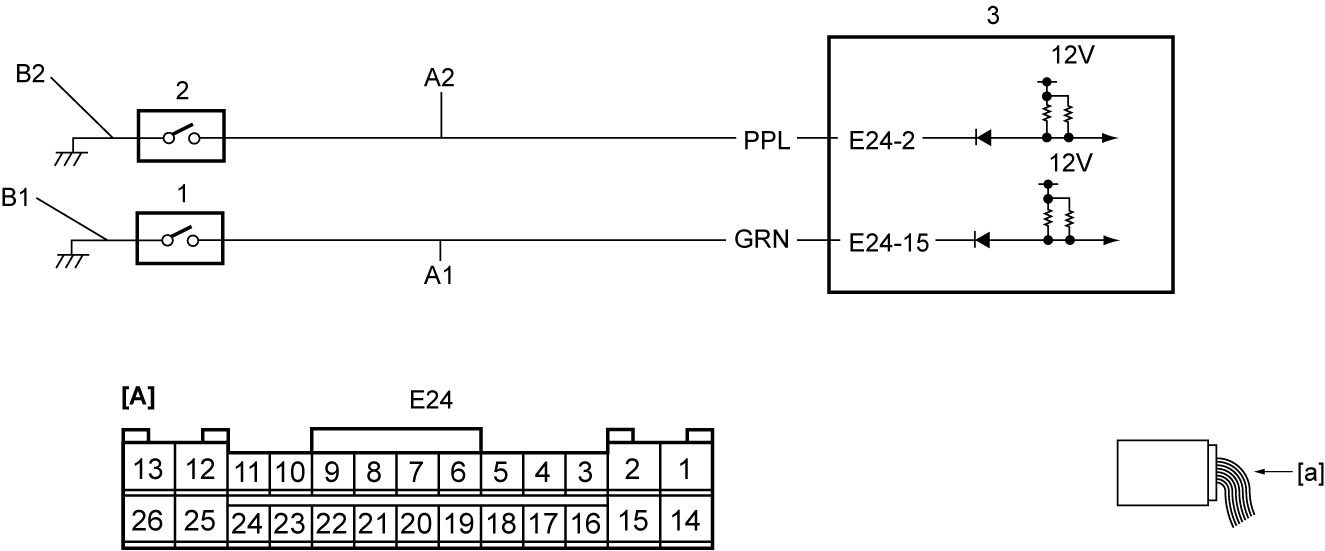
| [A]: | ENG A-STOP control module connector (View: [a]) | B1: | CPP No.1 switch ground circuit | 2. | CPP No.2 switch |
| A1: | CPP No.1 switch signal circuit | B2: | CPP No.2 switch ground circuit | 3. | ENG A-STOP control module |
| A2: | CPP No.2 switch signal circuit | 1. | CPP No.1 switch |
DTC Confirmation Procedure
1)Set ignition “ON”.
2)Depress clutch pedal fully for 1 second or more.
3)Release clutch pedal for 1 second or more.
DTC Troubleshooting
| Step | Action | Yes | No |
|---|---|---|---|
| 1 |
Parameter check
1)Connect SUZUKI scan tool to DLC when ignition is “OFF”.
2)Set ignition “ON”.
3)Check “Half Clutch Switch”, “Clutch Switch” and “Clutch SW Condition” displayed on SUZUKI scan tool.

Is check result OK?
|
Check for intermittent trouble.
|
Go to Step 2.
|
| 2 |
CPP No.1 switch signal circuit check
1)Set ignition “OFF”.
2)Disconnect CPP No.1 switch and “E24” connectors.
3)Check for proper terminal connection to CPP No.1 switch and “E24” connectors.
4)If connections are OK, check the following points.
•Resistance of “A1” circuit: less than 1 Ω
•Resistance between “A1” circuit and ground: infinity •Resistance between “A1” circuit terminal and other terminal at CPP No.1 switch connector: infinity •Voltage of “A1” circuit: approx. 0 V (When ignition is “ON”) Is check result OK?
|
Go to Step 3.
|
Repair or replace defective wire harness.
|
| 3 |
CPP No.1 switch ground circuit check
1)Set ignition “OFF”.
2)Check that resistance between “B1” circuit and ground is less than 1 Ω.
Is check result OK?
|
Go to Step 4.
|
Repair or replace defective wire harness.
|
| 4 |
CPP No.2 switch signal circuit check
1)Disconnect CPP No.2 switch connector.
2)Check for proper terminal connection to CPP No.2 switch and “E24” connectors.
3)If connections are OK, check the following points.
•Resistance of “A2” circuit: less than 1 Ω
•Resistance between “A2” circuit and ground: infinity •Resistance between “A2” circuit terminal and other terminal at CPP No.2 switch connector: infinity •Voltage of “A2” circuit: approx. 0 V (When ignition is “ON”) Is check result OK?
|
Go to Step 5.
|
Repair or replace defective wire harness.
|
| 5 |
CPP No.2 switch ground circuit check
1)Set ignition “OFF”.
2)Check that resistance between “B2” circuit and ground is less than 1 Ω.
Is check result OK?
|
Go to Step 6.
|
Repair or replace defective wire harness.
|
| 6 |
CPP No.1 switch check
1)Check CPP No.1 switch.
Is check result OK?
|
Go to Step 7.
|
Replace CPP No.1 switch.
|
| 7 |
CPP No.2 switch check
1)Check CPP No.2 switch.
Is check result OK?
|
Replace ENG A-STOP control module and recheck for DTC.
|
Replace CPP No.2 switch.
|