Home › ENGINE ยท 2UZ-FE › ENGINE CONTROL SYSTEM › SFI SYSTEM

DTC    P1442    Stuck Close in Secondary Air Injection Vacuum Switching Valve Bank 1

DTC    P1445    Stuck Close in Secondary Air Injection Vacuum Switching Valve Bank 2

DTC    P2441    Secondary Air Injection System Switching Valve Stuck Close Bank1

for Preparation Click here


DESCRIPTION

Refer to DTC P0412 .

DTC No.
DTC Detection Condition
Trouble Area
P1442
No. 2 air switching valve (bank 1) stuck closed:
No pressure change (decrease) after the ECM sends an open No. 2 air switching valve (bank 1) signal.
(2 trip detection logic)
  1. VSV for air injection system circuit (bank 1)
  2. Vacuum hose (VSV for air injection system - No. 2 air switching valve)
  3. Air injector pipe (No. 2 air switching valve - exhaust manifold)
  4. No. 2 air switching valve (bank 1)
  5. VSV for air injection system (bank 1)
  6. ECM
P1445
No. 2 air switching valve (bank 2) stuck closed:
No pressure change (decrease) after the ECM sends an open No. 2 air switching valve (bank 2) signal.
(2 trip detection logic)
  1. VSV for air injection system circuit (Bank 2)
  2. Vacuum hose (VSV for air injection system - No. 2 air switching valve )
  3. Air injector pipe (No. 2 air switching valve - exhaust manifold)
  4. No. 2 air switching valve (bank 2)
  5. VSV for air injection system (bank 2)
  6. ECM
P2441
Air switching valve stuck closed:
The pressure sensor does not detect exhaust pulsation when system operates. (All of air switching valve ON)
This DTC means either of the following conditions is met.
  1. Electromagnetic air switching valve stuck closed.
  2. Both of "No. 2 air switching valve (bank 1)" and "No. 2 air switching valve (Bank 2)" are stuck closed.
    (2 trip detection logic)
  1. Vacuum hoses (Throttle body - VSVs for air injection system)
  2. Air switching valve
  3. Air injector pipe (No. 2 air switching valve - exhaust manifold)
  4. Air injection hose
  5. No. 2 air switching valve (bank 1 and/or 2)
  6. VSV for air injection system (bank 1 and/or 2)
  7. Air injection control driver
  8. Air injection control driver circuit
  9. ECM

MONITOR DESCRIPTION

Refer to DTC P1441, P1444 and P2440 .

MONITOR STRATEGY


Related DTCs
(Case 1) P1442 AIR VSV stuck close bank 1
(Case 2) P1445 AIR VSV stuck close bank 2
(Case 3) P2441 AIR valve stuck close
Required sensors/Components
AIR valve, AIR VSV bank 1, AIR VSV bank 2
Frequency of operation
Continuous
Duration
Within 60 seconds
MIL operation
2 driving cycles
Sequence operation
None

TYPICAL ENABLING CONDITIONS


The monitor will run whenever these DTCs are not present
P0010 - P0022 (VVT system)
P0031 - P0052 (A/F sensor heater)
P0100 - P0103 (MAF sensor)
P0110 - P0113 (IAT sensor)
P0115 - P0118 (ECT sensor)
P0120 - P0223, P2135 (TP sensor)
P0125 (Closed loop)
P0171, P0172 (Fuel trim)
P0300 - P0308 (Misfire)
P0327 - P0333 (Knock sensor)
P0335 (CKP sensor)
P0340 - P0346 (VVT sensor)
P0351 - P0358 (Ignitor)
P0455, P0456 (EVAP system)
P0450, P0453 (EVAP press sensor)
P0500 (VSS)
P2196, P2198 (A/F sensor - rationality)
P2430 - P2433 (AIR pressure sensor)
P2A00, P2A03 (A/F sensor - slow response)
All monitor running conditions
Atmospheric pressure
45 kPa (338 mmHg) or more
Battery voltage
11.5 V or more
Monitor sequence 1
AIR
In operation
AIR pump
ON
AIR valve (electric type)
ON
Either of the following conditions is met:
Condition 1 or 2
1. Both of the following conditions are met:
Condition (a) and (b)
(a) AIR valve (vacuum type) bank 1
ON
(b) AIR valve (vacuum type) bank 2
OFF
2. Both of the following conditions are met:
Condition (c) and (d)
(c) AIR valve (vacuum type) bank 1
OFF
(d) AIR valve (vacuum type) bank 2
ON
Monitor sequence 2
AIR valve (electric type)
ON
AIR valve (vacuum type) bank 1
ON
AIR valve (vacuum type) bank 2
ON
Idle
ON
Monitor sequence 3
AIR pump
ON
AIR valve (electric type)
ON
AIR valve (vacuum type) bank 1
ON
AIR valve (vacuum type) bank 2
ON
Engine RPM
Less than 3,750 rpm
Monitor sequence 4 (This sequence is run when AIR pressure is no change at monitor)
AIR
Not operating
AIR pump
ON
AIR valve (electric type)
ON
Either of the following conditions is met:
Condition 1 or 2
1. Both of the following conditions are met:
Condition (a) and (b)
(a) AIR valve (vacuum type) bank 1
ON
(b) AIR valve (vacuum type) bank 2
OFF
2. Both of the following conditions are met:
Condition (c) and (d)
(c) AIR valve (vacuum type) bank 1
OFF
(d) AIR valve (vacuum type) bank 2
ON
Engine RPM
Less than 3,750 rpm
Monitor sequence 5
AIR
Not operating
AIR pump
OFF
AIR valve (electric type)
OFF
AIR valve (vacuum type) bank 1
OFF
AIR valve (vacuum type) bank 2
OFF
Engine RPM
Less than 3,750 rpm
Monitor sequence 6
AIR status
Not operating
AIR pump
OFF
AIR valve (electric type)
ON
AIR valve (vacuum type) bank 1
OFF
AIR valve (vacuum type) bank 2
OFF
Engine RPM
Less than 3,750 rpm

TYPICAL MALFUNCTION THRESHOLDS


Case 1: 
Both of the following conditions are met:
Condition 1 and 2
1. One of the following conditions is met:
Condition (a), (b), (c) or (d)
(a) Both of the following conditions are met:
-
AIR pressure during monitor sequence 3
1 kPa (7.5 mmHg) or more and pulse is not operated
AIR pressure during monitor sequence 6
5 kPa (37.5 mmHg) or more and pulse is not operated
(b) Both of the following conditions are met:
-
AIR pressure during monitor sequence 3
1 kPa (7.5 mmHg) or more and pulse is not operated
AIR pressure during monitor sequence 6
Less than 5 kPa (37.5 mmHg) and pulse is not operated
(c) Both of the following conditions are met:
-
AIR pressure during monitor sequence 3
Less than 1 kPa (7.5 mmHg) and pulse is not operated
AIR pressure during monitor sequence 6
5 kPa (37.5 mmHg) or more and pulse is not operated
(d) Both of the following conditions are met:
-
AIR pressure during monitor sequence 3
Less than 1 kPa (7.5 mmHg) and pulse is not operated
AIR pressure during monitor sequence 6
Less than 5 kPa (37.5 mmHg) and pulse is not operated
2. One of the following conditions is met:
Condition (e), (f) or (g)
(e) AIR pressure during monitor sequence 1
(When AIR VSV bank 1 is open)
No change
(f) AIR pressure during monitor sequence 2
(When AIR VSV bank 1 is open)
No change
(g) AIR pressure during monitor sequence 4
(When AIR VSV bank 1 is open)
No pulse is generated

Case 2: 
Both of the following conditions are met:
Condition 1 and 2
1. One of the following conditions is met:
Condition (a), (b), (c) or (d)
(a) Both of the following conditions are met:
-
AIR pressure during monitor sequence 3
1 kPa (7.5 mmHg) or more and pulse is not operated
AIR pressure during monitor sequence 6
5 kPa (37.5 mmHg) or more and pulse is not operated
(b) Both of the following conditions are met:
-
AIR pressure during monitor sequence 3
1 kPa (7.5 mmHg) or more and pulse is not operated
AIR pressure during monitor sequence 6
Less than 5 kPa (37.5 mmHg) and pulse is not operated
(c) Both of the following conditions are met:
-
AIR pressure during monitor sequence 3
Less than 1 kPa (7.5 mmHg) and pulse is not operated
AIR pressure during monitor sequence 6
5 kPa (37.5 mmHg) or more and pulse is not operated
(d) Both of the following conditions are met:
-
AIR pressure during monitor sequence 3
Less than 1 kPa (7.5 mmHg) and pulse is not operated
AIR pressure during monitor sequence 6
Less than 5 kPa (37.5 mmHg) and pulse is not operated
2. One of the following conditions is met:
Condition (e), (f) or (g)
(e) AIR pressure during monitor sequence 1
(When AIR VSV bank 2 is open)
No change
(f) AIR pressure during monitor sequence 2
(When AIR VSV bank 2 is open)
No change
(g) AIR pressure during monitor sequence 4
(When AIR VSV bank 2 is open)
No pulse is generated

Case 3: 
AIR pressure during monitor sequence 3
1 kPa (7.5 mmHg) or more and pulse is not operated

MONITOR RESULT

Refer to Checking Monitor Status (Click here).
The test value and test limit information are described as shown in the following table. Check the monitor result and test values after performing the monitor drive pattern (refer to "Confirmation Monitor").
  1. MID (Monitor Identification Data) is assigned to each emissions-related component.
  2. TID (Test Identification Data) is assigned to each test value.
  3. Scaling is used to calculate the test value indicated on generic OBD II scan tools.

    Secondary air injection (AIR) system 
    MID
    TID
    Scaling
    Description of Test Value
    Minimum Test Limit
    Maximum Test Limit
    $71
    $E1
    Multiply by 0.01 (g/s)
    Test value of AIR amount insufficient
    Minimum test limit
    Maximum test limit
    $71
    $E2
    Multiply by 0.01 (kPa)
    Test value of AIR pump stuck ON
    Minimum test limit
    Maximum test limit
    $71
    $E9
    Multiply by 0.01 (kPa)
    Test value of AIR pump stuck OFF
    Minimum test limit
    Maximum test limit
    $71
    $E4
    Multiply by 0.01 (kPa)
    Test value of AIR control valve ON
    Minimum test limit
    Maximum test limit
    $71
    $E5
    Multiply by 0.01 (kPa)
    Test value of AIR control valve OFF
    Minimum test limit
    Maximum test limit
    $71
    $E6
    Multiply by 0.01 (kPa)
    Test value of AIR pressure change for AIR valve
    Minimum test limit
    Maximum test limit
    $71
    $E7
    Multiply by 0.01 (kPa)
    Test value of AIR pressure change for AIR VSV bank 1
    Minimum test limit
    Maximum test limit
    $71
    $E5
    Multiply by 0.01 (kPa)
    Test value of AIR pressure change for AIR VSV bank 2
    Minimum test limit
    Maximum test limit
    $71
    $E9
    Multiply by 0.01 (kPa)
    Test value of AIR pressure pulsation for AIR VSV when AIR pressure is low
    Minimum test limit
    Maximum test limit

WIRING DIAGRAM

Refer to DTC P0412 .

INSPECTION PROCEDURE

HINT:
Read freeze frame data using the intelligent tester. The ECM records vehicle and driving condition information as freeze frame data the moment a DTC is stored. When troubleshooting, freeze frame data can be helpful in determining whether the vehicle was running or stopped, whether the engine was warmed up or not, whether the air/fuel ratio was lean or rich, as well as other data recorded at the time of a malfunction.

1.CHECK ANY OTHER DTCS OUTPUT (IN ADDITION TO SECONDARY AIR INJECTION SYSTEM DTCS)
  1. Connect the intelligent tester to the DLC3 with CAN VIM.

  1. Turn the ignition switch ON and turn the tester ON.

  1. Enter the following menus: DIAGNOSIS / ENHANCED OBD II / DTC INFO / CURRENT CODES.

  1. Read DTCs.

    Result 
    Display (DTC Output)
    Proceed to
    "P1442 and/or P1445" and P2441
    A
    P1442 and/or P1445
    B
    "P1442 and/or P1445 and/or P2441" and other DTCs
    C

    HINT:
    If any DTCs other than P1441 and/or P1444 and P2440 are output, troubleshoot those DTCs first.


B
Go to step 5

C
GO TO DTC CHART
A


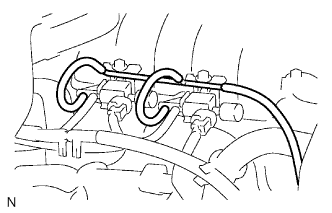
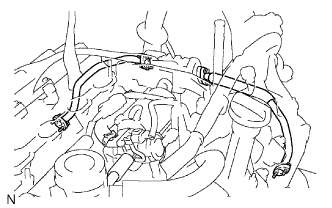
2.CHECK VACUUM HOSES (THROTTLE BODY - VSV FOR AIR INJECTION SYSTEM)


    A121722
  1. Check that the vacuum hoses between the throttle body and VSV for air injection system are securely connected.

    OK:
    The vacuum hoses are securely connected.

  1. Inspect the vacuum hoses for blockages and damage.

    OK:
    The vacuum hoses have no blockages and damage.


NG
REPAIR OR REPLACE VACUUM HOSES
OK


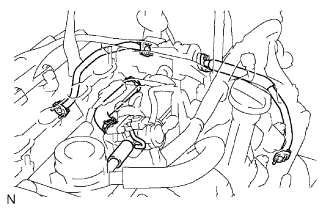
3.CHECK PIPES AND HOSES (CONNECTION OF AIR INJECTION SYSTEM)


    G032737E01
  1. Remove the intake manifold .

  1. Check all pipes and hoses of the air injection system.

    OK:
    All air injection pipes and hoses are securely connected.

  1. Check all pipes and hoses of the air injection system for blockage or damage.

    OK:
    All air injection pipes or hoses have no blockages or damage.


NG
REPAIR OR REPLACE AIR INJECTION SYSTEM PIPING AND HOSES
OK


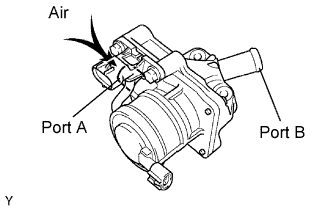
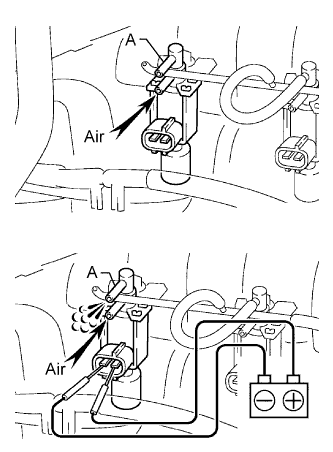
4.CHECK AIR SWITCHING VALVE (OPERATION)


    G032728E01
  1. Remove the intake manifold .

  1. Remove the Air Switching Valve (ASV).

  1. Blow air into port A and check that air is not discharged from port B.

    OK:
    Not discharged


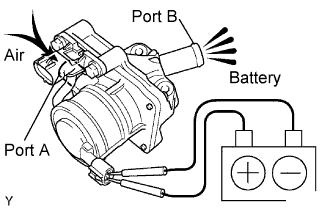
    G032729E02
  1. Apply battery positive voltage across the terminals.

  1. Blow air into port A and check that air is discharged from port B.

    OK:
    Discharged


NG
REPLACE AIR SWITCHING VALVE AND GO TO STEP 6
OK


5.CHECK NO. 2 AIR SWITCHING VALVE (OPERATION)


    A116419
  1. Start the engine and warm it up.

  1. Turn the ignition switch OFF.

  1. Connect the intelligent tester to the DLC3 with CAN VIM.

  1. Turn the ignition switch ON and push the intelligent tester main switch ON.

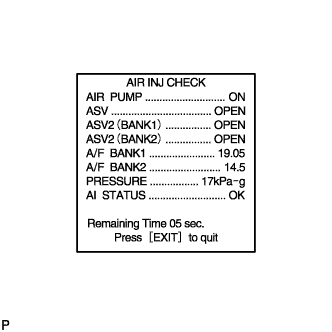
  1. Enter the following menus: DIAGNOSIS / ENHANCED OBD II / SYSTEM CHECK / AIR INJ CHECK / MANUAL / OPERATION 5 and 6.

    HINT:
    OPERATION 5: AP: ON; EASV: OPEN; ASV1: OPEN; ASV2: CLOSE
    OPERATION 6: AP: ON; EASV: OPEN; ASV1: CLOSE; ASV2: OPEN

    NOTICE:
    1. This test only allows technicians to operate the AIR system for 5 seconds. Furthermore, the test can be performed 4 times a trip. If the test is repeated, intervals of at least 30 seconds are required between tests.
      While the AIR system operation using the intelligent tester is prohibited, the tester displays the prohibition (WAIT or ERROR). If ERROR (AI STATUS NG) is displayed on the tester, stop the engine for 10 minutes and then try again.
    2. When performing the AIR INJ CHECK operation after the battery cable has been reconnected, wait for 7 minutes with the ignition switch turned ON or the engine running.
    3. Turn the ignition switch OFF when the AIR INJ CHECK operation finishes.

  1. Read values of the A/F BANK1 and BANK2 on the intelligent tester.

    Result:

    Air switching valve No. 2 operation
    Air fuel ratio
    Open
    18 or more
    Closed
    Approximately 14.5

    HINT:
    1. When the No. 2 ASV operates normally, the A/F value is 18 or more when the valve is open, and approximately 14.5 when the valve is closed.
    2. Perform the following procedures only on the bank of which the valve is not open.


NEXT


6.CHECK VSV (FOR AIR INJECTION SYSTEM)


    A121723E01
  1. Turn the ignition switch OFF.

  1. Disconnect the vacuum hoses from the VSV for the air injection system.

  1. Connect the intelligent tester to the DLC3 with CAN VIM.

  1. Start the engine and turn the tester ON.

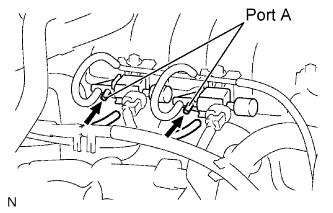
  1. When the air switching valve is operated using the intelligent tester, check that negative pressure from port A.

  1. Enter the following menus: DIAGNOSIS / ENHANCED OBD II / SYSTEM CHECK / AIR INJ CHECK / MANUAL / OPERATION 2.

    HINT:
    OPERATION 2: AP: ON; EASV: OPEN; ASV1: OPEN; ASV2: OPEN

    NOTICE:
    1. This test only allows technicians to operate the AIR system for 5 seconds. Furthermore, the test can be performed 4 times a trip. If the test is repeated, intervals of at least 30 seconds are required between tests.
      While the AIR system operation using the intelligent tester is prohibited, the tester displays the prohibition (WAIT or ERROR). If ERROR (AI STATUS NG) is displayed on the tester, stop the engine for 10 minutes and then try again.
    2. When performing the AIR INJ CHECK operation after the battery cable has been reconnected, wait for 7 minutes with the ignition switch turned ON or the engine running.
    3. Turn the ignition switch OFF when the AIR INJ CHECK operation finishes.

    OK:
    Negative pressure from port A

  1. Reconnect the vacuum hose.


NG
Go to step 10
OK


7.CHECK VACUUM HOSES (AIR SWITCHING VALVE - VSV FOR AIR INJECTION SYSTEM)


    A121724
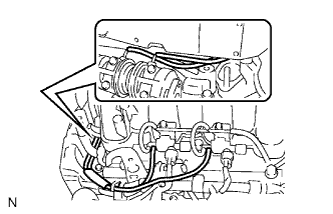
  1. Check that the vacuum hoses between the No. 2 air switching valve(s) and VSV for the air injection system are securely connected.

    OK:
    The vacuum hose(s) are securely connected.

  1. Check the vacuum hoses for blockages and damage.

    OK:
    The vacuum hoses have no blockages and damage.


NG
REPAIR OR REPLACE VACUUM HOSES
OK


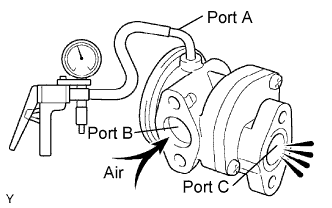
8.CHECK NO. 2 AIR SWITCHING VALVE (OPERATION)


    G032732E01
  1. Remove the No. 2 air switching valve.


    G032733E01
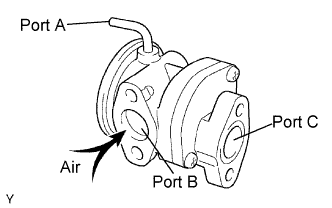
  1. Blow air into port B and check that air is not discharged from port C.

    OK:
    Not discharged from port C

  1. Apply vacuum 30 kPa (225 mmHg) to port A, blow air into port B and check that air is discharged from port C.

    OK:
    Discharged from port C


NG
REPLACE NO. 2 AIR SWITCHING VALVE
OK


9.CHECK AIR INJECTION PIPE (NO. 2 AIR SWITCHING VALVE - EXHAUST MANIFOLD)


    G032739E01
  1. Check that the air injection pipe between the No. 2 air switching valve(s) and exhaust manifold are securely connected.

    OK:
    The air injection pipe is securely connected.

  1. Check the air injection pipe for blockages and damage.

    OK:
    The air injection pipe has no blockages and damage.


NG
REPAIR OR REPLACE AIR INJECTION PIPE
OK

CHECK FOR INTERMITTENT PROBLEMS 

10.CHECK VSV (FOR AIR INJECTION SYSTEM)


    A138067E01
  1. Disconnect the 2 vacuum hoses.

  1. Disconnect the VSV for the air injection system connector.

  1. Blow air into port B. Check that air does not flow from port A.

    OK:
    Air does not flow from port A

  1. Apply battery positive voltage across the terminals. Then blow air into port B and check that air flows from port A.

    OK:
    Air flows from port A


NG
REPLACE VSV
OK

REPLACE ECM