 |
Install the rear quarter outside moulding sub-assembly with the 5 clips.
OUTSIDE MOULDING > INSTALLATION |
| 1. INSTALL REAR QUARTER OUTSIDE MOULDING |
| 2. INSTALL NO. 1 QUARTER PANEL MOULDING PAD |
Install a new No. 1 quarter panel moulding pad.
| 3. INSTALL NO. 4 OUTSIDE MOULDING CLIP |
| 4. INSTALL NO. 3 OUTSIDE MOULDING CLIP |
| 5. INSTALL REAR QUARTER OUTSIDE MOULDING SUB-ASSEMBLY |
|
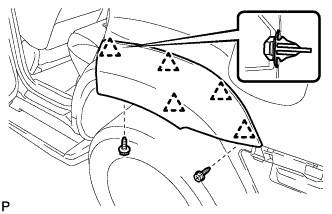
Install the rear quarter outside moulding sub-assembly with the 5 clips.
Install the 2 screws.
| 6. INSTALL REAR BUMPER ASSEMBLY |
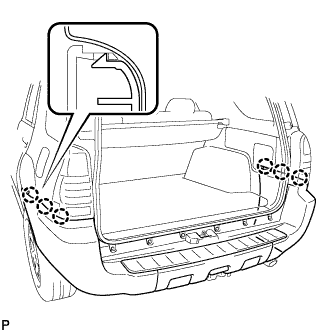 |
Install the rear bumper assembly with the 6 claws.
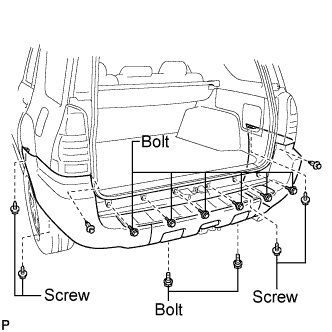 |
Install the 8 bolts and 4 screws.
Install the 2 clips.
| 7. INSTALL QUARTER PANEL MUDGUARD SUB-ASSEMBLY REAR RH |
| 8. INSTALL QUARTER PANEL MUDGUARD SUB-ASSEMBLY REAR LH |
| 9. INSTALL FRONT WHEEL OPENING OR ARCH MOULDING EXTENSION |
| 10. INSTALL BODY OUTSIDE MOULDING PAD |
Install a new body outside moulding pad.
| 11. INSTALL FRONT FENDER OUTSIDE MOULDING PAD |
Install a new front fender outside moulding pad.
| 12. INSTALL NO. 2 OUTSIDE MOULDING CLIP |
| 13. INSTALL NO. 1 OUTSIDE MOULDING CLIP |
| 14. INSTALL FRONT WHEEL OPENING EXTENSION SUB-ASSEMBLY |
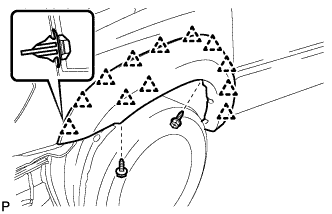 |
Install the front wheel opening extension sub-assembly with the 12 clips.
Install the 2 screws.
| 15. INSTALL FRONT BUMPER SIDE SUPPORT |
| 16. INSTALL FRONT BUMPER ASSEMBLY |
| 17. INSTALL CONNECT BATTERY NEGATIVE TERMINAL |
| 18. VEHICLE PREPARATION FOR FOG LIGHT AIM |
| 19. PREPARATION FOR FOG LIGHT AIMING |
| 20. INSPECT FOG LIGHT AIMING |
| 21. ADJUST FOG LIGHT AIMING |
| 22. PERFORM INITIALIZATION |
| 23. INSTALL ROCKER PANEL MOULDING FRONT |
| 24. INSTALL NO. 1 ROCKER PANEL MOULDING PROTECTOR |
Install a new No. 1 rocker panel moulding protector.
| 25. INSTALL NO. 2 OUTSIDE MOULDING CLIP |
| 26. INSTALL NO. 1 OUTSIDE MOULDING CLIP |
| 27. INSTALL ROCKER PANEL MOULDING SUB-ASSEMBLY |
| Item | Temperature |
| Vehicle Body | 40 to 60°C (104 to 140°F) |
| Moulding | 20 to 30°C (68 to 86°F) |
Clean the vehicle body surface.
Using a heat light, heat the vehicle body surface.
Remove the double-sided tape from the vehicle body.
Wipe off any tape adhesive residue with cleaner.
Clean the rocker panel moulding sub-assembly. (If reusing the rocker panel moulding sub-assembly.)
Using a heat light, heat the rocker panel moulding sub-assembly.
Remove the double-sided tape from the rocker panel moulding sub-assembly.
Wipe off any tape adhesive residue with cleaner.
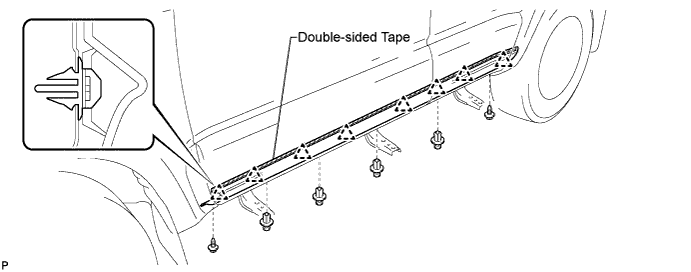
Apply new double-sided tape to the rocker panel moulding sub-assembly.
Install the rocker panel moulding sub-assembly.
Using a heat light, heat the vehicle body and rocker panel moulding sub-assembly.
Remove the peeling paper from the face of the rocker panel moulding sub-assembly.
Install the rocker panel moulding sub-assembly with the 8 clips.
Install the 2 screws and 4 clips.
| 28. INSTALL STEP SUB-ASSEMBLY |
with Step light:
Connect the step light wiring connector.
Install the step sub-assembly with the 6 bolts.
| 29. INSTALL FRONT BODY MUDGUARD |
| 30. INSTALL REAR DOOR OUTSIDE MOULDING |
| 31. INSTALL NO. 5 OUTSIDE MOULDING CLIP |
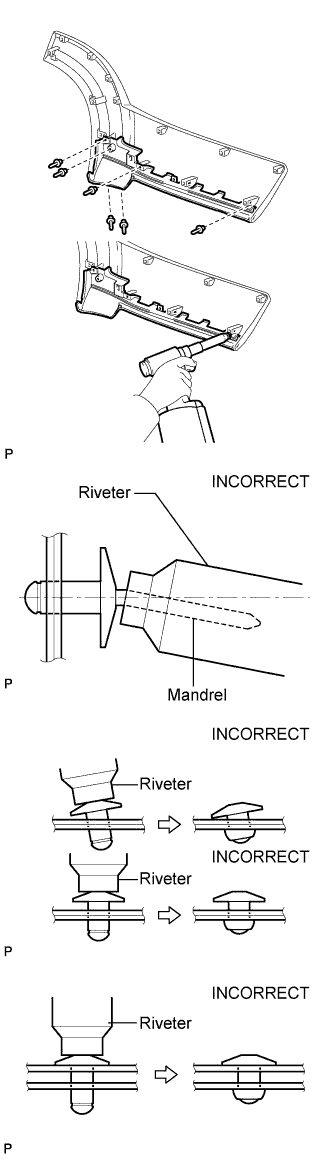 |
Using an air riveter or hand riveter with a nose piece, install the No. 5 outside moulding retainer with 6 new rivets.
| 32. INSTALL REAR DOOR OUTSIDE MOULDING PAD UPPER |
Install a new rear door outside moulding pad upper.
| 33. INSTALL NO. 1 REAR DOOR MOULDING PAD |
Install a new No. 1 rear door moulding pad.
| 34. INSTALL NO. 1 OUTSIDE MOULDING PAD |
Install a new No. 1 body outside moulding pad.
| 35. INSTALL WHEEL HOUSE SEAL FRONT |
Install a new wheel house seal front.
| 36. INSTALL NO. 4 OUTSIDE MOULDING CLIP |
| 37. INSTALL NO. 3 OUTSIDE MOULDING CLIP |
| 38. INSTALL REAR DOOR OUTSIDE MOULDING SUB-ASSEMBLY |
| Item | Temperature |
| Vehicle Body | 40 to 60°C (104 to 140°F) |
| Moulding | 20 to 30°C (68 to 86°F) |
Clean the vehicle body surface.
Using a heat light, heat the vehicle body surface.
Remove the double-sided tape from the vehicle body.
Wipe off any tape adhesive residue with cleaner.
Clean the rear door outside moulding sub-assembly. (If reusing the rear door outside moulding sub-assembly.)
Using a heat light, heat the rear door outside moulding sub-assembly.
Remove the double-sided tape from the rear door outside moulding sub-assembly.
Wipe off any tape adhesive residue with cleaner.
Apply new double-sided tape to the rear door outside moulding sub-assembly.
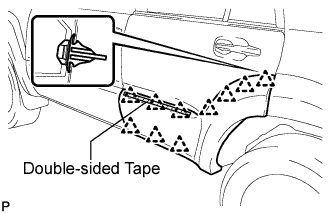 |
Install the rear door outside moulding sub-assembly.
Using a heat light, heat the vehicle body and rear door outside moulding sub-assembly.
Remove the peeling paper from the face of the rear door outside moulding sub-assembly.
Install the rear door outside moulding sub-assembly with the 10 clips.
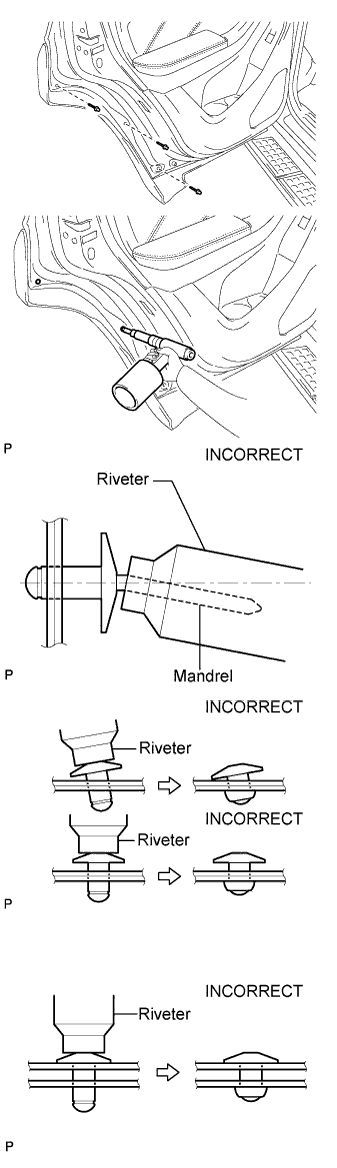 |
Using an air riveter or hand riveter with a nose piece, install 3 new rivets.
| 39. INSTALL FRONT DOOR OUTSIDE MOULDING |
| 40. INSTALL NO. 3 OUTSIDE MOULDING RETAINER |
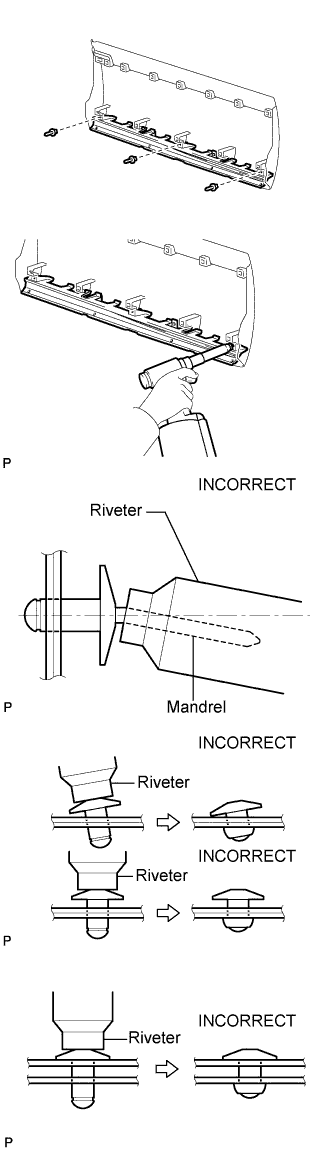 |
Using an air riveter or hand riveter with a nose piece, install the No. 3 outside moulding retainer with 3 new rivets.
| 41. INSTALL FRONT DOOR OUTSIDE MOULDING PAD UPPER |
Install a new front door outside moulding pad upper.
| 42. INSTALL NO. 4 OUTSIDE MOULDING CLIP |
| 43. INSTALL NO. 3 OUTSIDE MOULDING CLIP |
| 44. INSTALL FRONT DOOR OUTSIDE MOULDING SUB-ASSEMBLY |
| Item | Temperature |
| Vehicle Body | 40 to 60°C (104 to 140°F) |
| Moulding | 20 to 30°C (68 to 86°F) |
Clean the vehicle body surface.
Using a heat light, heat the vehicle body surface.
Remove the double-sided tape from the vehicle body.
Wipe off any tape adhesive residue with cleaner.
Clean the front door outside moulding sub-assembly. (If reusing the front door outside moulding sub-assembly.)
Using a heat light, heat the front door outside moulding sub-assembly.
Remove the double-sided tape from the front door outside moulding sub-assembly.
Wipe off any tape adhesive residue with cleaner.
Apply new double-sided tape to the front door outside moulding sub-assembly.
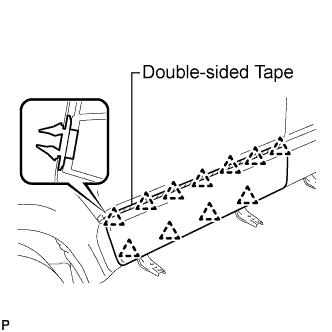 |
Install the front door outside moulding sub-assembly.
Using a heat light, heat the vehicle body and front door outside moulding sub-assembly.
Remove the peeling paper from the face of the front door outside moulding sub-assembly.
Install the front door outside moulding sub-assembly with the 11 clips.
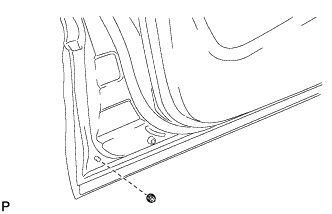 |
Install the nut.