 |
Remove the No. 2 fuel pipe clamp.
FUEL INJECTOR > REMOVAL |
| 1. DISCHARGE FUEL SYSTEM PRESSURE |
| 2. REMOVE THROTTLE BODY COVER SUB-ASSEMBLY |
Remove the 2 cap nuts and throttle body cover sub-assembly.
| 3. REMOVE AIR CLEANER HOSE ASSEMBLY |
Disconnect the vacuum hoses (for the P/S idle-up and fuel pressure regulator) and ventilation hose.
Remove the air cleaner hose assembly.
| 4. REMOVE NO. 1 FUEL PIPE SUB-ASSEMBLY |
Remove the 2 union bolts and 4 gaskets.
Remove the bolts and fuel pipe sub-assembly.
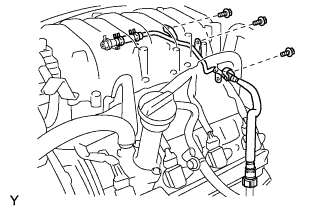
| 5. SEPARATE NO. 3 FUEL PIPE SUB-ASSEMBLY |
|
Remove the No. 2 fuel pipe clamp.
Remove the 3 bolts and disconnect the fuel return pipe sub-assembly from the fuel pressure regulator.
| 6. DISCONNECT FUEL HOSE |
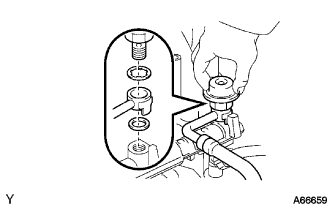 |
Remove the pulsation damper and 2 gaskets.
Disconnect the No. 1 fuel hose.
| 7. SEPARATE NO. 1 VACUUM SWITCHING VALVE ASSEMBLY |
Remove the bolts and separate the vacuum switching valve assembly from the intake manifold.
| 8. DISCONNECT ENGINE WIRE |
Disconnect the 8 fuel injector connectors.
Remove the 3 bolts and disconnect the engine wire.
| 9. REMOVE FUEL DELIVERY PIPE SUB-ASSEMBLY |
Remove the 2 nuts, and then the fuel delivery pipe by holding both ends and pulling it straight upward.
| 10. REMOVE NO. 2 FUEL DELIVERY PIPE SUB-ASSEMBLY |
Remove the 2 nuts, and then the No.2 fuel delivery pipe by holding both ends and pulling it straight upward.
| 11. REMOVE FUEL INJECTOR ASSEMBLY |
Remove the injector from the delivery pipe.
Remove the O-ring, grommet and insulator from the injector.