 |
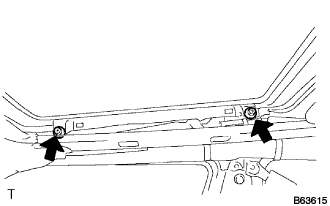
Using a "torx" wrench (T25), remove the 4 screws.
SLIDING ROOF HOUSING > REMOVAL |
| 1. REMOVE ROOF HEADLINING ASSEMBLY |
| 2. REMOVE SLIDING ROOF GUIDE RAIL COVER LH |
Using a screwdriver, pry out the rail cover.
| 3. REMOVE SLIDING ROOF GUIDE RAIL COVER RH |
| 4. REMOVE SLIDING ROOF SIDE GARNISH LH |
Using screwdriver, pry out the garnish.
| 5. REMOVE SLIDING ROOF SIDE GARNISH RH |
| 6. REMOVE SLIDING ROOF GLASS SUB-ASSEMBLY |
|
Using a "torx" wrench (T25), remove the 4 screws.
Pull the glass upward to remove it.
| 7. REMOVE SLIDING ROOF HOUSING SUB-ASSEMBLY |
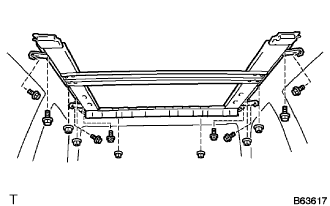 |
Disconnect the 4 drain hoses from the housing.
Remove the 8 bolts and 4 brackets.
Remove the 6 nuts and housing sub-assembly.
| 8. REMOVE SLIDING ROOF DRIVE GEAR SUB-ASSEMBLY |
Disconnect the sliding roof motor switch connector.
Remove the 2 bolts and the drive gear sub-assembly.
| 9. REMOVE SLIDING ROOF SUNSHADE STOPPER |
Using a screwdriver, remove the sliding roof sunshade stopper.
| 10. REMOVE SUNSHADE TRIM SUB-ASSEMBLY |
| 11. REMOVE SUNSHADE TRIM KNOB |
Remove the 2 screws and trim knob.
| 12. REMOVE ROOF DRIP CHANNEL REAR |
Slide the drip channel backward and remove it.
| 13. REMOVE SLIDING ROOF DRIVE CABLE SUB-ASSEMBLY |
Using a screwdriver, slide the drive cable backward and remove it.
| 14. REMOVE ROOF WIND DEFLECTOR PANEL SUB-ASSEMBLY |