VF4BM TRANSFER / 4WD / AWD TRANSFER ASSEMBLY REASSEMBLY
PROCEDURE

 36273
1.INSTALL TRANSFER LOW PLANETARY RING GEAR
Install the low planetary ring gear to the front transfer case.
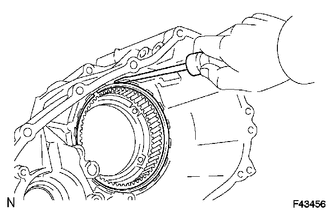
Using a screwdriver, install the snap ring.
2.INSTALL PIN
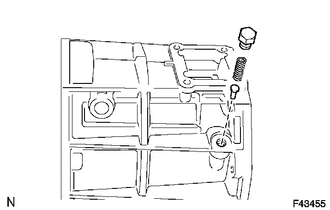
Install the pin.
41331A
3.INSTALL COMPRESSION SPRING
Install the spring.
36111C
4.INSTALL TRANSFER CASE PLUG
Install the transfer case plug.
- Torque:
- 19 N*m (190 kgf*cm, 14 ft.*lbf)
36231D
5.INSTALL TRANSFER OUTPUT SHAFT PLATE WASHER
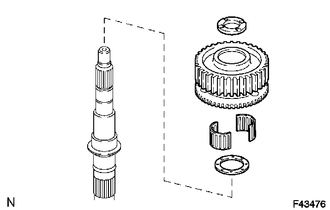
Install the washer.
36291A
6.INSTALL TRANSFER DRIVE SPROCKET BEARING
Install the bearing.
36205
7.INSTALL TRANSFER DRIVE SPROCKET SUB-ASSEMBLY
Install the transfer drive sprocket.
36255
8.INSTALL NO. 1 TRANSFER OUTPUT SHAFT SPACER
Install the output shaft spacer.
36231J
9.INSTALL REAR TRANSFER OUTPUT SHAFT RADIAL BALL BEARING
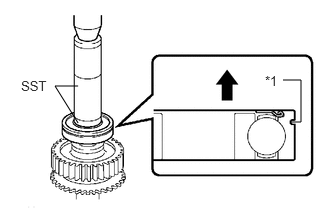
Using SST and a press, install a new bearing.
- SST
- 09316-60011 (09316-00011, 09316-00071)
| *1 | Groove |

|
Rear |
- NOTICE:
-
Install the bearing so that the bearing snap ring groove faces the rear.
36231D
10.INSTALL TRANSFER OUTPUT SHAFT PLATE WASHER
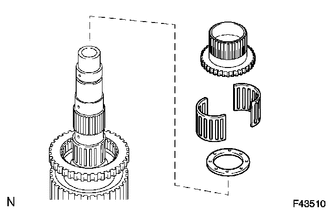
Install the washer.
36231E
11.INSTALL TRANSFER OUTPUT SHAFT FRONT NEEDLE ROLLER BEARING
Install the needle roller bearing.
36237
12.INSTALL TRANSFER CLUTCH HUB
Install the transfer clutch hub.
41311M
13.INSTALL CENTER DIFFERENTIAL CASE
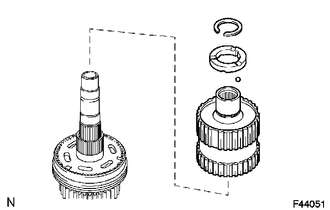
Install the center differential case.
36255A
14.INSTALL TRANSFER OUTPUT SHAFT SPACER BALL
Install the ball.
36256
15.INSTALL NO. 2 TRANSFER OUTPUT SHAFT SPACER
Install the spacer.
Using a snap ring expander, install the snap ring.
16.INSPECT DRIVE SPROCKET RADIAL CLEARANCE
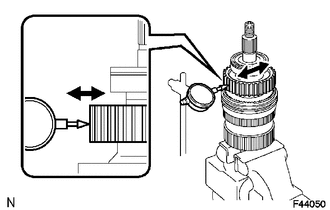
Using a dial indicator, measure the radial clearance of the drive sprocket.
- Standard clearance:
0.01 to 0.06 mm (0.000394 to 0.00236 in.)
- Maximum clearance:
0.06 mm (0.00236 in.)
If the clearance is more than the maximum, replace the drive sprocket, rear output shaft or bearing.
17.INSPECT DRIVE SPROCKET THRUST CLEARANCE
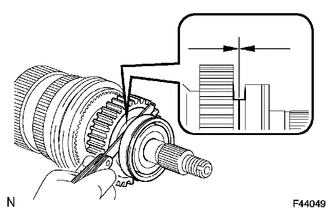
Using a feeler gauge, measure the thrust clearance of the drive sprocket.
- Standard clearance:
0.15 to 0.24 mm (0.00591 to 0.00944 in.)
- Maximum clearance:
0.24 mm (0.00944 in.)
If the clearance is more than the maximum, replace the drive sprocket.
36210A
18.INSTALL TRANSFER INPUT SHAFT BEARING
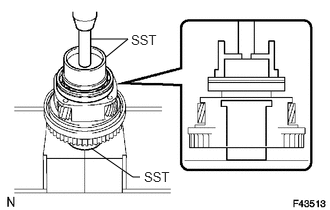
Using SST and a press, install a new bearing with the groove facing forward.
- SST
- 09223-15020
09515-30010
09950-70010 (09951-07100)
36212D
19.INSTALL TRANSFER INPUT BEARING SHAFT SNAP RING
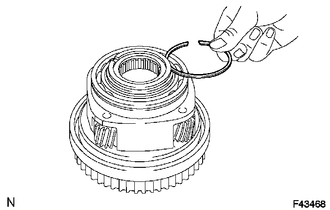
Select a new snap ring that allows minimal axial play.
- Standard Snap Ring Thickness:
Mark Specified Condition 1 1.45 to 1.50 mm (0.0571 to 0.0591 in.) 2 1.50 to 1.55 mm (0.0591 to 0.0610 in.) 3 1.55 to 1.60 mm (0.0610 to 0.0630 in.) 4 1.60 to 1.65 mm (0.0630 to 0.0650 in.) 5 1.65 to 1.70 mm (0.0650 to 0.0669 in.)
Using a snap ring expander, install the snap ring.
36273
20.INSTALL TRANSFER LOW PLANETARY GEAR SPLINE PIECE
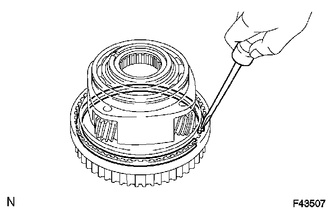
Using a screwdriver, install the low planetary gear spline piece and snap ring.
36270A
21.INSTALL TRANSFER LOW PLANETARY GEAR BEARING
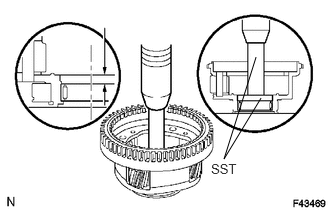
Using SST and a press, press in a new low planetary gear bearing.
- SST
- 09950-60010 (09951-00570)
09950-70010 (09951-07100)
- Standard depth:
7.7 to 8.3 mm (0.304 to 0.326 in.)
36216A
22.INSTALL NO. 1 TRANSFER INPUT SHAFT SEAL RING
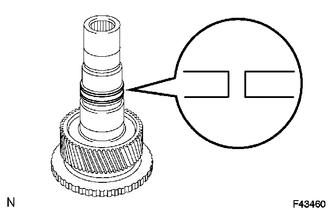
Apply gear oil to 2 new seal rings.
Install the 2 seal rings to the input shaft.
- NOTICE:
-
When installing the seal ring, make sure not to expand it so that its inner diameter exceeds 65 mm (2.55 in.).
36270A
23.INSTALL TRANSFER LOW PLANETARY GEAR THRUST BEARING
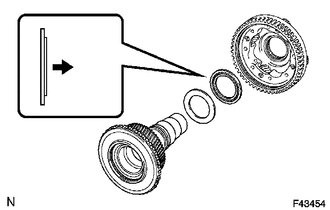
Install the bearing.
|
|
Front |
36288
24.INSTALL NO. 1 TRANSFER THRUST BEARING RACE
Install the thrust bearing race.
36211
25.INSTALL TRANSFER INPUT SHAFT
Install the transfer input shaft.
26.INSTALL MANUAL TRANSFER PLANETARY CARRIER WASHER
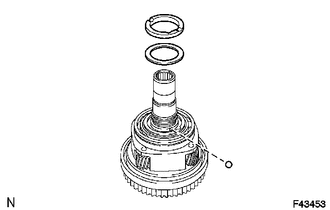
Install the washer.
36213A
27.INSTALL TRANSFER INPUT GEAR STOPPER BALL
Install the ball.
36213
28.INSTALL TRANSFER INPUT GEAR STOPPER
Install the input gear stopper..
36213B
29.INSTALL TRANSFER INPUT GEAR STOPPER SHAFT SNAP RING
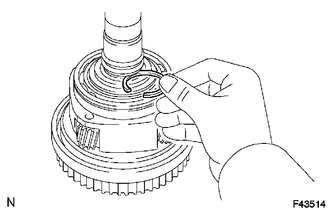
Select a new input gear stopper shaft snap ring that allows 0.05 to 0.15 mm (0.00197 to 0.00590 in.) of axial play.
- Standard Snap Ring Thickness:
Mark Specified Condition A 2.10 to 2.15 mm (0.0827 to 0.0846 in.) B 2.15 to 2.20 mm (0.0846 to 0.0866 in.) C 2.20 to 2.25 mm (0.0866 to 0.0886 in.) D 2.25 to 2.30 mm (0.0886 to 0.0906 in.) E 2.30 to 2.35 mm (0.0906 to 0.0925 in.) F 2.35 to 2.40 mm (0.0925 to 0.0945 in.) G 2.40 to 2.45 mm (0.0945 to 0.0965 in.) H 2.45 to 2.50 mm (0.0965 to 0.0984 in.) J 2.50 to 2.55 mm (0.0984 to 0.100 in.) K 2.55 to 2.60 mm (0.100 to 0.102 in.) L 2.60 to 2.65 mm (0.102 to 0.104 in.) M 2.65 to 2.70 mm (0.104 to 0.106 in.) N 2.70 to 2.75 mm (0.106 to 0.108 in.) P 2.75 to 2.80 mm (0.108 to 0.110 in.) Q 2.80 to 2.85 mm (0.110 to 0.112 in.) R 2.85 to 2.90 mm (0.112 to 0.114 in.) S 2.90 to 2.95 mm (0.114 to 0.116 in.) T 2.95 to 3.00 mm (0.116 to 0.118 in.) U 3.00 to 3.05 mm (0.118 to 0.120 in.)
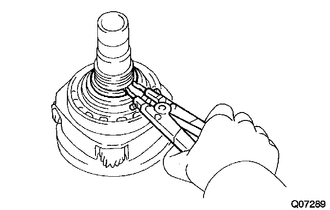
Using a snap ring expander, install the snap ring.
30.INSTALL LOW PLANETARY GEAR ASSEMBLY WITH TRANSFER INPUT SHAFT SUB-ASSEMBLY
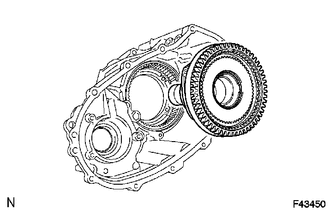
Install the low planetary gear together with the input shaft.
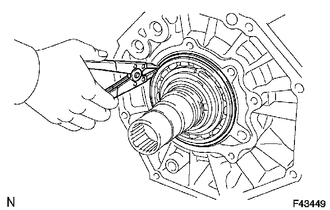
Using a snap ring expander, install the shaft snap ring.
36227
31.INSTALL TRANSFER OIL PUMP GEAR
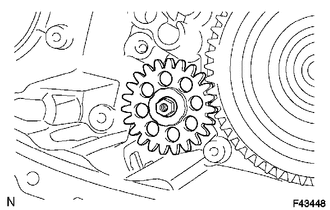
Install the transfer oil pump gear.
36104J
32.INSTALL TRANSFER OIL PUMP BODY O-RING
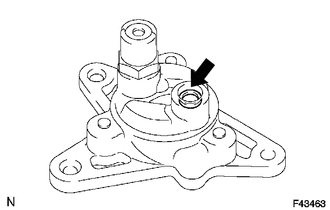
Coat a new O-ring with gear oil and install it to the oil pump body.
36106
33.INSTALL TRANSFER OIL PUMP BODY SUB-ASSEMBLY
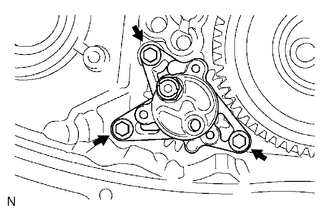
Install the oil pump body with the 3 bolts.
- Torque:
- 7.5 N*m (76 kgf*cm, 66 in.*lbf)
33449D
34.INSTALL TRANSFER CASE MAGNET
36104H
35.INSTALL TRANSFER OIL SEPARATOR SUB-ASSEMBLY
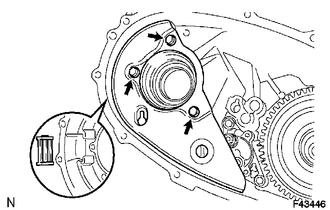
Install the oil separator with the 3 bolts.
- Torque:
- 7.5 N*m (76 kgf*cm, 66 in.*lbf)
36114B
36.INSTALL FILLER PLUG
Install a new gasket and the filler plug.
- Torque:
- 37 N*m (377 kgf*cm, 27 ft.*lbf)
36114B
37.INSTALL DRAIN PLUG
Install a new gasket and the drain plug.
- Torque:
- 37 N*m (377 kgf*cm, 27 ft.*lbf)
36410J
38.INSTALL TRANSFER SHIFT ACTUATOR ASSEMBLY
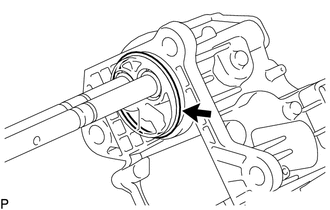
Install a new O-ring to the transfer shift actuator assembly.
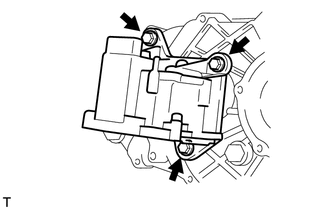
Install the shift actuator assembly with the 3 bolts.
- Torque:
- 20 N*m (204 kgf*cm, 15 ft.*lbf)
Using a screwdriver and hammer, tap on the 2 snap rings.
36212A
39.INSTALL TRANSFER INPUT GEAR RADIAL BALL BEARING
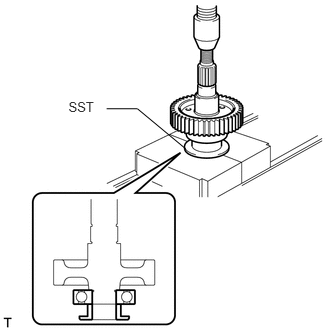
Using SST and a press, install a new input gear radial ball bearing.
- SST
- 09316-60011 (09316-00031)
36292A
40.INSTALL TRANSFER DRIVEN SPROCKET BEARING
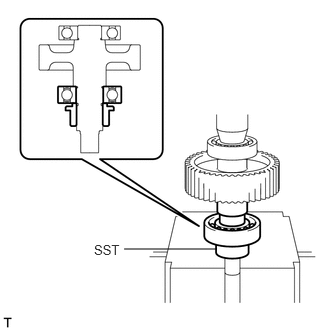
Using SST and a press, install a new driven sprocket bearing.
- SST
- 09316-60011 (09316-00071)
41.INSTALL REAR OUTPUT SHAFT SUB-ASSEMBLY, FRONT DRIVE CHAIN AND DRIVEN SPROCKET SUB-ASSEMBLY
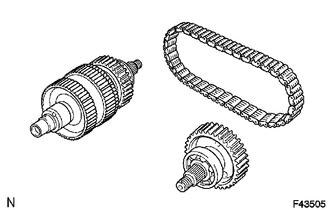
Install the rear output shaft and drive sprocket to the front drive chain.
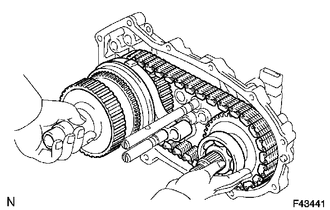
Install the rear output shaft, front drive chain and driven sprocket to the rear transfer case.
- HINT:
-
Check that the rear output shaft and driven sprocket turn without much effort.
Using a snap ring expander, install the snap ring.
- NOTICE:
-
Make sure that the snap ring is firmly installed to the groove.
41408
42.INSTALL CENTER DIFFERENTIAL LOCK FORK SUB-ASSEMBLY WITH FRONT DRIVE CLUTCH SLEEVE
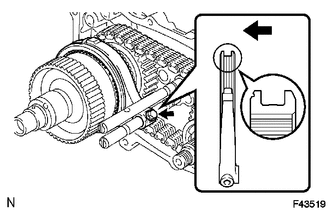
Install the center differential lock fork and front drive clutch sleeve.
|
|
Front |
- NOTICE:
-
Install the clutch sleeve in the correct direction.
Install the bolt.
- Torque:
- 24 N*m (245 kgf*cm, 18 ft.*lbf)
Using a screwdriver and hammer, drive in the snap ring.
43.INSTALL NO. 2 TRANSFER GEAR SHIFT FORK SUB-ASSEMBLY WITH TRANSFER HIGH AND LOW CLUTCH SLEEVE
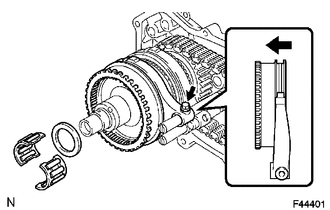
Install the No. 2 gear shift fork and high and low clutch sleeve.
|
|
Front |
- NOTICE:
-
Install the clutch sleeve in the correct direction.
Install the bolt.
- Torque:
- 24 N*m (245 kgf*cm, 18 ft.*lbf)
36231E
44.INSTALL TRANSFER OUTPUT SHAFT FRONT NEEDLE ROLLER BEARING
Install the needle roller bearing to the input shaft.
36231A
45.INSTALL TRANSFER OUTPUT SHAFT SPACER
Install the transfer output shaft spacer to the input shaft.
36112
46.INSTALL REAR TRANSFER CASE
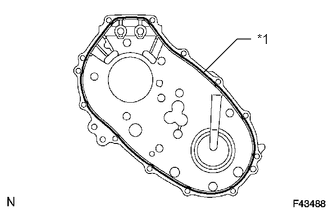
Apply seal packing to the rear transfer case as shown in the illustration.
- Seal packing:
Toyota Genuine Seal Packing 1281, Three Bond 1281 or equivalent
| *1 | Seal Packing |
- NOTICE:
-
If the removed rear transfer case is reused, be sure to perform the following before reinstalling it: 1) using a knife, cut off any old seal packing on the rear transfer case contact surface, 2) clean off any remaining old seal packing from the rear transfer case contact surface, and 3) reapply seal packing to the rear transfer case.
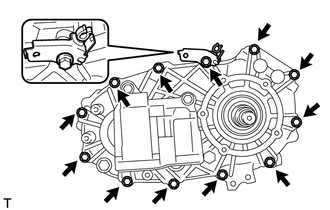
Install the clamp and rear transfer case with the 12 bolts.
- Torque:
- 28 N*m (286 kgf*cm, 21 ft.*lbf)
- NOTICE:
-
Tighten the bolts of the rear transfer case within 10 minutes of applying the seal packing. The seal packing will dry very quickly.
47.INSTALL COLLAR
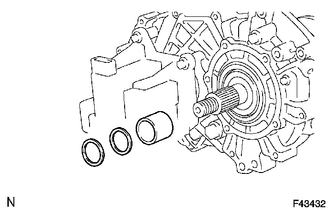
Install the collar.
33309H
48.INSTALL TRANSFER OUTPUT SHAFT WASHER
Install the 2 washers.
36105
49.INSTALL TRANSFER EXTENSION HOUSING SUB-ASSEMBLY
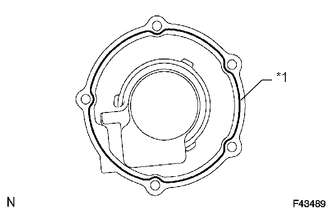
Apply seal packing to the extension housing as shown in the illustration.
- Seal packing:
Toyota Genuine Seal Packing 1281, Three Bond 1281 or equivalent
| *1 | Seal Packing |
- NOTICE:
-
If the removed extension housing will be reused, be sure to perform the following before reinstalling it: 1) using a knife, cut off any old seal packing on the housing contact surface, 2) clean off any remaining old seal packing from the housing contact surface, and 3) reapply seal packing to the housing.
Apply adhesive to the threads of the bolts.
- Adhesive:
Toyota Genuine Adhesive 1344, Three Bond 1344 or equivalent
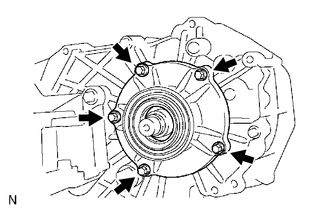
Install the extension housing with the 5 bolts.
- Torque:
- 12 N*m (122 kgf*cm, 9 ft.*lbf)
- NOTICE:
-
Tighten the bolts of the extension housing within 10 minutes of applying the seal packing. The seal packing will dry very quickly.
36115C
50.INSTALL TRANSFER CASE REAR OIL SEAL
33309D
51.INSTALL REAR TRANSFER OUTPUT SHAFT COMPANION FLANGE OIL SEAL
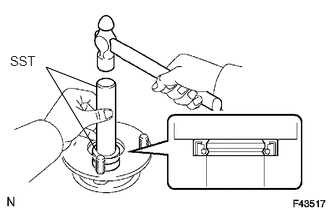
Using SST and a hammer, tap in a new oil seal.
- SST
- 09950-60010 (09951-00320)
09950-70010 (09951-07100)
Coat the lip of the oil seal with MP grease.
33309C
52.INSTALL REAR OUTPUT SHAFT COMPANION FLANGE SUB-ASSEMBLY
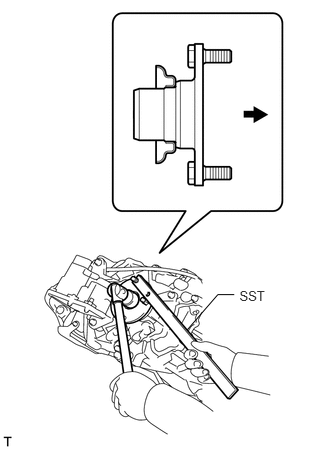
Apply gear oil to the connecting areas of the companion flange and output shaft.
Install the companion flange to the output shaft.
|
|
Rear |
Using SST to hold the companion flange, install a new lock nut.
- SST
- 09330-00021
- Torque:
- 118 N*m (1203 kgf*cm, 87 ft.*lbf)
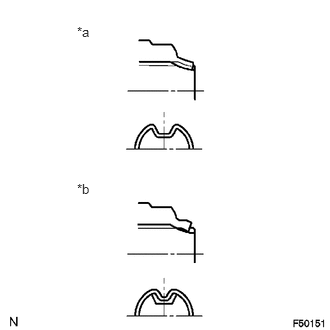
Using a chisel and hammer, stake the lock nut.
| *a | Correct |
| *b | Incorrect |
- NOTICE:
- ·
Securely stake the shaft to the lock nut groove.
·Be careful not to damage the parts around the lock nut.
·Do not apply excessive force to the shaft.
36111B
53.INSTALL TRANSFER CASE FRONT OIL SEAL
33309D
54.INSTALL FRONT TRANSFER OUTPUT SHAFT COMPANION FLANGE OIL SEAL
Using SST and a hammer, tap in a new oil seal.
- SST
- 09950-60010 (09951-00320)
09950-70010 (09951-07100)
Coat the lip of the oil seal with MP grease.
33309C
55.INSTALL FRONT OUTPUT SHAFT COMPANION FLANGE SUB-ASSEMBLY
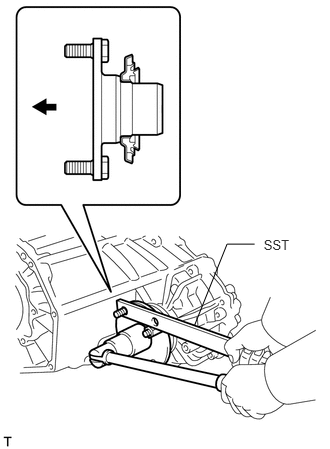
Apply gear oil to the connecting areas of the companion flange and driven sprocket.
Install the companion flange to the driven sprocket.
|
|
Front |
Using SST to hold the companion flange, install a new lock nut.
- SST
- 09330-00021
- Torque:
- 118 N*m (1203 kgf*cm, 87 ft.*lbf)
Using a chisel and hammer, stake the lock nut.
| *a | Correct |
| *b | Incorrect |
- NOTICE:
- ·
Securely stake the shaft to the lock nut groove.
·Be careful not to damage the parts around the lock nut.
·Do not apply excessive force to the shaft.
36128
56.INSTALL BREATHER OIL DEFLECTOR
Install the oil deflector.
36102
57.INSTALL TRANSFER CASE COVER SUB-ASSEMBLY
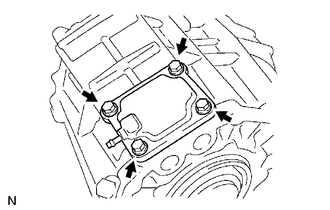
Install the case cover with the 4 bolts.
- Torque:
- 18 N*m (184 kgf*cm, 13 ft.*lbf)
36102F
58.INSTALL TRANSFER RH BEARING RETAINER OIL SEAL
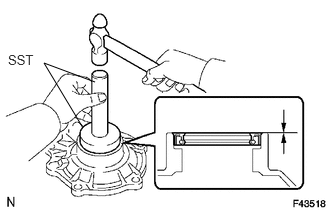
Using SST and a hammer, drive in a new oil seal until its surface is flush with the retainer upper surface.
- SST
- 09950-60010 (09951-00590)
09950-70010 (09951-07100)
Coat the lip of the oil seal with MP grease.
36102D
59.INSTALL TRANSFER RH BEARING RETAINER SUB-ASSEMBLY
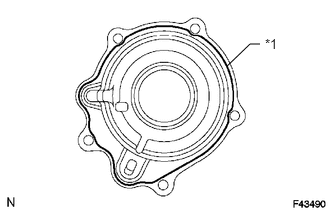
Apply seal packing to the bearing retainer as shown in the illustration.
- Seal packing:
Toyota Genuine Seal Packing 1281, Three Bond 1281 or equivalent
| *1 | Seal Packing |
- NOTICE:
-
If the removed bearing retainer is reused, be sure to perform the following before reinstalling it: 1) using a knife, cut off any old seal packing on the retainer contact surface, 2) clean off any remaining old seal packing from the retainer contact surface, and 3) reapply seal packing to the retainer.
Apply sealant to the bolt threads.
- Sealant:
Toyota Genuine Adhesive 1344, Three Bond 1344 or equivalent
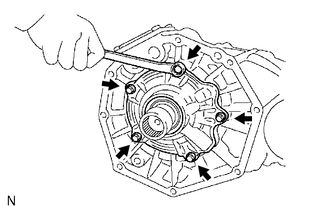
Install the retainer with the 5 bolts.
- Torque:
- 12 N*m (117 kgf*cm, 8 ft.*lbf)
- NOTICE:
-
Tighten the bolts of the bearing retainer within 10 minutes of applying the seal packing. The seal packing will dry very quickly.
60.INSTALL HOSE
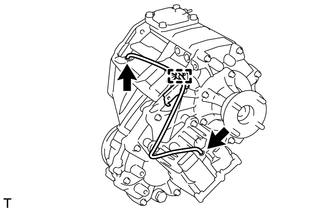
Attach the clamp and install the hose.