HEATING / AIR CONDITIONING FRONT EVAPORATOR TEMPERATURE SENSOR REASSEMBLY
PROCEDURE

 88625
1.INSTALL NO. 1 COOLER THERMISTOR
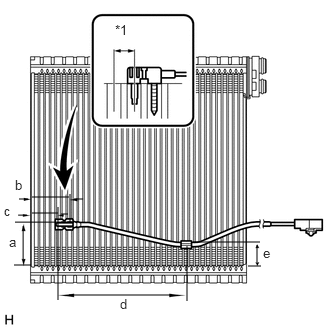
- NOTICE:
-
If reusing the evaporator, do not insert the sensor into a location where the sensor was previously inserted.
Insert the sensor to a location that is 1 fin to the right or left of its previous location.
- Standard:
Area Specified Condition a 50 mm (1.97 in.) b 46.7 mm (1.84 in.) c 33.3 mm (1.31 in.) d 154.1 mm (6.07 in.) e 25 mm (0.98 in.)
| *1 | 1 Fin |
88501
2.INSTALL NO. 1 COOLER EVAPORATOR SUB-ASSEMBLY
Sufficiently apply compressor oil to 2 new O-rings and the fitting surface of the hose joint.
- Compressor oil:
ND-OIL 8 or equivalent
Install the 2 O-rings to the evaporator.
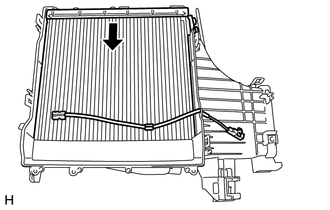
Install the evaporator.
Attach the 4 claws to install the unit case.
Install the 6 screws.
87106D
3.INSTALL DAMPER SERVO SUB-ASSEMBLY LH
Align the grooves on the damper servo sub-assembly with the protrusions on the unit and install the damper servo sub-assembly.
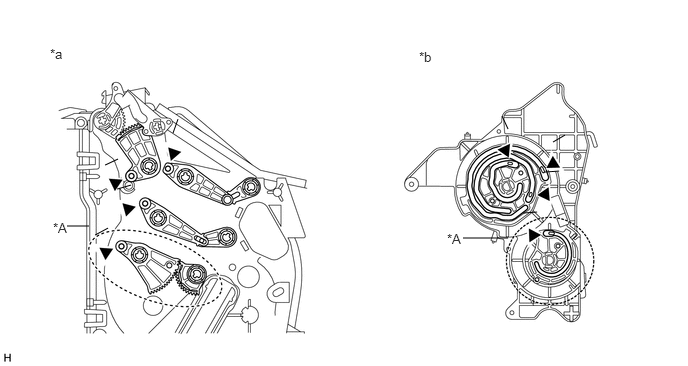
| *A | for Automatic Air conditioning System | - | - |
| *a | Air Conditioning Unit Side | *b | Damper Servo Side |
Install the 4 screws.
87106L
4.INSTALL DAMPER SERVO SUB-ASSEMBLY RH
Align the grooves on the damper servo sub-assembly with the protrusions on the unit and install the damper servo sub-assembly.
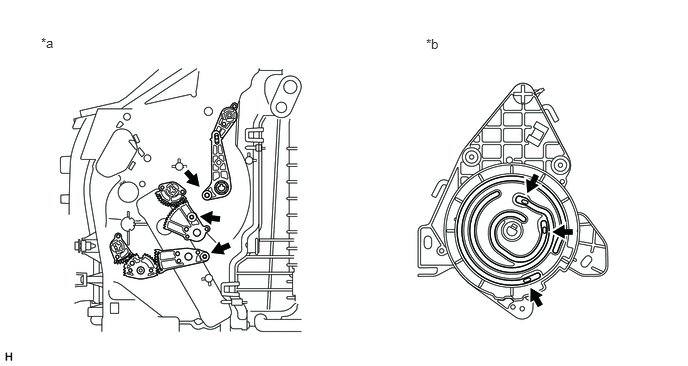
| *a | Air Conditioning Unit Side | *b | Damper Servo Side |
Install the 3 screws.
88515
5.INSTALL COOLER EXPANSION VALVE
Install the expansion valve.
88710H
6.INSTALL AIR CONDITIONING TUBE AND ACCESSORY ASSEMBLY
Sufficiently apply compressor oil to 2 new O-rings and the fitting surface of the hose joint.
- Compressor oil:
ND-OIL 8 or equivalent
Install the 2 O-rings to the air conditioning tube and accessory assembly.
Install the air conditioning tube and accessory assembly.
Using a 4 mm hexagon wrench, install the 2 hexagon bolts.
- Torque:
- 3.5 N*m (36 kgf*cm, 31 in.*lbf)
Install new butyl tape.
Install new packing.
7.INSTALL AIR CONDITIONING HARNESS
Attach the clamps to install the harness.
Connect the connectors.
87107A
8.INSTALL HEATER RADIATOR UNIT SUB-ASSEMBLY
Install the radiator.
Install the bracket with the 2 screws.
88539J
9.INSTALL DRAIN COOLER HOSE
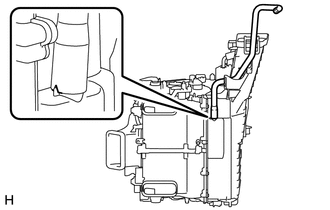
Install the drain cooler hose, as shown in the illustration.
87211K
10.INSTALL ASPIRATOR HOSE
Attach the 2 claws to install the aspirator hose.
55950G
11.INSTALL DEFROSTER NOZZLE ASSEMBLY
Attach the 6 claws to install the defroster nozzle assembly.
87130D
12.INSTALL BLOWER ASSEMBLY
Attach the 2 claws to install the blower assembly.
Install the screw.
- Torque:
- 2.7 N*m (28 kgf*cm, 24 in.*lbf)