INTERIOR PANELS / TRIM FRONT CONSOLE BOX INSTALLATION
CAUTION / NOTICE / HINT
- HINT:
-
A bolt without a torque specification is shown in the standard bolt chart (See page General>INTRODUCTION>REPAIR INSTRUCTION>INITIALIZATION).
PROCEDURE

 58910C
1.INSTALL REAR CONSOLE BOX ASSEMBLY
Connect each connector.
Attach the 2 guides.
Install the rear console box assembly with the 4 bolts and 2 screws.
58987A
2.INSTALL NO. 2 CONSOLE BOX RETAINER
Attach the clip, 2 claws and 2 guides to install the No. 2 console box retainer.
58804A
3.INSTALL UPPER CONSOLE PANEL SUB-ASSEMBLY
Connect each connector.
Attach the 10 clips to install the upper console panel sub-assembly.
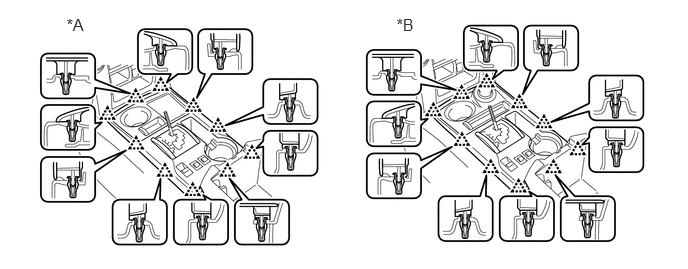
| *A | for 2WD | *B | for 4WD |
33504F
4.INSTALL SHIFT LEVER KNOB SUB-ASSEMBLY
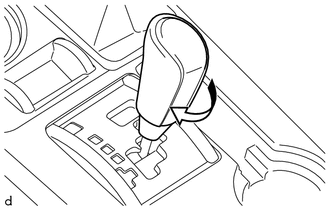
Install the shift lever knob sub-assembly and turn it in the direction indicated by the arrow.
58816B
5.INSTALL FRONT NO. 1 CONSOLE BOX INSERT
Attach the 2 clips and 2 guides to install the front No. 1 console box insert.
58817A
6.INSTALL FRONT NO. 2 CONSOLE BOX INSERT
Attach the 2 clips and guide to install the front No. 2 console box insert.
55474C
7.INSTALL NO. 1 INSTRUMENT CLUSTER FINISH PANEL GARNISH
Attach the 5 clips to install the No. 1 instrument cluster finish panel garnish.
55475A
8.INSTALL NO. 2 INSTRUMENT CLUSTER FINISH PANEL GARNISH