EXTERIOR PANELS / TRIM NAME PLATE INSTALLATION
CAUTION / NOTICE / HINT
- HINT:
-
When installing the symbol emblem, No. 1 back door emblem, No. 2 back door name plate and No. 1 roof side mark, heat the vehicle body, symbol emblem, No. 1 back door emblem, No. 2 back door name plate and No. 1 roof side mark using a heat light.
- Standard:
Item Temperature Vehicle Body 40 to 60°C (104 to 140°F) Symbol Emblem 20 to 30°C (68 to 86°F) No. 1 Back Door Emblem 20 to 30°C (68 to 86°F) No. 2 Back Door Name Plate 20 to 30°C (68 to 86°F) No. 1 Roof Side Mark 20 to 30°C (68 to 86°F)
- NOTICE:
-
Do not heat the vehicle body, symbol emblem, No. 1 back door emblem or No. 1 roof side mark excessively.
PROCEDURE

 75741E
1.INSTALL SYMBOL EMBLEM
Clean the vehicle body surface.
Using a heat light, heat the vehicle body surface.
Remove the double-sided tape from the vehicle body.
Wipe off any tape adhesive residue with cleaner.
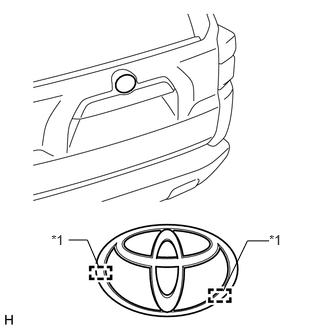
Install a new symbol emblem.
Using a heat light, heat the vehicle body and a new symbol emblem.
Remove the peeling paper from the face of the symbol emblem.
- HINT:
-
After removing the peeling paper, keep the exposed adhesive free from foreign matter.
Align the boss positions to install the symbol emblem.
- HINT:
-
Press the symbol emblem firmly to install it.
| *1 | Boss |
75431A
2.INSTALL NO. 1 BACK DOOR EMBLEM
Clean the vehicle body surface.
Using a heat light, heat the vehicle body surface.
Remove the double-sided tape from the vehicle body.
Wipe off any tape adhesive residue with cleaner.
Install a new No. 1 back door emblem.
Using a heat light, heat the vehicle body and a new No. 1 back door emblem.
Remove the peeling paper from the face of the No. 1 back door emblem.
- HINT:
-
After removing the peeling paper, keep the exposed adhesive free from foreign matter.
Install the No. 1 back door emblem in the position shown in the installation.
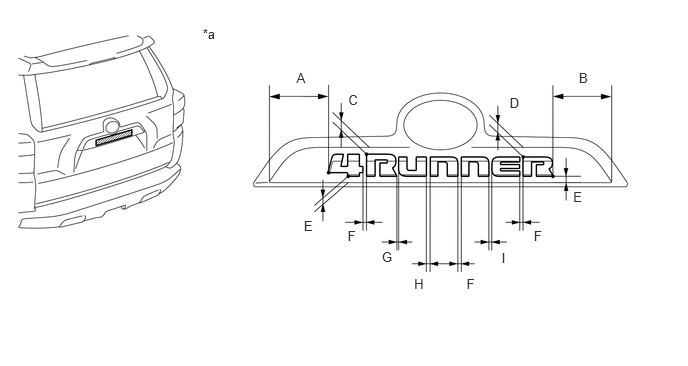
| *a | Reference Value | - | - |
- Reference Measurement:
Area Measurement Area Measurement A 105.0 mm (4.134 in.) B 104.0 mm (4.094 in.) C 11.8 mm (0.465 in.) D 17.5 mm (0.689 in.) E 10.5 mm (0.413 in.) F 6.0 mm (0.236 in.) G 4.0 mm (0.157 in.) H 7.0 mm (0.276 in.) I 5.5 mm (0.217 in.) - -
75442A
3.INSTALL NO. 2 BACK DOOR NAME PLATE
Clean the vehicle body surface.
Using a heat light, heat the vehicle body surface.
Remove the double-sided tape from the vehicle body.
Wipe off any tape adhesive residue with cleaner.
Install a new No. 2 back door name plate.
Using a heat light, heat the vehicle body and a new No. 2 back door name plate.
Remove the peeling paper from the face of the No. 2 back door name plate.
- HINT:
-
After removing the peeling paper, keep the exposed adhesive free from foreign matter.
Install the No. 2 back door name plate in the position shown in the installation.
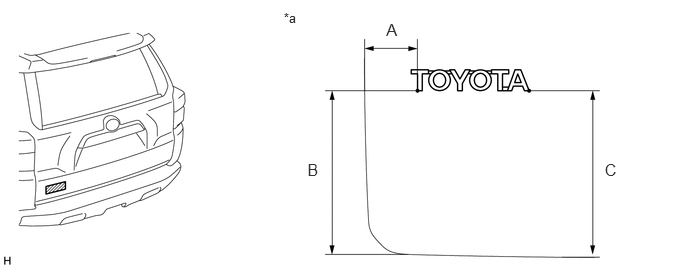
| *a | Reference Value | - | - |
- Reference Measurement:
Area Measurement Area Measurement A 58.4 mm (2.299 in.) B 193.4 mm (7.614 in.) C 198.8 mm (7.827 in.) - -
75455A
4.INSTALL NO. 1 ROOF SIDE MARK
Clean the vehicle body surface.
Using a heat light, heat the vehicle body surface.
Remove the double-sided tape from the vehicle body.
Wipe off any tape adhesive residue with cleaner.
Install a new No. 1 roof side mark.
Using a heat light, heat the vehicle body and a new No. 1 roof side mark.
Remove the peeling paper from the face of the No. 1 roof side mark.
- HINT:
-
After removing the peeling paper, keep the exposed adhesive free from foreign matter.
Install the No. 1 roof side mark in the position shown in the installation.
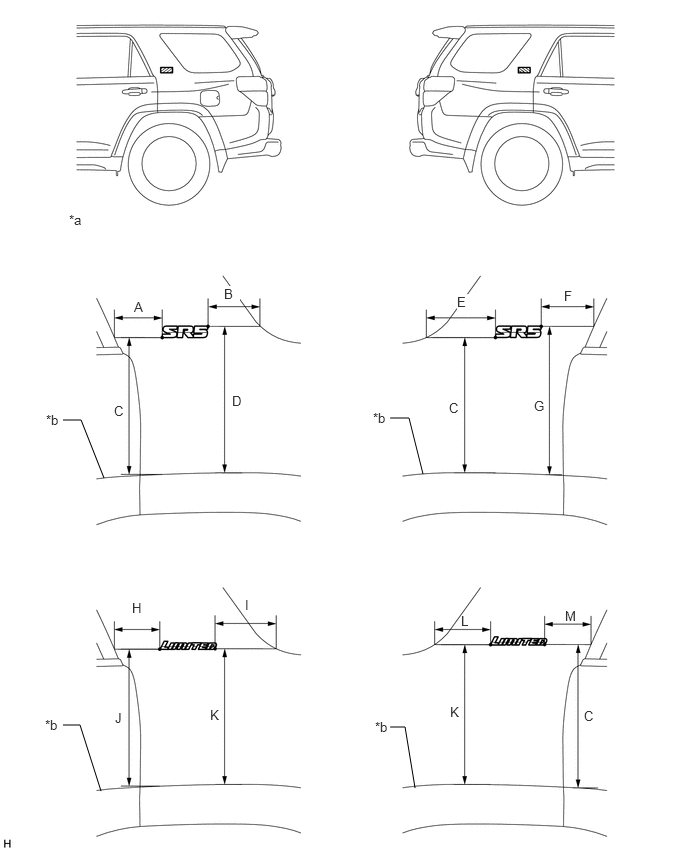
| *a | Reference Value | *b | Over Fender End Line |
- Reference Measurement:
Area Measurement Area Measurement A 95.0 mm (3.740 in.) B 122.1 mm (4.807 in.) C 346.6 mm (13.646 in.) D 371.0 mm (14.606 in.) E 157.3 mm (6.193 in.) F 105.2 mm (4.142 in.) G 370.9 mm (14.602 in.) H 79.6 mm (3.134 in.) I 149.4 mm (5.882 in.) J 346.7 mm (13.650 in.) K 346.9 mm (13.657 in.) L 141.5 mm (5.571 in.) M 87.7 mm (3.453 in.) - -