Home › Vehicle Exterior › MIRROR (EXT) › OUTER REAR VIEW MIRROR

OUTER REAR VIEW MIRROR > INSPECTION

for Preparation Click here


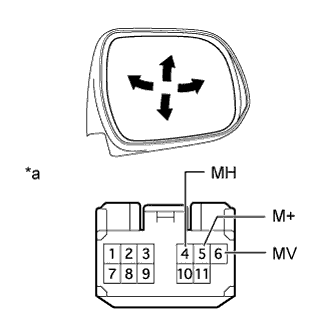
1. INSPECT OUTER REAR VIEW MIRROR ASSEMBLY LH (w/ Side Turn Signal Light)


    B353495E02
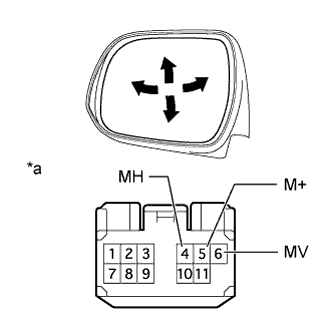
  1. Apply battery voltage and check the operation of the outer mirror LH.

    OK:
    Condition
    Specified Condition
    Battery positive (+) → Terminal 6 (MV)
    Battery negative (-) → Terminal 5 (M+)
    Turns upward
    Battery negative (-) → Terminal 6 (MV)
    Battery positive (+) → Terminal 5 (M+)
    Turns downward
    Battery positive (+) → Terminal 4 (MH)
    Battery negative (-) → Terminal 5 (M+)
    Turns left
    Battery negative (-) → Terminal 4 (MH)
    Battery positive (+) → Terminal 5 (M+)
    Turns right

    Text in Illustration 
    *a
    Component without harness connected
    (Outer Rear View Mirror Assembly LH)
    If the result is not as specified, replace the outer rear view mirror assembly LH.


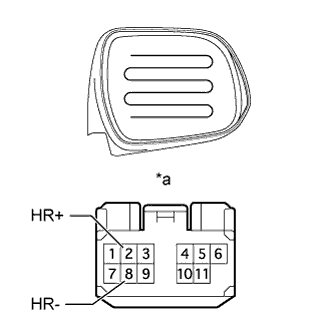
    B353496E01
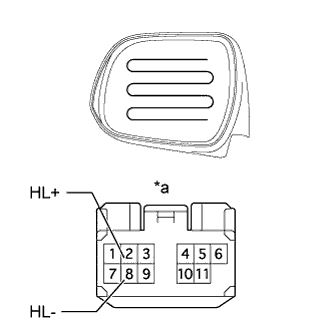
  1. Check the outer mirror heater LH.

    1. Measure the resistance according to the value(s) in the table below.

      Standard Resistance:
      Tester Connection
      Condition
      Specified Condition
      Terminal 2 (HL+) - Terminal 8 (HL-)
      25°C (77°F)
      5.3 to 7.9 Ω

      If the result is not as specified, replace the outer rear view mirror assembly LH.

    2. Apply battery voltage to check the operation of the outer mirror heater LH.

      OK:
      Condition
      Specified Condition
      Battery positive (+) → Terminal 2 (HL+)
      Battery negative (-) → Terminal 8 (HL-)
      Mirror becomes warm

      Text in Illustration 
      *a
      Component without harness connected
      (Outer Rear View Mirror Assembly LH)

      HINT:
      It will take a short amount of time for the outer mirror LH to become warm.

      If the result is not as specified, replace the outer rear view mirror assembly LH.


  1. Check the side turn signal light assembly LH.


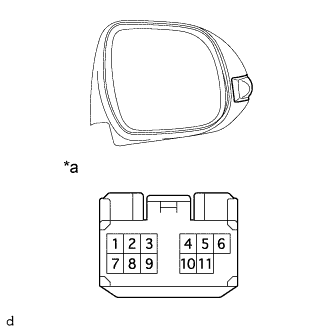
      B353497E01
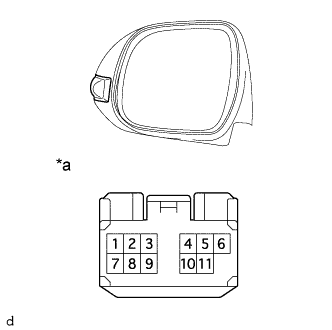
    1. Apply battery voltage to the connector to check the illumination condition.

      OK:
      Condition
      Specified Condition
      Battery positive (+) → Terminal 10
      Battery negative (-) → Terminal 11
      Side turn signal light illuminates

      Text in Illustration 
      *a
      Component without harness connected
      (Outer Rear View Mirror Assembly LH)
      If the result is not as specified, inspect the side turn signal light assembly LH (Click here).
      If the result is not as specified, replace the outer rear view mirror assembly LH.


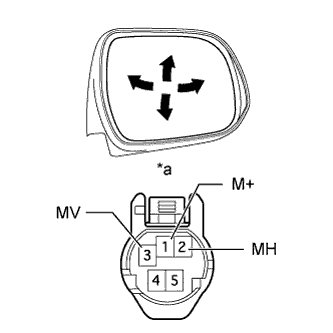
2. INSPECT OUTER REAR VIEW MIRROR ASSEMBLY LH (w/o Side Turn Signal Light)


    B353498E01
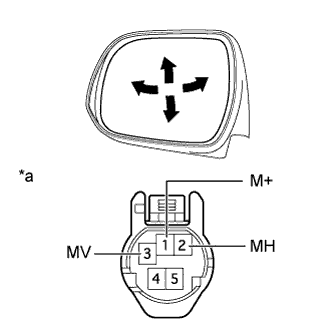
  1. Apply battery voltage to check the operation of the outer mirror LH.

    OK:
    Condition
    Specified Condition
    Battery positive (+) → Terminal 3 (MV)
    Battery negative (-) → Terminal 1 (M+)
    Turns upward
    Battery negative (-) → Terminal 3 (MV)
    Battery positive (+) → Terminal 1 (M+)
    Turns downward
    Battery positive (+) → Terminal 2 (MH)
    Battery negative (-) → Terminal 1 (M+)
    Turns left
    Battery negative (-) → Terminal 2 (MH)
    Battery positive (+) → Terminal 1 (M+)
    Turns right

    Text in Illustration 
    *a
    Component without harness connected
    (Outer Rear View Mirror Assembly LH)
    If the result is not as specified, replace the outer rear view mirror assembly LH.


  1. Check the outer mirror heater LH.


      B354441E01
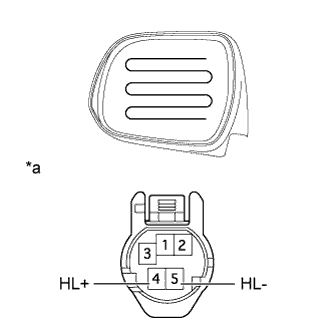
    1. Measure the resistance according to the value(s) in the table below.

      Standard Resistance:
      Tester Connection
      Condition
      Specified Condition
      Terminal 4 (HL+) - Terminal 5 (HL-)
      25°C (77°F)
      5.3 to 7.9 Ω

      If the result is not as specified, replace the outer rear view mirror assembly LH.

    2. Apply battery voltage to check the operation of the outer mirror heater LH.

      OK:
      Condition
      Specified Condition
      Battery positive (+) → Terminal 4 (HL+)
      Battery negative (-) → Terminal 5 (HL-)
      Mirror becomes warm

      Text in Illustration 
      *a
      Component without harness connected
      (Outer Rear View Mirror Assembly LH)

      HINT:
      It will take a short amount of time for the outer mirror LH to become warm.

      If the result is not as specified, replace the outer rear view mirror assembly LH.


3. INSPECT OUTER REAR VIEW MIRROR ASSEMBLY RH (w/ Side Turn Signal Light)


    B354442E01
  1. Apply battery voltage to check the operation of the outer mirror RH.

    OK:
    Condition
    Specified Condition
    Battery positive (+) → Terminal 6 (MV)
    Battery negative (-) → Terminal 5 (M+)
    Turns upward
    Battery negative (-) → Terminal 6 (MV)
    Battery positive (+) → Terminal 5 (M+)
    Turns downward
    Battery positive (+) → Terminal 4 (MH)
    Battery negative (-) → Terminal 5 (M+)
    Turns left
    Battery negative (-) → Terminal 4 (MH)
    Battery positive (+) → Terminal 5 (M+)
    Turns right

    Text in Illustration 
    *a
    Component without harness connected
    (Outer Rear View Mirror Assembly RH)
    If the result is not as specified, replace the outer rear view mirror assembly RH.


  1. Check the outer mirror heater RH.


      B354443E01
    1. Measure the resistance according to the value(s) in the table below.

      Standard Resistance:
      Tester Connection
      Condition
      Specified Condition
      Terminal 2 (HR+) - Terminal 8 (HR-)
      25°C (77°F)
      5.3 to 7.9 Ω

      If the result is not as specified, replace the outer rear view mirror assembly RH.

    2. Apply battery voltage to check the operation of the outer mirror heater RH.

      OK:
      Condition
      Specified Condition
      Battery positive (+) → Terminal 2 (HR+)
      Battery negative (-) → Terminal 8 (HR-)
      Mirror becomes warm

      Text in Illustration 
      *a
      Component without harness connected
      (Outer Rear View Mirror Assembly RH)

      HINT:
      It will take a short amount of time for the outer mirror RH to become warm.

      If the result is not as specified, replace the outer rear view mirror assembly RH.


  1. Check the side turn signal light assembly RH.


      B354444E01
    1. Apply battery voltage to the connector to check the illumination condition.

      OK:
      Condition
      Specified Condition
      Battery positive (+) → Terminal 10
      Battery negative (-) → Terminal 11
      Side turn signal light illuminates

      Text in Illustration 
      *a
      Component without harness connected
      (Outer Rear View Mirror Assembly RH)
      If the result is not as specified, inspect the side turn signal light assembly RH (Click here).
      If the result is not as specified, replace the outer rear view mirror assembly RH.


4. INSPECT OUTER REAR VIEW MIRROR ASSEMBLY RH (w/o Side Turn Signal Light)


    B354445E01
  1. Apply battery voltage to check the operation of the outer mirror.

    OK:
    Condition
    Specified Condition
    Battery positive (+) → Terminal 3 (MV)
    Battery negative (-) → Terminal 1 (M+)
    Turns upward
    Battery negative (-) → Terminal 3 (MV)
    Battery positive (+) → Terminal 1 (M+)
    Turns downward
    Battery positive (+) → Terminal 2 (MH)
    Battery negative (-) → Terminal 1 (M+)
    Turns left
    Battery negative (-) → Terminal 2 (MH)
    Battery positive (+) → Terminal 1 (M+)
    Turns right

    Text in Illustration 
    *a
    Component without harness connected
    (Outer Rear View Mirror Assembly RH)
    If the result is not as specified, replace the outer rear view mirror assembly RH.


  1. Check the outer mirror heater RH.


      B354446E01
    1. Measure the resistance according to the value(s) in the table below.

      Standard Resistance:
      Tester Connection
      Condition
      Specified Condition
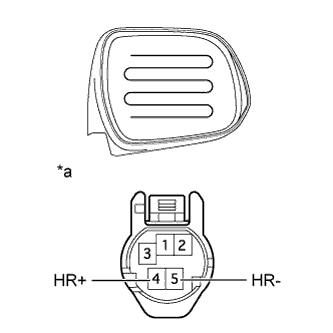
      Terminal 4 (HR+) - Terminal 5 (HR-)
      25°C (77°F)
      5.3 to 7.9 Ω

      If the result is not as specified, replace the outer rear view mirror assembly RH.

    2. Apply battery voltage to check the operation of the outer mirror heater RH.

      OK:
      Condition
      Specified Condition
      Battery positive (+) → Terminal 4 (HR+)
      Battery negative (-) → Terminal 5 (HR-)
      Mirror becomes warm

      Text in Illustration 
      *a
      Component without harness connected
      (Outer Rear View Mirror Assembly RH)

      HINT:
      It will take a short amount of time for the outer mirror RH to become warm.

      If the result is not as specified, replace the outer rear view mirror assembly RH.