 |
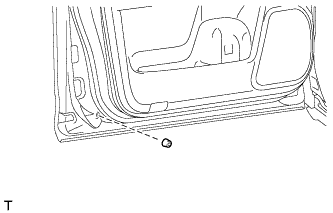
Attach the claw to install a new front door panel cushion.
FRONT DOOR > REASSEMBLY |
| 1. INSTALL FRONT DOOR PANEL CUSHION |
|
Attach the claw to install a new front door panel cushion.
| 2. INSTALL FRONT DOOR LOWER OUTSIDE STRIPE LH |
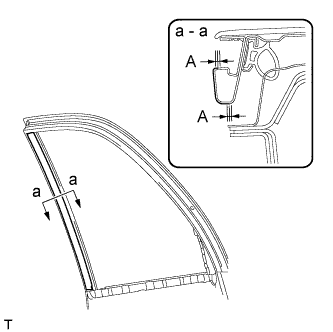 |
Refer to the illustration to position a new front door lower outside stripe.
| Area | Specified Condition |
| A | +/- 1.0 mm (0.039 in.) From End |
| 3. INSTALL FRONT DOOR OUTSIDE STRIPE LH |
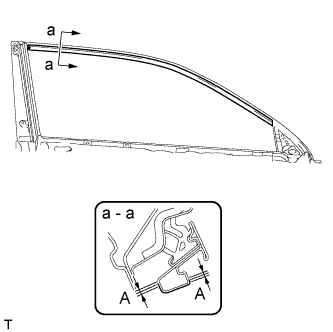 |
Refer to the illustration to position a new front door outside stripe.
| Area | Specified Condition |
| A | +/- 1.0 mm (0.039 in.) From End |
| 4. INSTALL NO. 1 BLACK OUT TAPE LH |
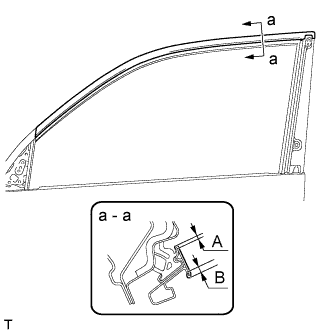 |
Refer to the illustration to position new black out tape.
| Area | Specified Condition |
| A | 2 to 4 mm (0.078 to 0.158 in.) |
| B | 4 to 6 mm (0.157 to 0.236 in.) |
| 5. INSTALL FRONT DOOR REAR WINDOW FRAME MOULDING LH |
Clean the vehicle body surface.
Using a heat light, heat the vehicle body surface.
Remove the double-sided tape from the vehicle body surface.
Wipe off any tape adhesive residue with cleaner.
Install a new front door rear window frame moulding.
Using a heat light, heat a new front door rear window frame moulding and the vehicle body surface.
Remove the peeling paper from the face of the front door rear window frame moulding.
Attach the clip and double-sided tape to install the front door rear window frame moulding.
Install a new door window frame moulding clip.
| 6. INSTALL FRONT DOOR BELT MOULDING LH |
Attach the 6 claws to install the front door belt moulding.
| 7. INSTALL FRONT DOOR WEATHERSTRIP LH |
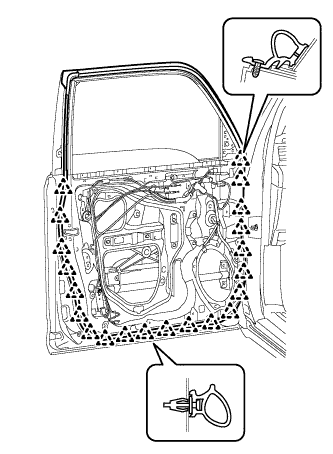 |
Attach the 21 clips to install the front door weatherstrip LH.
| 8. INSTALL FRONT DOOR CHECK ASSEMBLY LH |
Apply MP grease to the sliding areas of the front door check assembly LH.
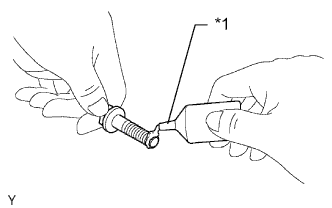 |
Apply a few drops of adhesive to 2 or 3 threads of the bolt.
| *1 | Adhesive |
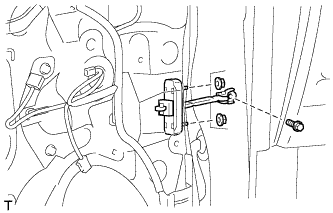 |
Install the front door check assembly LH to the front door panel with the 2 nuts.
Install the front door check assembly LH to the vehicle body with the bolt.
| 9. INSTALL FRONT DOOR NO. 2 STIFFENER CUSHION |
Clean the installation surface.
Using a heat light, heat the installation surface.
| Item | Temperature |
| Vehicle body | 40 to 60°C (104 to 140°F) |
Remove the double-sided tape from the installation surface.
Wipe off any tape adhesive residue with cleaner.
Install a new front door No. 2 stiffener cushion.
Using a heat light, heat a new front door No. 2 stiffener cushion and the installation surface.
| Item | Temperature |
| Front door No. 2 stiffener cushion | 20 to 30°C (68 to 86°F) |
| Vehicle body | 40 to 60°C (104 to 140°F) |
Remove the peeling paper from the face of the front door No. 2 stiffener cushion.
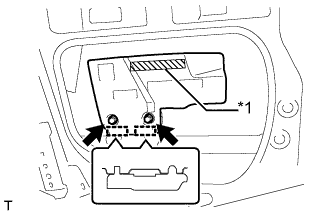 |
Attach the 2 clamps and double-sided tape to install the front door No. 2 stiffener cushion.
| *1 | Double-sided Tape |
Install the 2 bolts.
| 10. INSTALL FRONT DOOR LOCK OPEN ROD LH |
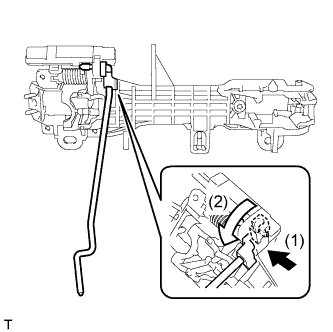 |
Install the front door lock open rod LH as indicated by the arrows in the order shown in the illustration.
| 11. INSTALL FRONT DOOR NO. 2 WIRE LH (w/ Smart Key System) |
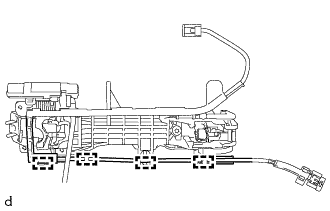 |
Attach the 4 clamps to install the front door No. 2 wire LH.
| 12. INSTALL FRONT DOOR OUTSIDE HANDLE FRAME SUB-ASSEMBLY LH |
Apply MP grease to the sliding parts on the front door outside handle frame sub-assembly LH.
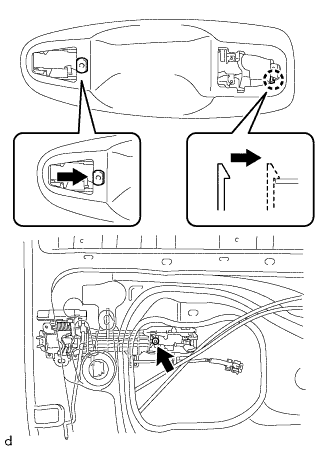 |
Attach the door handle nut and claw.
Using a T30 "TORX" socket wrench, install the front door outside handle frame sub-assembly LH with the screw.
w/ Smart Key System:
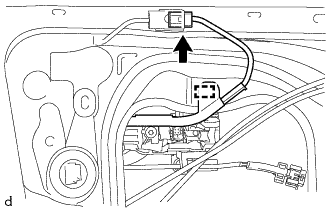 |
Attach the clamp.
Connect the connector to the front door No. 2 wire LH.
| 13. INSTALL FRONT DOOR INSIDE LOCKING CABLE ASSEMBLY LH |
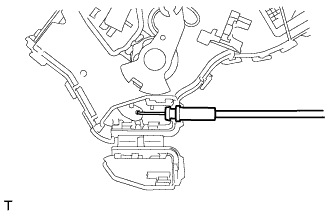 |
Install the front door inside locking cable assembly LH to the front door lock assembly LH.
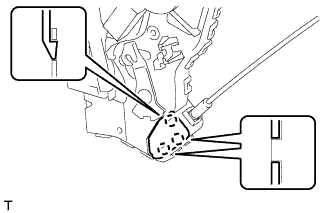 |
Attach the 3 claws to close the cover.
| 14. INSTALL FRONT DOOR LOCK REMOTE CONTROL CABLE ASSEMBLY LH |
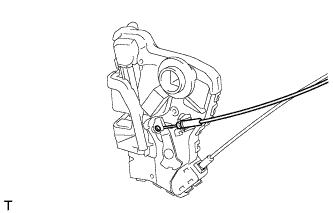 |
Install the front door lock remote control cable assembly LH to the front door lock assembly LH.
| 15. INSTALL FRONT DOOR LOCK ASSEMBLY LH |
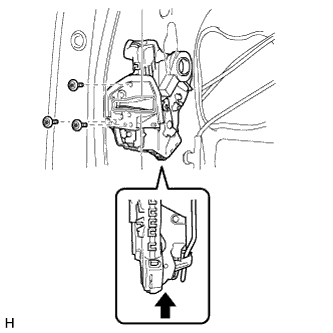 |
Apply MP grease to the sliding parts of the front door lock assembly.
Install a new door lock wiring harness seal to the front door lock assembly.
Insert the front door lock open rod into the front door lock assembly.
Check that the front door lock open rod is securely connected to the front door lock assembly.
Using a T30 "TORX" wrench, install the front door lock assembly with the 3 screws.
Connect the connector.
| 16. INSTALL FRONT DOOR REAR OUTSIDE HANDLE PAD LH |
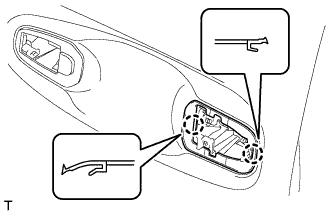 |
Attach the 2 claws to install the front door rear outside handle pad LH.
| 17. INSTALL FRONT DOOR FRONT OUTSIDE HANDLE PAD LH |
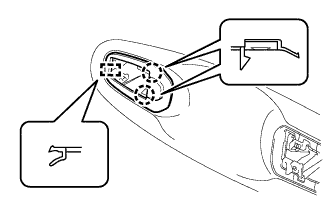 |
Attach the guide and 2 claws to install the front door front outside handle pad LH.
| 18. INSTALL FRONT DOOR OUTSIDE HANDLE ASSEMBLY LH |
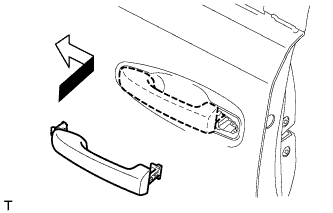 |
Insert the front end of the front door outside handle assembly LH into the front door outside handle frame sub-assembly.
Insert the rear end of the front door outside handle assembly LH into the front door outside handle frame sub-assembly. Then slide the front door outside handle assembly LH toward the front of the vehicle to install it.
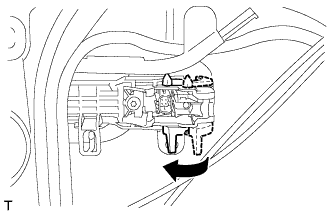 |
Move the lever back in the direction indicated by the arrow in the illustration to lock the front door outside handle assembly LH.
w/ Smart Key System:
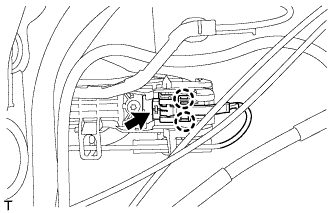 |
Connect the connector.
Attach the 2 claws.
| 19. INSTALL FRONT DOOR OUTSIDE HANDLE COVER RH (for Front Passenger Side) |
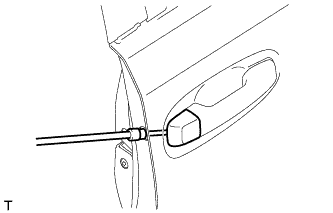 |
Using a T30 "TORX" socket wrench, install the front door outside handle cover RH with the screw.
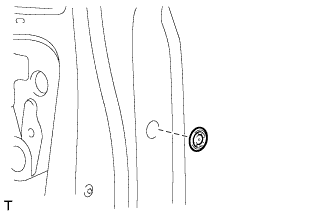 |
Install the hole plug.
| 20. INSTALL FRONT DOOR OUTSIDE HANDLE COVER LH (for Driver Side) |
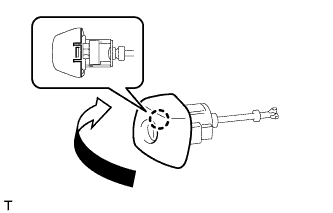 |
Attach the claw to install the front door outside handle cover LH to the lock cylinder assembly.
| 21. INSTALL FRONT DOOR OUTSIDE HANDLE COVER WITH LOCK CYLINDER ASSEMBLY (for Driver Side) |
Install the front door outside handle cover with lock cylinder assembly.
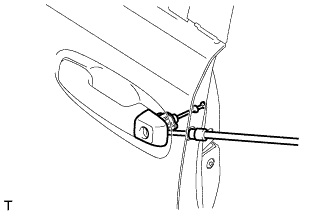 |
Using a T30 "TORX" socket wrench, install the front door outside handle cover with lock cylinder assembly with the screw.
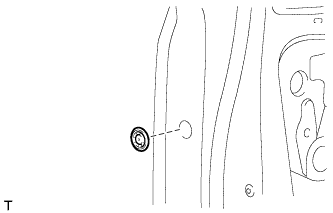 |
Install the hole plug.
| 22. INSTALL FRONT DOOR REAR LOWER FRAME SUB-ASSEMBLY LH |
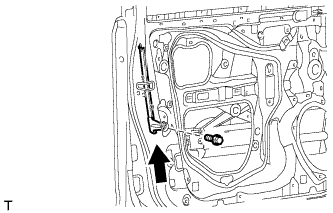 |
Install the front door rear lower frame sub-assembly LH with the bolt as shown in the illustration.
| 23. INSTALL FRONT DOOR GLASS RUN LH |
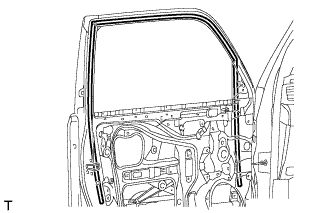 |
Install the front door glass run LH.
| 24. INSTALL DOOR FRAME GARNISH LH |
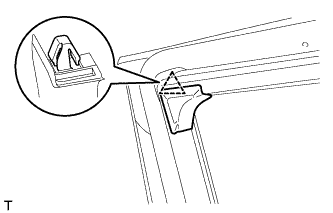 |
Attach the clip to install a new door frame garnish LH.
| 25. INSTALL FRONT POWER WINDOW REGULATOR MOTOR ASSEMBLY LH |
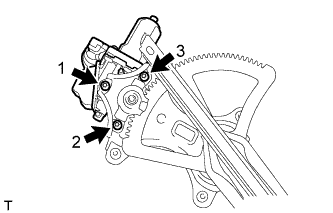 |
Using a T25 "TORX" socket wrench, install the power window regulator motor with the 3 screws.
| 26. INSTALL FRONT DOOR WINDOW REGULATOR SUB-ASSEMBLY LH |
Apply MP grease to the sliding parts of the front door window regulator sub-assembly LH.
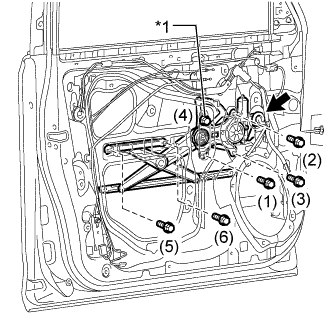 |
Install the temporary bolt to the front door window regulator sub-assembly LH.
| *1 | Temporary Bolt |
Temporarily install the front door window regulator sub-assembly LH.
Tighten the temporary bolt and 5 bolts to install the front door window regulator sub-assembly LH.
Connect the connector.
| 27. INSTALL FRONT DOOR GLASS SUB-ASSEMBLY LH |
Connect the multiplex network master switch assembly (for Driver Side).
Connect the power window regulator switch assembly (for Front Passenger Side).
Connect the cable to the negative (-) battery terminal.
Move the front door glass sub-assembly so that the front door glass bolts can be seen.
Disconnect the cable from the negative (-) battery terminal.
Disconnect the multiplex network master switch assembly (for Driver Side).
Disconnect the power window regulator switch assembly (for Front Passenger Side).
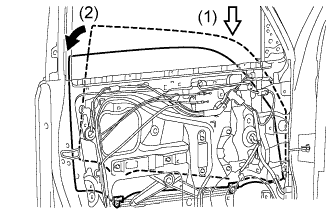 |
Insert the front door glass sub-assembly LH into the front door panel along the front door glass run LH as indicated by the arrows in the order shown in the illustration.
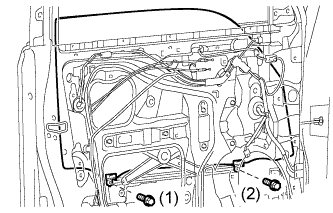 |
Install the front door glass sub-assembly LH with the 2 bolts in the order shown in the illustration.
| 28. INSTALL OUTER REAR VIEW MIRROR ASSEMBLY LH |
Attach the claw to install the outer rear view mirror assembly LH.
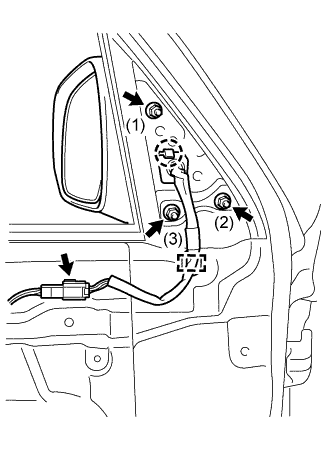 |
Install the 3 nuts in the order shown in the illustration.
Attach the clamp.
Connect the connector.
| 29. INSTALL FRONT DOOR SERVICE HOLE COVER LH |
Apply a new butyl tape to the front door panel.
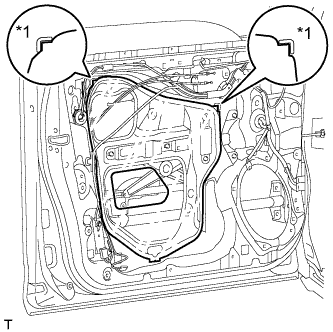 |
Pass the front door lock remote control cable assembly LH and front door inside locking cable assembly LH through a new front door service hole cover LH.
Install a new front door service hole cover LH according to the reference points on the front door panel.
| *1 | Reference Point |
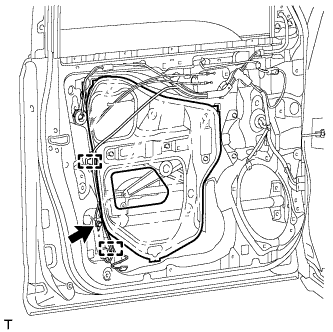 |
Attach the 2 clamps.
Connect the door wire with the bolt.
| 30. INSTALL SIDE AIRBAG SENSOR ASSEMBLY LH |
Turn the ignition switch off.
Disconnect the cable from the negative (-) battery terminal.
Install the side airbag sensor with the bolt.
Check that the side airbag sensor is not loose.
Connect the connector.
| 31. INSTALL FRONT NO. 1 SPEAKER ASSEMBLY |
Temporarily install the speaker by attaching the 2 claws of the speaker to the door panel.
Install the speaker with the 4 screws.
Connect the connector.
| 32. INSTALL SEAT MEMORY SWITCH (w/ Seat Position Memory System) |
Attach the 4 claws to install the seat memory switch.
Install the 2 screws.
Connect the connector.
| 33. INSTALL POWER WINDOW REGULATOR SWITCH ASSEMBLY (for Front Passenger Side) |
Attach the 2 claws to install the power window regulator switch.
Connect the connectors.
Attach the 10 claws to install the power window regulator switch with base panel.
| 34. INSTALL DOOR CONTROL SWITCH ASSEMBLY (for Front Passenger Side) |
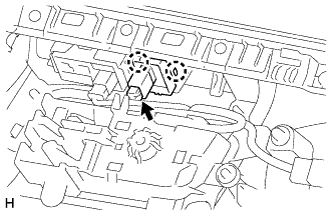 |
Attach the 2 claws to install the door control switch assembly.
Connect the door control switch connector.
| 35. INSTALL MULTIPLEX NETWORK MASTER SWITCH ASSEMBLY (for Driver Side) |
Install the multiplex network master switch assembly with the 3 screws.
Attach the 10 claws to install the multiplex network master switch with base panel.
Connect the connector.
| 36. INSTALL COURTESY LIGHT ASSEMBLY LH |
Install the bulb.
Connect the connector.
Attach the 2 claws to install the light.
| 37. INSTALL NO. 1 INTERIOR ILLUMINATION LIGHT ASSEMBLY (w/ Intuitive Parking Assist System) |
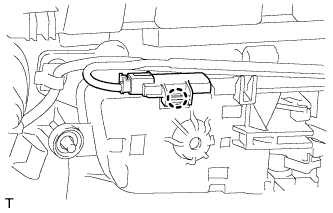 |
Connect the connector.
Attach the claw to install the light.
| 38. INSTALL FRONT DOOR INNER GLASS WEATHERSTRIP LH |
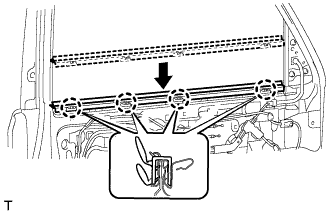 |
Attach the 4 claws to install the front door inner glass weatherstrip LH as shown in the illustration.
| 39. INSTALL FRONT DOOR TRIM BOARD SUB-ASSEMBLY LH |
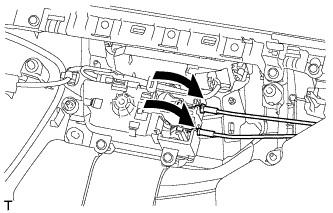 |
Connect the front door lock remote control cable assembly LH and front door inside locking cable assembly LH.
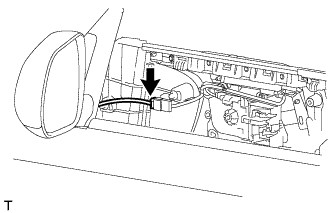 |
Connect the connector.
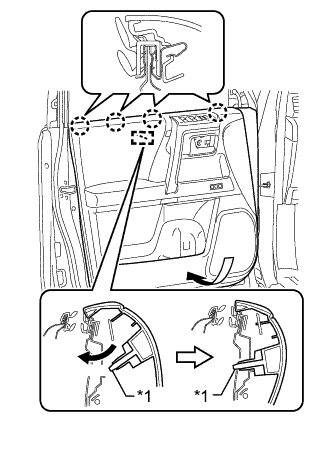 |
Attach the front door trim board sub-assembly LH to the 4 claws of the front door inner glass weatherstrip LH as shown in the illustration.
Attach the reference boss.
| *1 | Reference Boss |
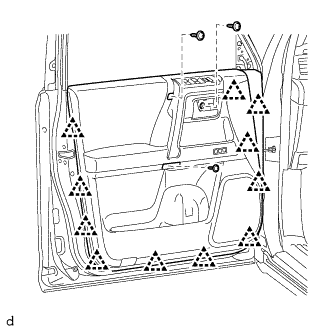 |
Attach the 11 clips to install the front door trim board sub-assembly LH.
Install the 3 screws.
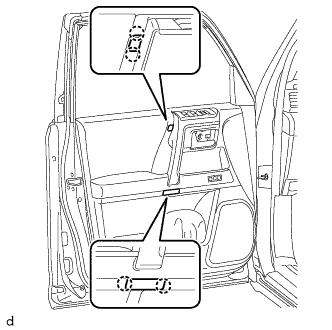 |
Attach the 4 claws to install the 2 door armrest caps.
| 40. INSTALL NO. 2 DOOR INSIDE HANDLE BEZEL LH |
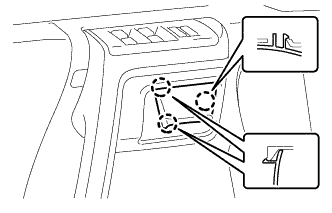 |
Attach the 3 claws to install the No. 2 door inside handle bezel LH.
| 41. INSTALL FRONT DOOR LOWER FRAME BRACKET GARNISH LH |
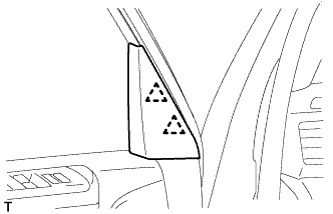 |
Attach the 2 clips to install the front door lower frame bracket garnish LH.
| 42. CONNECT CABLE TO NEGATIVE BATTERY TERMINAL |
| 43. INITIALIZE POWER WINDOW CONTROL SYSTEM |
| 44. CHECK SRS WARNING LIGHT |