REAR NO. 2 SEAT OUTER BELT ASSEMBLY > INSTALLATION |
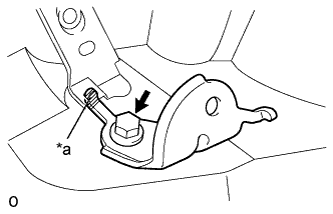
| 1. INSTALL REAR SEAT OUTER BELT ANCHOR PLATE SUB-ASSEMBLY LH |
|
Install the anchor plate with the bolt.
| *a | Protruding Part |
| 2. INSTALL SEAT BELT ANCHOR PLATE ASSEMBLY (for RH Side) |
Install the anchor plate with the 2 bolts.
| 3. INSTALL REAR NO. 2 SEAT OUTER BELT ASSEMBLY LH |
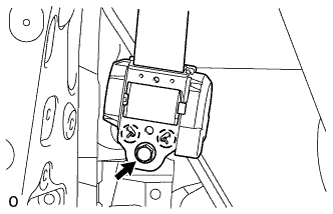 |
Align the claws with the seat belt positioning holes and install the retractor of the seat belt with the bolt as shown in the illustration.
Install the rear No. 1 seat outer belt shoulder anchor with the bolt.
| 4. INSTALL REAR WINDOW SIDE GARNISH ASSEMBLY LH |
Pass the rear No. 1 seat outer belt floor anchor through the rear window side garnish assembly LH and attach the 4 claws and 2 guides.
Attach the 7 clips and 4 guides to install the rear window side garnish assembly LH.
| 5. INSTALL REAR NO. 2 WINDOW SIDE GARNISH ASSEMBLY LH |
w/ Rear No. 2 Seat:
Pass the rear No. 2 seat outer belt floor anchor through the rear No. 2 window side garnish assembly LH and attach the 7 claws and guide.
Attach the 6 clips and guide to install the rear No. 2 window side garnish assembly LH.
| 6. INSTALL DECK TRIM SIDE PANEL ASSEMBLY LH |
Attach the 7 clips, 5 claws and 2 guides to install the deck trim side panel.
Install the 3 bolts and 2 screws.
Install the rear No. 1 seat outer belt floor anchor with the bolt.
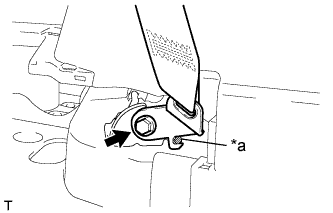 |
for LH Side:
Install the rear No. 2 seat outer belt floor anchor with the bolt.
| *a | Protruding Part |
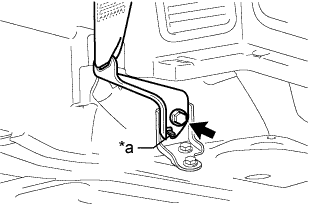 |
for RH Side:
Install the rear No. 2 seat outer belt floor anchor with the bolt.
| *a | Protruding Part |
| 7. INSTALL FRONT DECK SIDE TRIM COVER LH |
Attach the 2 claws to install the front deck side trim cover LH.
| 8. INSTALL NO. 1 LUGGAGE COMPARTMENT TRIM HOOK |
Push in the No. 1 luggage compartment trim hook to install it.
| 9. INSTALL REAR NO. 1 SEAT OUTER LAP BELT ANCHOR COVER |
Attach the 3 claws to install the rear No. 1 seat outer lap belt anchor cover.
| 10. INSTALL REAR DOOR OPENING TRIM WEATHERSTRIP LH |
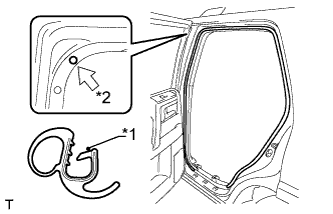 |
Align the paint mark on the rear door opening trim weatherstrip LH with the mark position on the vehicle to install the rear door opening trim weatherstrip LH as shown in the illustration.
| *1 | Paint Mark |
| *2 | Mark Position |
| 11. INSTALL REAR DOOR SCUFF PLATE LH |
Attach the 3 clips, 6 claws and 2 guides to install the rear door scuff plate LH.
| 12. INSTALL QUARTER SCUFF PLATE LH |
Install the quarter scuff plate LH with the 2 bolts.
| 13. INSTALL REAR NO. 2 SEAT ASSEMBLY |
Install the rear No. 2 seat assembly (Click here).