
SLIDING ROOF SYSTEM > TERMINALS OF ECU |
| CHECK SLIDING ROOF DRIVE GEAR SUB-ASSEMBLY (SLIDING ROOF ECU) |
Disconnect the S8 ECU connector.
Measure the resistance and voltage according to the value(s) in the table below.
| Terminal No. (Symbol) | Wiring Color | Terminal Description | Condition | Specified Condition |
| S8-1 (B) - S8-2 (E) | W - W-B | Battery power supply | Always | 11 to 14 V |
| S8-5 (IG) - S8-2 (E) | L - W-B | IG power supply | Ignition switch off | Below 1 V |
| S8-5 (IG) - S8-2 (E) | L - W-B | IG power supply | Ignition switch ON | 11 to 14 V |
| S8-2 (E) - Body ground | W-B - Body ground | Ground | Always | Below 1 Ω |
Reconnect the S8 ECU connector.
Measure the voltage according to the value(s) in the table below.
| Terminal No. (Symbol) | Wiring Color | Terminal Description | Condition | Specified Condition |
| S8-7 (OPN) - S8-2 (E) | LG - W-B | Sliding roof motor open | Ignition switch ON, sliding roof closed Slide open switch off | 11 to 14 V |
| S8-7 (OPN) - S8-2 (E) | LG - W-B | Sliding roof motor open | Ignition switch ON, sliding roof closed Slide open switch on | Below 1 V |
| S8-9 (CLS) - S8-2 (E) | B - W-B | Sliding roof motor close | Ignition switch ON, sliding roof open Slide close switch off | 11 to 14 V |
| S8-9 (CLS) - S8-2 (E) | B - W-B | Sliding roof motor close | Ignition switch ON, sliding roof open Slide close switch on | Below 1 V |
| S8-10 (UP) - S8-2 (E) | R - W-B | Sliding roof motor up | Ignition switch ON, sliding roof tilted downward Tilt up switch off | 11 to 14 V |
| S8-10 (UP) - S8-2 (E) | R - W-B | Sliding roof motor up | Ignition switch ON, sliding roof tilted downward Tilt up switch on | Below 1 V |
| S8-8 (DWN) - S8-2 (E) | P - W-B | Sliding roof motor down | Ignition switch ON, sliding roof tilted upward Tilt down switch off | 11 to 14 V |
| S8-8 (DWN) - S8-2 (E) | P - W-B | Sliding roof motor down | Ignition switch ON, sliding roof tilted upward Tilt down switch on | Below 1 V |
| CHECK DRIVER SIDE JUNCTION BLOCK ASSEMBLY, MAIN BODY ECU (MULTIPLEX NETWORK BODY ECU) |
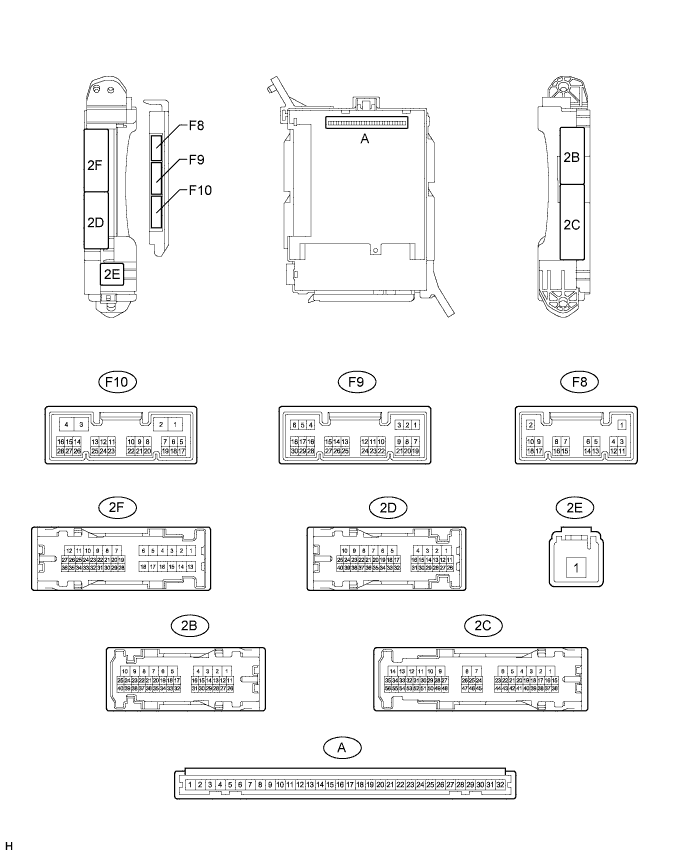
Remove the main body ECU (multiplex network body ECU) from the driver side junction block assembly (Click here).
Measure the voltage and resistance according to the value(s) in the table below.
| Terminal No. (Symbol) | Wiring Color | Terminal Description | Condition | Specified Condition |
| A-30 (BECU) - Body ground | - | Battery power supply | Ignition switch off | 11 to 14 V |
| A-31 (ALTB) - Body ground | - | Battery power supply | Ignition switch off | 11 to 14 V |
| A-32 (IG) - Body ground | - | Ignition switch power supply | Ignition switch ON | 11 to 14 V |
| A-32 (IG) - Body ground | - | Ignition switch power supply | Ignition switch off | Below 1 V |
| A-29 (ACC) - Body ground | - | ACC power supply | Ignition switch ACC | 11 to 14 V |
| A-29 (ACC) - Body ground | - | ACC power supply | Ignition switch off | Below 1 V |
| A-11 (GND1) - Body ground | - | Ground | Always | Below 1 Ω |
| F10-3 (GND2) - Body ground | W-B - Body ground | Ground | Always | Below 1 Ω |
| F9-17 (KSW)* - Body ground | B - Body ground | Unlock warning switch input | No key in ignition key cylinder | 10 kΩ or higher |
| F9-17 (KSW)* - Body ground | B - Body ground | Unlock warning switch input | Key in ignition key cylinder | Below 1 Ω |
Reconnect the main body ECU (multiplex network body ECU).
Measure the voltage according to the value(s) in the table below.
| Terminal No. (Symbol) | Wiring Color | Terminal Description | Condition | Specified Condition |
| 2F-27 (FLCY) - Body ground | R - Body ground | Front door courtesy switch LH input | Front door LH open | Below 1 V |
| 2F-27 (FLCY) - Body ground | R - Body ground | Front door courtesy switch LH input | Front door LH closed | 11 to 14 V |
| 2B-15 (FRCY) - Body ground | B - Body ground | Front door courtesy switch RH input | Front door RH open | Below 1 V |
| 2B-15 (FRCY) - Body ground | B - Body ground | Front door courtesy switch RH input | Front door RH closed | 11 to 14 V |
| F9-11 (L2) - Body ground | LG - Body ground | Driver side door key-linked lock input | Driver side door key cylinder turned to lock | Below 1 V |
| F9-11 (L2) - Body ground | LG - Body ground | Driver side door key-linked lock input | Driver side door key cylinder off | 11 to 14 V |
| F9-24 (UL3) - Body ground | GR - Body ground | Driver side door key-linked unlock input | Driver side door key cylinder turned to unlock | Below 1 V |
| F9-24 (UL3) - Body ground | GR - Body ground | Driver side door key-linked unlock input | Driver side door key cylinder off | 11 to 14 V |
| F9-26 (RDA)* - Body ground | P - Body ground | Door control receiver input | No key in ignition key cylinder, all doors closed and transmitter switch off → on | Pulse generation |
| CHECK CERTIFICATION ECU (w/ Smart Key System) |
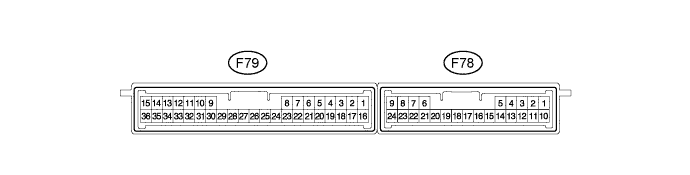
Disconnect the F79 ECU connector.
Measure the resistance and voltage according to the value(s) in the table below.
| Terminal No. (Symbol) | Wiring Color | Terminal Description | Condition | Specified Condition |
| F79-1 (+B) - F79-15 (E) | V - W-B | Battery power supply | Always | 11 to 14 V |
| F79-17 (CUTB) - F79-15 (E) | L - W-B | Battery power supply | Always | 11 to 14 V |
| F79-16 (IG) - F79-15 (E) | W - W-B | Ignition power supply | Ignition switch off → ON | Below 1 V → 11 to 14 V |
| F79-15 (E) - Body ground | W-B - Body ground | Ground | Always | Below 1 Ω |
Reconnect the F79 ECU connector.
Measure the resistance and voltage according to the value(s) in the table below.
| Terminal No. (Symbol) | Wiring Color | Terminal Description | Condition | Specified Condition |
| F78-5 (RCO) - F79-15 (E) | L - W-B | Door control receiver power source | Ignition switch off, all doors closed and transmitter switch not pressed → pressed | Below 1 V → 4.5 to 5.5 V |
| F78-15 (RDA) - F79-15 (E) | G - W-B | Door control receiver data input signal | Ignition switch off | 11 to 14 V pulse generation at regular intervals |
| F78-16 (RSSI) - F79-15 (E) | P - W-B | Door control receiver electric wave existence signal | All doors locked, all doors closed and transmitter switch not pressed → pressed | 11 to 14 V → Below 2 V |