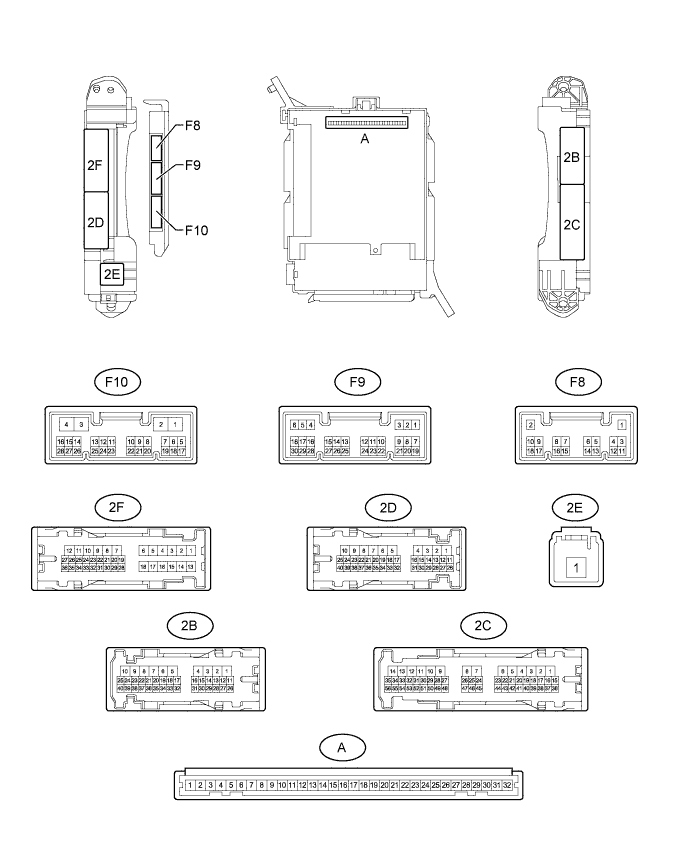
LIN COMMUNICATION SYSTEM > TERMINALS OF ECU |
| CHECK MAIN BODY ECU (MULTIPLEX NETWORK BODY ECU) AND DRIVER SIDE JUNCTION BLOCK ASSEMBLY |
Remove the main body ECU (multiplex network body ECU) from the driver side junction block assembly (Click here).
Measure the resistance and voltage according to the value(s) in the table below.
| Terminal No. (Symbol) | Wiring Color | Terminal Description | Condition | Specified Condition |
| F10-3 (GND2) - Body ground | W-B - Body ground | Ground | Always | Below 1 Ω |
| A-11 (GND1) - Body ground | None - Body ground | Ground | Always | Below 1 Ω |
| A-30 (BECU) - Body ground | None - Body ground | Battery power supply | Always | 11 to 14 V |
| A-32 (IG) - Body ground | None - Body ground | IG power supply | Ignition switch ON | 11 to 14 V |
| CHECK MULTIPLEX NETWORK MASTER SWITCH ASSEMBLY |
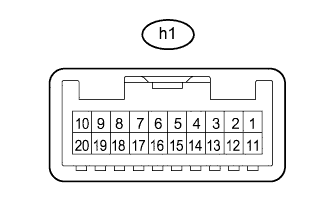 |
Disconnect the h1 multiplex network master switch assembly connector.
Measure the resistance and voltage according to the value(s) in the table below.
| Terminal No. (Symbol) | Wiring Color | Terminal Description | Condition | Specified Condition |
| h1-12 (GND) - Body ground | W-B - Body ground | Ground | Always | Below 1 Ω |
| h1-11 (B) - Body ground | G - Body ground | Battery power supply | Always | 11 to 14 V |
| CHECK FRONT POWER WINDOW REGULATOR MOTOR ASSEMBLY LH |
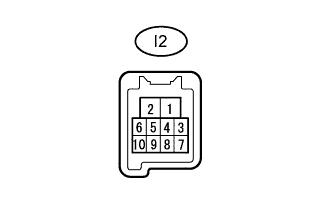 |
Disconnect the I2 front power window regulator motor assembly LH connector.
Measure the resistance and voltage according to the value(s) in the table below.
| Terminal No. (Symbol) | Wiring Color | Terminal Description | Condition | Specified Condition |
| I2-1 (GND) - Body ground | W-B - Body ground | Ground | Always | Below 1 Ω |
| I2-2 (B) - Body ground | R - Body ground | Battery power supply | Always | 11 to 14 V |
| CHECK FRONT POWER WINDOW REGULATOR MOTOR ASSEMBLY RH |
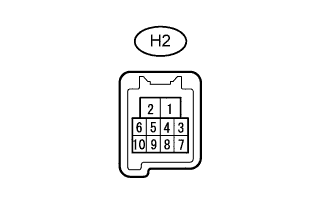 |
Disconnect the H2 front power window regulator motor assembly RH connector.
Measure the resistance and voltage according to the value(s) in the table below.
| Terminal No. (Symbol) | Wiring Color | Terminal Description | Condition | Specified Condition |
| H2-1 (GND) - Body ground | W-B - Body ground | Ground | Always | Below 1 Ω |
| H2-2 (B) - Body ground | G - Body ground | Battery power supply | Always | 11 to 14 V |
| CHECK REAR POWER WINDOW REGULATOR MOTOR ASSEMBLY LH |
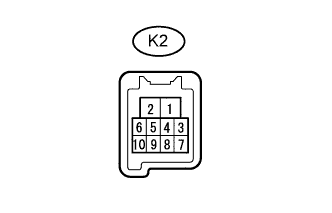 |
Disconnect the K2 rear power window regulator motor assembly LH connector.
Measure the resistance and voltage according to the value(s) in the table below.
| Terminal No. (Symbol) | Wiring Color | Terminal Description | Condition | Specified Condition |
| K2-1 (GND) - Body ground | W-B - Body ground | Ground | Always | Below 1 Ω |
| K2-2 (B) - Body ground | W - Body ground | Battery power supply | Always | 11 to 14 V |
| CHECK REAR POWER WINDOW REGULATOR MOTOR ASSEMBLY RH |
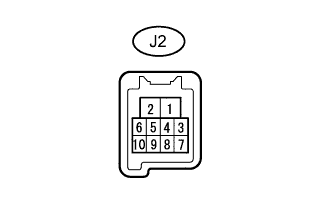 |
Disconnect the J2 rear power window regulator motor assembly RH connector.
Measure the resistance and voltage according to the value(s) in the table below.
| Terminal No. (Symbol) | Wiring Color | Terminal Description | Condition | Specified Condition |
| J2-1 (GND) - Body ground | W-B - Body ground | Ground | Always | Below 1 Ω |
| J2-2 (B) - Body ground | W - Body ground | Battery power supply | Always | 11 to 14 V |
| CHECK SLIDING ROOF DRIVE GEAR SUB-ASSEMBLY (w/ Sliding Roof System) |
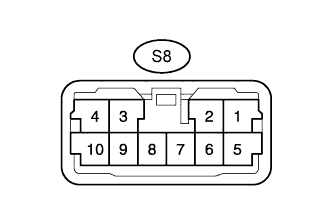 |
Disconnect the S8 sliding roof drive gear sub-assembly connector.
Measure the resistance and voltage according to the value(s) in the table below.
| Terminal No. (Symbol) | Wiring Color | Terminal Description | Condition | Specified Condition |
| S8-2 (E) - Body ground | W-B - Body ground | Ground | Always | Below 1 Ω |
| S8-1 (B) - Body ground | W - Body ground | Battery power supply | Always | 11 to 14 V |
| S8-5 (IG) - Body ground | L - Body ground | IG power supply | Always | 11 to 14 V |
| CHECK CERTIFICATION ECU (w/ Smart Key System) |
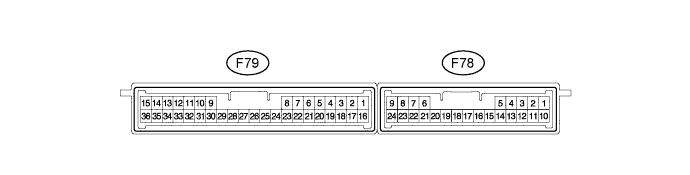
Disconnect the F79 certification ECU connector.
Measure the resistance and voltage according to the value(s) in the table below.
| Terminal No. (Symbol) | Wiring Color | Terminal Description | Condition | Specified Condition |
| F79-15 (E) - Body ground | W-B - Body ground | Ground | Always | Below 1 Ω |
| F79-1 (+B) - Body ground | V - Body ground | Battery power supply | Always | 11 to 14 V |
| F79-16 (IG) - Body ground | W - Body ground | IG power supply | Ignition switch ON | 11 to 14 V |
| CHECK POWER MANAGEMENT CONTROL ECU (w/ Smart Key System) |
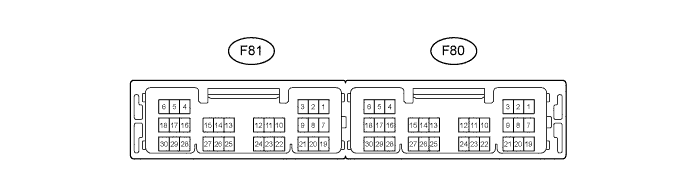
Disconnect the F80 power management control ECU connector.
Measure the resistance and voltage according to the value(s) in the table below.
| Terminal No. (Symbol) | Wiring Color | Terminal Description | Condition | Specified Condition |
| F80-6 (GND) - Body ground | W-B - Body ground | Ground | Always | Below 1 Ω |
| F80-5 (GND2) - Body ground | W-B - Body ground | Ground | Always | Below 1 Ω |
| F80-1 (AM22) - Body ground | B - Body ground | Battery power supply | Always | 11 to 14 V |
| F80-2 (AM21) - Body ground | B - Body ground | Battery power supply | Always | 11 to 14 V |
| CHECK ID CODE BOX (w/ Smart Key System) |
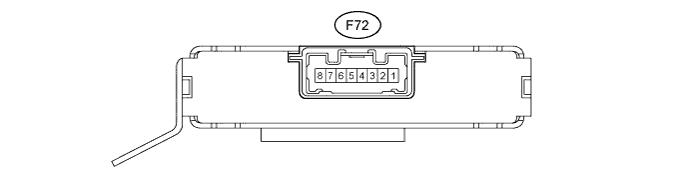
Disconnect the F72 ID code box connector.
Measure the resistance and voltage according to the value(s) in the table below.
| Terminal No. (Symbol) | Wiring Color | Terminal Description | Condition | Specified Condition |
| F72-8 (GND) - Body ground | W-B - Body ground | Ground | Always | Below 1 Ω |
| F72-1 (+B) - Body ground | V - Body ground | Battery power supply | Always | 11 to 14 V |
| CHECK STEERING LOCK ACTUATOR ASSEMBLY (STEELING LOCK ECU) (w/ Smart Key System) |
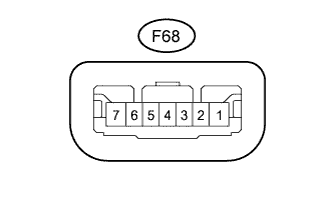 |
Disconnect the F68 steering lock actuator assembly (steering lock ECU) connector.
Measure the resistance and voltage according to the value(s) in the table below.
| Terminal No. (Symbol) | Wiring Color | Terminal Description | Condition | Specified Condition |
| F68-1 (GND) - Body ground | W-B - Body ground | Ground | Always | Below 1 Ω |
| F68-6 (IG2) - Body ground | W - Body ground | IG power supply | Ignition switch ON | 11 to 14 V |
| F68-7 (B) - Body ground | GR - Body ground | Battery power supply | Always | 11 to 14 V |
| CHECK AIR CONDITIONING AMPLIFIER ASSEMBLY |

Disconnect the F42 air conditioning amplifier assembly connector.
Measure the resistance and voltage according to the value(s) in the table below.
| Terminal No. (Symbol) | Wiring Color | Terminal Description | Condition | Specified Condition |
| F42-14 (GND) - Body ground | W-B - Body ground | Ground | Always | Below 1 Ω |
| F42-1 (IG+) - Body ground | L - Body ground | IG power supply | Ignition switch ON | 11 to 14 V |
| F42-21 (B) - Body ground | V - Body ground | Battery power supply | Always | 11 to 14 V |
| CHECK AIR CONDITIONING CONTROL ASSEMBLY |
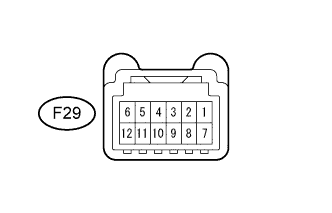 |
Disconnect the F29 air conditioning control assembly connector.
Measure the voltage and resistance according to the value(s) in the table below.
| Terminal No. (Symbol) | Wiring Color | Terminal Description | Condition | Specified Condition |
| F29-11 (GND) - Body ground | W-B - Body ground | Ground | Always | Below 1 Ω |
| F29-4 (IG+) - Body ground | L - Body ground | IG power supply | Ignition switch ON | 11 to 14 V |
| CHECK MULTIPLEX NETWORK DOOR ECU (BACK DOOR P/W) |
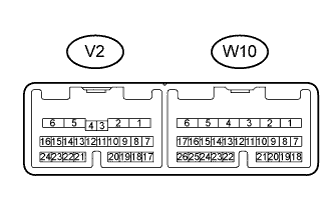 |
Disconnect the V2 multiplex network door ECU (back door P/W) connector.
Measure the voltage and resistance according to the value(s) in the table below.
| Terminal No. (Symbol) | Wiring Color | Terminal Description | Condition | Specified Condition |
| V2-6 (GND) - Body ground | W-B - Body ground | Ground | Always | Below 1 Ω |
| V2-7 (BECU) - Body ground | L - Body ground | Battery power supply | Always | 11 to 14 V |
| V2-8 (SIG) - Body ground | G - Body ground | IG power supply | Ignition switch ON | 11 to 14 V |
| CHECK BACK DOOR POWER WINDOW REGULATOR MOTOR ASSEMBLY |
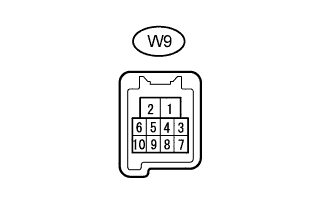 |
Disconnect the W9 back door power window regulator motor assembly connector.
Measure the resistance and voltage according to the value(s) in the table below.
| Terminal No. (Symbol) | Wiring Color | Terminal Description | Condition | Specified Condition |
| W9-1 (GND) - Body ground | LG - Body ground | Ground | Always | Below 1 Ω |
| W9-2 (B) - Body ground | GR - Body ground | Battery power supply | Always | 11 to 14 V |
| CHECK COMBINATION METER ASSEMBLY |
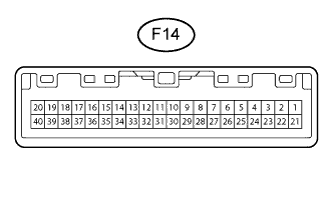 |
Disconnect the F14 combination meter assembly connector.
Measure the voltage and resistance according to the value(s) in the table below.
| Terminal No. (Symbol) | Wiring Color | Terminal Description | Condition | Specified Condition |
| F14-20 (E1) - Body ground | W-B - Body ground | Ground | Always | Below 1 Ω |
| F14-15 (B) - Body ground | L - Body ground | Battery power supply | Always | 11 to 14 V |
| F14-17 (IG+) - Body ground | R - Body ground | IG power supply | Ignition switch ON | 11 to 14 V |
| CHECK ACCESSORY METER ASSEMBLY (w/ Accessory Meter) |
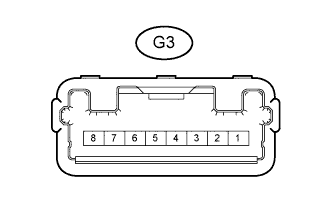 |
Disconnect the G3 accessory meter assembly connector.
Measure the voltage and resistance according to the value(s) in the table below.
| Terminal No. (Symbol) | Wiring Color | Terminal Description | Condition | Specified Condition |
| G3-1 (E) - Body ground | W-B - Body ground | Ground | Always | Below 1 Ω |
| G3-5 (IG+) - Body ground | L - Body ground | IG power supply | Ignition switch ON | 11 to 14 V |
| G3-7 (B) - Body ground | L - Body ground | Battery power supply | Always | 11 to 14 V |
| CHECK DRIVE MONITOR SWITCH (w/ CRAWL Control) |
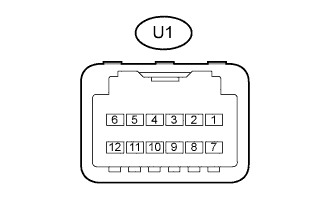 |
Disconnect the U1 drive monitor switch connector.
Measure the voltage and resistance according to the value(s) in the table below.
| Terminal No. (Symbol) | Wiring Color | Terminal Description | Condition | Specified Condition |
| U1-7 (GND) - Body ground | W-B - Body ground | Ground | Always | Below 1 Ω |
| U1-6 (+B) - Body ground | L - Body ground | Battery power supply | Always | 11 to 14 V |
| U1-12 (IG) - Body ground | G - Body ground | IG power supply | Ignition switch ON | 11 to 14 V |