ROOF DRIP SIDE FINISH MOULDING > INSTALLATION |
| Item | Temperature |
| Vehicle Body | 40 to 60°C (104 to 140°F) |
| Clip | 20 to 30°C (68 to 86°F) |
| 1. INSTALL ROOF DRIP SIDE FINISH MOULDING CLIP |
![]() |
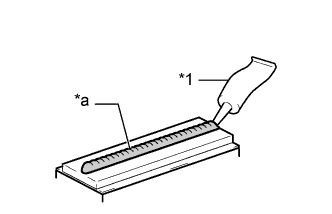
Apply a 2 to 3 mm (0.0787 to 0.118 in.) bead of adhesive (3M DP-105 or equivalent) to new roof drip side finish moulding clips.
| *1 | Adhesive |
| *a | 2 to 3 mm (0.0787 to 0.118 in.) Bead of Adhesive |
Apply primer to the body where the roof drip side finish moulding clip will be installed.
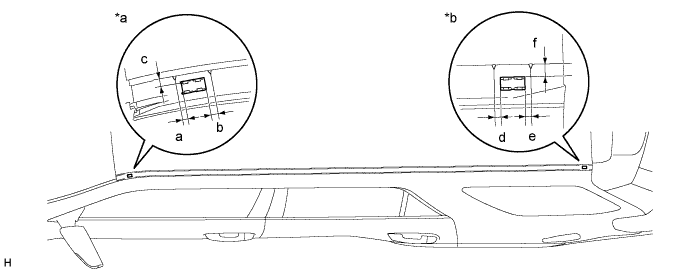
While using the position shown in the illustration as a reference, place the No. 1 roof drip side finish moulding clip onto the roof panel. Then position and install the clip after lightly pressing it so that the adhesive adheres to the primer.

| *a | for Front Side | *b | for Rear Side |
| Area | Specified Condition | Area | Specified Condition |
| a | 5.1 to 5.6 mm (0.201 to 0.220 in.) | b | 5.8 mm (0.228 in.) |
| c | 6.05 to 6.1 mm (0.238 to 0.240 in.) | d | 5 mm (0.197 in.) |
| e | 5 to 5.5 mm (0.197 to 0.217 in.) | f | 10.5 to 11 mm (0.413 to 0.433 in.) |
Install the rear roof drip side finish moulding when 40 minutes or more have elapsed after pressing and installing the roof drip side finish moulding clip.
| 2. INSTALL ROOF DRIP SIDE FINISH MOULDING LH |
Attach the clip to install the roof drip side finish moulding.
| 3. INSTALL CENTER ROOF DRIP SIDE FINISH MOULDING LH |
Install the center roof drip side finish moulding.
| 4. INSTALL ROOF DRIP SIDE FINISH MOULDING LH |
Attach the clip to install the roof drip side finish moulding.
| 5. INSTALL ROOF RACK BRACKET (w/o Roof Rack) |
Install the roof rack bracket with the 2 bolts.
| 6. INSTALL FRONT ROOF DRIP SIDE MOULDING COVER LH (w/o Roof Rack) |
Attach the 2 clips to install the front roof drip side moulding cover.
| 7. INSTALL ROOF RAIL ASSEMBLY LH (w/ Roof Rack) |
Install the roof rail (Click here).