Home › Drivetrain ยท AXLE AND DIFFERENTIAL › REAR DIFFERENTIAL CARRIER OIL SEAL

REAR DIFFERENTIAL CARRIER OIL SEAL > REPLACEMENT

for Preparation Click here


1. REMOVE REAR DIFFERENTIAL CARRIER ASSEMBLY
(Click here)


2. REMOVE REAR DIFFERENTIAL CARRIER COVER


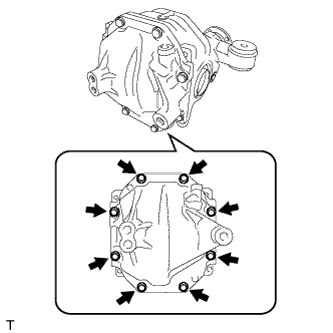
    C120860
  1. Remove the 8 bolts.


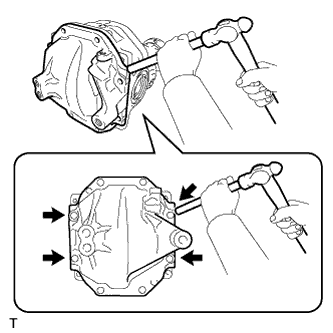
    C120861
  1. Using a brass bar and a hammer, remove the rear differential carrier cover from the rear differential carrier assembly.

    NOTICE:
    1. Place the brass bar onto the corners of the rear differential carrier cover.
    2. Do not damage the sealing surface of the rear differential carrier.


3. SECURE REAR DIFFERENTIAL CARRIER ASSEMBLY


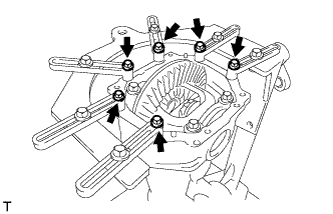
    C120862
  1. Secure the rear differential carrier sub-assembly to the overhaul stand with the 6 bolts.


4. REMOVE REAR DRIVE PINION NUT


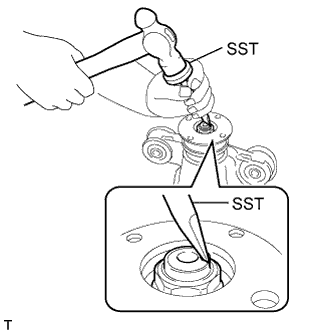
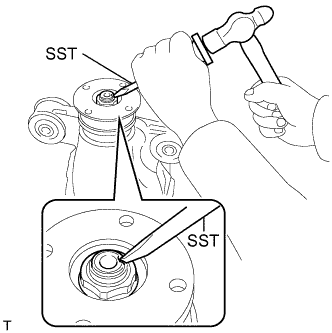
    C120869E01
  1. Using SST and a hammer, unstake the staked part of the rear drive pinion nut.
    SST
    09930-00010  

    NOTICE:
    1. Be sure to use SST with the tapered surface facing the differential drive pinion.
    2. Do not grind the tip of SST with a grinder, etc.
    3. Completely loosen the staked part of the rear drive pinion nut when removing it.
    4. Do not damage the threads of the differential drive pinion.


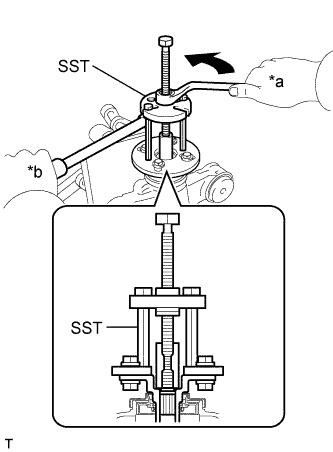
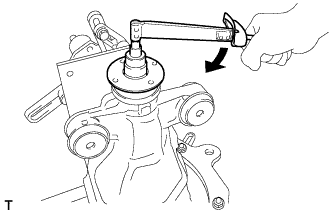
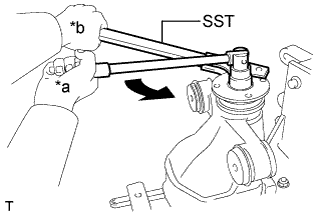
    C120871E03
  1. Using SST to hold the rear drive pinion companion flange, remove the rear drive pinion nut.

    SST
    09330-00021  
    Text in Illustration 
    *a
    Turn
    *b
    Hold


5. REMOVE REAR DRIVE PINION COMPANION FLANGE SUB-ASSEMBLY


    C120873E05
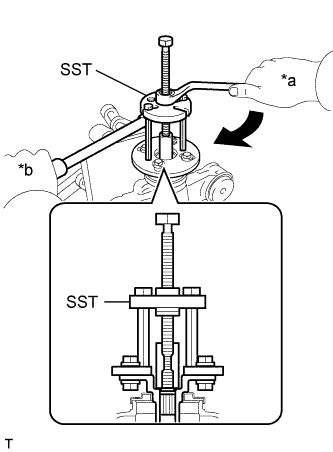
  1. Using SST, remove the rear drive pinion companion flange sub-assembly.
    Text in Illustration 
    *a
    Turn
    *b
    Hold

    SST
    09950-30012   (09951-03010, 09953-03010, 09954-03010, 09955-03030, 09956-03030)

    NOTICE:
    Apply grease to the threads of SST center bolt before use.


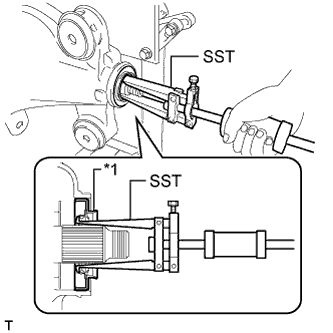
6. REMOVE REAR DIFFERENTIAL CARRIER OIL SEAL


    C120878E03
  1. Using SST, remove the rear differential carrier oil seal from the rear differential carrier.

    SST
    09308-00010  
    *1
    Rear Differential Carrier Oil Seal

    HINT:
    When replace the rear differential carrier oil seal, replace the rear differential drive pinion bearing spacer and adjust the drive pinion preload.


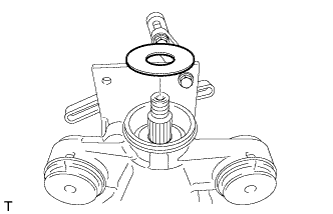
7. REMOVE REAR DIFFERENTIAL DRIVE PINION OIL SLINGER


    C126208
  1. Remove the rear differential drive pinion oil slinger.


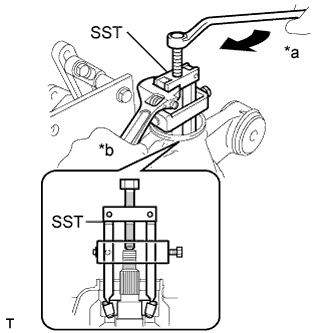
8. REMOVE REAR DRIVE PINION FRONT TAPERED ROLLER BEARING


    C120880E03
  1. Using SST, remove the rear drive pinion front tapered roller bearing (inner race) from the differential drive pinion.

    SST
    09556-22010  
    Text in Illustration 
    *a
    Turn
    *b
    Hold

    NOTICE:
    Apply grease to the threads and tip of SST center bolt before use.


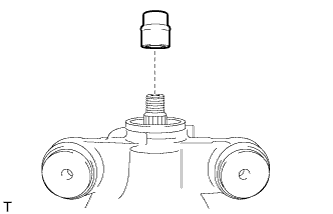
9. REPLACE REAR DIFFERENTIAL DRIVE PINION BEARING SPACER


    C187201
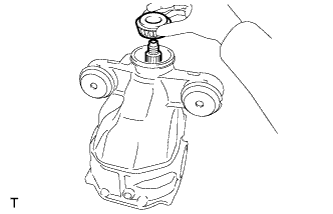
  1. Replace the new rear differential drive pinion bearing spacer.


10. INSTALL REAR DRIVE PINION FRONT TAPERED ROLLER BEARING


    C123430
  1. Install the rear drive pinion front tapered roller bearing (inner race) to the differential drive pinion.


11. INSTALL REAR DIFFERENTIAL DRIVE PINION OIL SLINGER


    C126208
  1. Install the rear differential drive pinion oil slinger to the differential drive pinion.


12. INSTALL REAR DRIVE PINION COMPANION FLANGE SUB-ASSEMBLY


    C123389E03
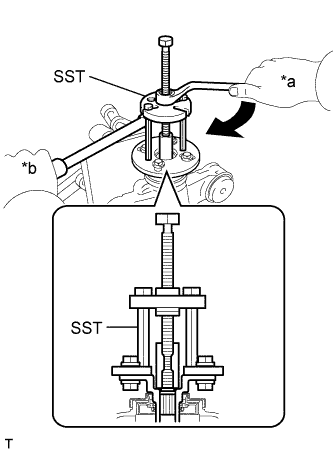
  1. Using SST, install the rear drive pinion companion flange.
    Text in Illustration 
    *a
    Turn
    *b
    Hold

    SST
    09950-30012   (09951-03010, 09953-03010, 09954-03010, 09955-03030, 09956-03030)

    NOTICE:
    Apply grease to the threads of SST center bolt before use.


13. REMOVE REAR DRIVE PINION COMPANION FLANGE SUB-ASSEMBLY


    C120873E05
  1. Using SST, remove the rear drive pinion companion flange sub-assembly.
    Text in Illustration 
    *a
    Turn
    *b
    Hold

    SST
    09950-30012   (09951-03010, 09953-03010, 09954-03010, 09955-03030, 09956-03030)

    NOTICE:
    Apply grease to the threads of SST center bolt before use.


14. INSTALL REAR DIFFERENTIAL CARRIER OIL SEAL


    C120909E06
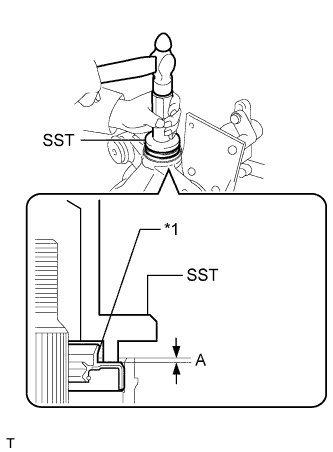
  1. Using SST and a hammer, install the new rear differential carrier oil seal.

    SST
    09554-22010  

    Standard depth:
    1.55 to 2.45 mm (0.0610 to 0.0964 in.)

    *1
    Rear Differential Carrier Oil Seal

    NOTICE:
    1. Tap the oil seal uniformly so that the oil seal is straight.
    2. Do not excessively tap the oil seal.

  1. Apply MP grease to the rear differential carrier oil seal lip.


15. INSTALL REAR DRIVE PINION COMPANION FLANGE SUB-ASSEMBLY


    C120873E06
  1. Using SST, install the rear drive pinion companion flange.
    Text in Illustration 
    *a
    Turn
    *b
    Hold

    SST
    09950-30012   (09951-03010, 09953-03010, 09954-03010, 09955-03030, 09956-03030)

    NOTICE:
    Apply grease to the threads of SST center bolt before use.

  1. Coat the threads of the rear drive pinion nut with hypoid gear oil LSD.
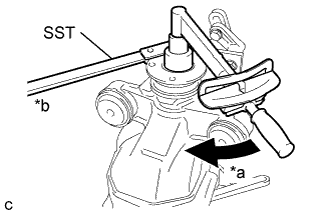


    C210688E02
  1. Using SST and a torque wrench, hold the rear drive pinion companion flange and tighten the rear drive pinion nut.
    Text in Illustration 
    *a
    Turn
    *b
    Hold

    SST
    09330-00021  

    Torque:
    338 N*m{ 3445 kgf*cm , 249 ft.*lbf } or less

    NOTICE:
    1. Tighten the rear drive pinion nut to approximately 100 N*m (1020 kgf*cm, 74 ft.*lbf), and then tighten it further while checking the differential drive pinion preload.
    2. Apply hypoid gear oil LSD to the rear drive pinion nut and the threads of the differential drive pinion.


16. ADJUST DIFFERENTIAL DRIVE PINION PRELOAD


    C120867
  1. Using a torque wrench, measure the starting torque of the differential drive pinion.

    HINT:
    1. The backlash between the differential drive pinion and differential ring gear should allow enough movement of the differential drive pinion to allow this measurement to be performed.
    2. Make sure not to include the preload of the differential ring gear (rear differential case sub-assembly) in the measurement of the differential drive pinion preload.

    Differential Drive Pinion Preload (at Starting):
    Item
    Specified Condition
    New rear drive pinion tapered roller bearing
    1.87 to 2.24 N*m (19.07 to 22.84 kgf*cm, 16.55 to 19.83 in.*lbf)
    Reused rear drive pinion tapered roller bearing
    1.87 to 2.17 N*m (19.07 to 22.13 kgf*cm, 16.55 to 19.21 in.*lbf)

    1. If the preload is less than the specified minimum value, check the preload while retightening the rear drive pinion nut by 5 to 10° to adjust it so that it is within the specified range.

      Torque:
      338 N*m (3445 kgf*cm, 249 ft.*lbf) or less

    2. If the preload is less than the specified minimum value even when the tightening torque of the rear drive pinion nut is more than the specified maximum value, loosen the rear drive pinion nut and check that the threads of the rear drive pinion nut and differential drive pinion are not stripped.
    3. If the threads are not stripped, replace the rear differential drive pinion bearing spacer. Apply hypoid gear oil LSD to the threads of the differential drive pinion and repeat the procedure.


17. INSPECT TOTAL PRELOAD


    C120867
  1. Using a torque wrench, measure the preload with the teeth of the drive pinion and ring gear in contact.

    Total Preload (at Starting):
    Item
    Specified Condition
    New rear drive pinion tapered roller bearing
    New differential case bearing
    2.27 to 2.87 N*m (23.15 to 29.27 kgf*cm, 20.09 to 25.40 in.*lbf)
    Reused differential case bearing
    2.19 to 2.77 N*m (22.33 to 28.25 kgf*cm, 19.38 to 24.52 in.*lbf)
    Reused rear drive pinion tapered roller bearing
    New differential case bearing
    2.27 to 2.80 N*m (23.15 to 28.55 kgf*cm, 20.09 to 24.78 in.*lbf)
    Reused differential case bearing
    2.19 to 2.70 N*m (22.33 to 27.53 kgf*cm, 19.38 to 23.90 in.*lbf)

    If the total preload is not within the specified range, adjust the total preload or perform repairs as necessary.


18. STAKE REAR DRIVE PINION NUT


    C120870E01
  1. Using SST and a hammer, stake the rear drive pinion nut.

    SST
    09930-00010  


19. REMOVE REAR DIFFERENTIAL CARRIER ASSEMBLY


    C256678
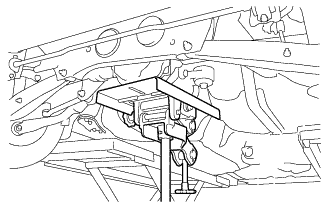
  1. Support the rear differential carrier assembly with a transmission jack.
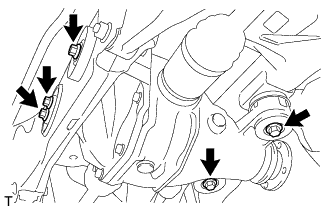


    C256679
  1. Remove the 5 bolts, rear upper differential mount stopper and rear lower differential mount stopper.

  1. Lower the transmission jack slowly.


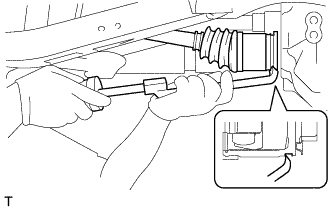
    C257535
  1. Using a SST, disconnect the rear drive shaft assembly from the rear differential carrier assembly as shown in the illustration.
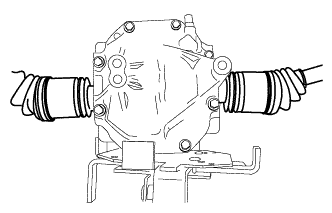
    SST
    09520-01010  
    09520-24010   (09520-32040)


    C262320
  1. Lower the transmission jack and pull off the rear drive shaft assembly from the rear differential carrier assembly, and then remove the rear differential carrier assembly.
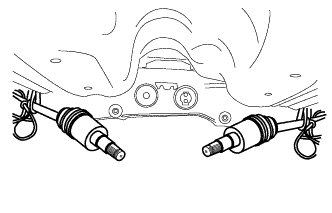
    HINT:
    C262321
    Tie the disconnected rear drive shaft with a rope.


20. INSTALL REAR DIFFERENTIAL CARRIER COVER


    C266479E01
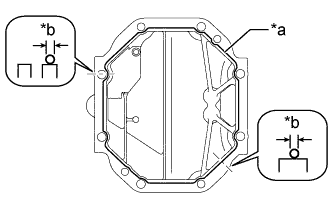
  1. Apply seal packing to the rear differential carrier cover as shown in the illustration.
    Text in Illustration 
    *a
    Seal packing
    *b
    2 to 3 mm (0.0787 to 0.118 in.)

    Seal packing:
    Toyota Genuine Seal Packing 1281, Three Bond 1281 or equivalent

    NOTICE:
    1. Apply the seal packing in a continuous line, approximately 2 to 3 mm (0.0787 to 0.118 in.) in diameter.
    2. Overlap the seal packing at least 10 mm (0.394 in.) at the beginning and end of application.
    3. Install the rear differential carrier cover within 3 minutes of application.


    C120860
  1. Install the rear differential carrier cover with the 8 bolts.

    Torque:
    47 N*m{ 475 kgf*cm , 35 ft.*lbf }

    NOTICE:
    Do not fill the differential with oil or drive the vehicle immediately after installing the differential carrier cover. Leave the vehicle for at least 1 hour. Also, avoid sudden acceleration and deceleration for at least 12 hours after application.


21. INSTALL REAR DIFFERENTIAL CARRIER ASSEMBLY
(Click here)