Home › Vehicle Interior › SUPPLEMENTAL RESTRAINT SYSTEMS › SIDE AIRBAG SENSOR (for Rear Side)

SIDE AIRBAG SENSOR (for Rear Side) > INSTALLATION

for Preparation Click here


HINT:
  1. Use the same procedure for the RH and LH sides.
  2. The procedure listed below is for the LH side.


1. INSTALL NO. 2 SIDE AIRBAG SENSOR ASSEMBLY
  1. Check that the ignition switch is off.

  1. Check that the cable is disconnected from the negative (-) battery terminal.

    CAUTION:
    Wait at least 90 seconds after disconnecting the cable from the negative (-) battery terminal to disable the SRS system.

    NOTICE:
    The power window system utilizes a mechanism that the door glass moves down slightly when the door is opened, and that the glass moves up when closing the door in order to prevent the door molding from being damaged. When the battery negative (-) terminal needs to be disconnected for servicing, fully open the driver and passenger door glasses in advance.


  1. Before connecting the connector, check that the position of the white housing lock is correct as shown in the illustration.
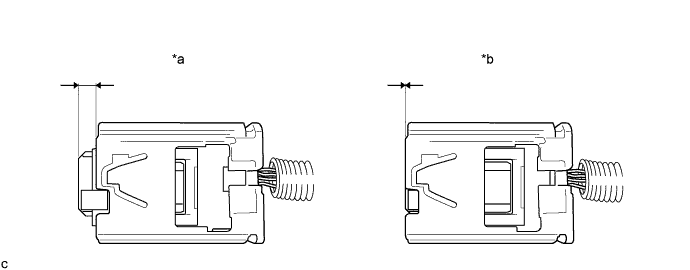

    B296256E01


    Text in Illustration 
    *a
    Correct
    *b
    Incorrect


  1. Connect the connector to the No. 2 side airbag sensor assembly.

    NOTICE:
    When connecting any airbag connector, take care not to damage the airbag wire harness.


    1. Be sure to engage the connectors until they are locked (when locking, make sure that a click sound can be heard).
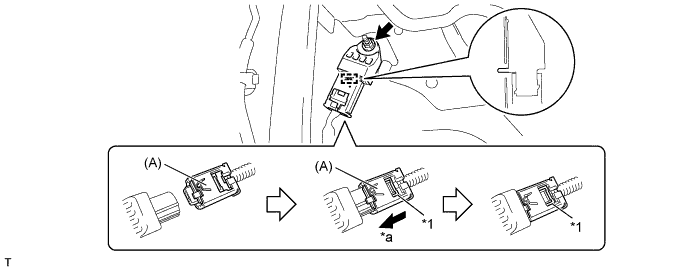
      HINT:
      When engaged, the white housing lock will slide. Be sure not to hold the white housing lock and part (A), as it may result in an insecure fit.


      B311400E01


      Text in Illustration 
      *1
      White housing lock
      -
      -
      *a
      Slide
      -
      -

  1. Insert the pin (stopper) into the body hole and install the No. 2 side airbag sensor assembly to the vehicle body with the nut.

    Torque:
    7.5 N*m{ 76 kgf*cm , 66 in.*lbf }

    NOTICE:
    1. If the No. 2 side airbag sensor assembly has been dropped, or there are any cracks, dents or other defects in the case or connector, replace it with a new one.
    2. When installing the No. 2 side airbag sensor assembly, be careful that the SRS wiring does not interfere with or is not pinched between other parts.
    3. Make sure that the pin (stopper) is securely inserted into the body hole.
    4. Tighten the nut while holding the No. 2 side airbag sensor assembly because the No. 2 side airbag sensor assembly pin (stopper) is easily damaged.

  1. Check that there is no looseness in the installation parts of the No. 2 side airbag sensor assembly.


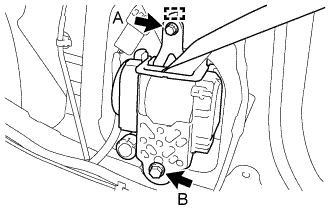
2. INSTALL FRONT SEAT OUTER BELT ASSEMBLY


    B311334E01
  1. Engage the guide and install the front seat outer belt assembly with the 2 bolts.
    Torque:
    Bolt A:
    7.5 N*m{ 76 kgf*cm , 66 in.*lbf }
    Bolt B:
    30 N*m{ 306 kgf*cm , 22 ft.*lbf }


    B311336E01
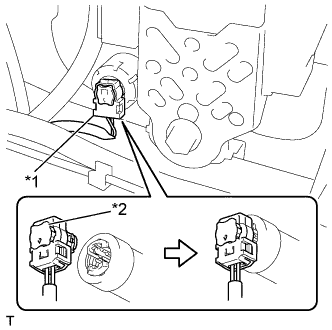
  1. Connect the pretensioner connector.
    Text in Illustration 
    *1
    Pretensioner Connector
    *2
    Pretensioner Connector Lock

  1. Push in the lock to install the pretensioner connector.


3. INSTALL LUGGAGE COMPARTMENT TRIM COVER
  1. Engage the 8 clips and install the luggage compartment trim cover LH.

  1. Install the 3clips.


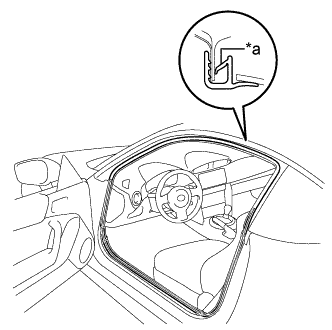
4. INSTALL FRONT DOOR OPENING TRIM WEATHERSTRIP


    B315249E01
  1. Align the alignment mark on the weatherstrip with the protruding portion on the body indicated by the arrow in the illustration, and install the front door opening trim weatherstrip LH.
    Text in Illustration 
    *a
    Alignment Mark

    NOTICE:
    After installation, check that the corners fit correctly.


5. INSTALL FRONT DOOR SCUFF PLATE
  1. Engage the 6 claws install the front door scuff plate LH.


6. INSTALL SEPARATE TYPE REAR SEAT CUSHION ASSEMBLY
  1. Engage the hook and install the separate type rear seat cushion assembly LH.

  1. Install the bolt.

    Torque:
    13 N*m{ 133 kgf*cm , 10 ft.*lbf }


7. CONNECT CABLE TO NEGATIVE BATTERY TERMINAL

Torque:
6.0 N*m{ 61 kgf*cm , 53 in.*lbf }


8. PERFORM DIAGNOSTIC SYSTEM CHECK
(Click here)


9. INSPECT SRS WARNING LIGHT
(Click here)