 |
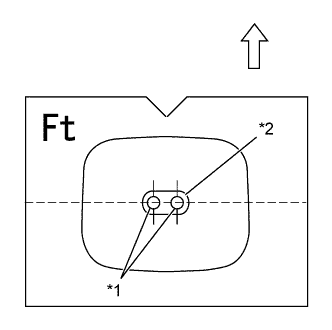
Align the seal hole with the locating marks on the door panel.
| *1 | Locating Mark on Door Panel |
| *2 | Seal Hole |
 | Vehicle front side |
LUGGAGE COMPARTMENT DOOR > REASSEMBLY |
| 1. PROTECTOR SEAL SEAL PARTS (w/ Rear Spoiler (except Sport Package)) |
Remove one side of release paper from a new protector seal.
|
Align the seal hole with the locating marks on the door panel.
| *1 | Locating Mark on Door Panel |
| *2 | Seal Hole |
| Vehicle front side |
While making the protector seal level, apply one side of the protector seal on the door panel.
Remove other side of release paper and apply the protector seal securely.
| 2. INSTALL LUGGAGE COMPARTMENT DOOR SUPPORT ASSEMBLY (for LH Side) |
When reusing the luggage compartment door support assembly:
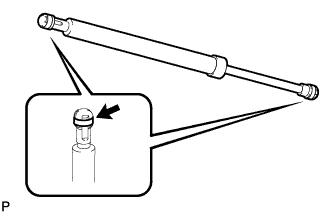 |
Install the 2 stop rings to the luggage compartment door support assembly.
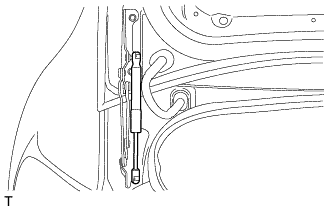 |
Install the luggage compartment door support assembly.
| 3. INSTALL LUGGAGE COMPARTMENT DOOR SUPPORT ASSEMBLY (for RH Side) |
| 4. INSTALL LUGGAGE COMPARTMENT DOOR OUTSIDE GARNISH CAP (w/o Lock Cylinder) |
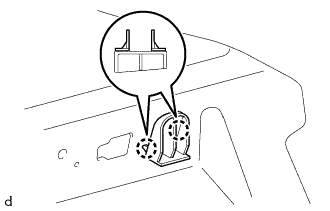 |
Engage the 2 claws to install the luggage compartment door outside garnish cap.
| 5. INSTALL LICENSE PLATE LIGHT ASSEMBLY |
Engage the 2 claws to install the license plate light assembly.
Connect the connector.
| 6. INSTALL RADIATOR GRILLE EMBLEM (for Rear Side) |
Clean the attachment surface.
Using an infrared light, heat the double-sided adhesive tape remaining on the luggage compartment door panel.
| Item | Temperature |
| Luggage Compartment Door Panel | 40 to 60°C (104 to 140°F) |
Using a piece of cloth, rub the remaining double-sided tape off the luggage compartment door panel while it is hot from the infrared light.
Using a non-residue solvent, clean the attachment surface.
Using an infrared light, heat the radiator grille emblem installation surface of the luggage compartment door panel and new radiator grille emblem.
| Item | Temperature |
| Luggage Compartment Door Panel | 40 to 60°C (104 to 140°F) |
| Radiator Grille Emblem | 20 to 30°C (68 to 86°F) |
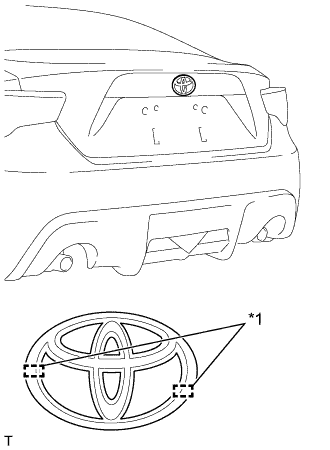 |
Insert the 2 pins into the luggage compartment door panel and install a new radiator grille emblem.
| *1 | Location Pin |
| 7. INSTALL BACK DOOR OPENER SWITCH ASSEMBLY |
Engage the 2 claws and install the back door opener switch assembly.
| 8. INSTALL LUGGAGE COMPARTMENT DOOR OUTSIDE GARNISH SUB-ASSEMBLY |
Engage the clip to install the 3 screws and the luggage compartment door outside garnish sub-assembly.
Connect the 2 license plate light connectors.
Connect the back door opener switch assembly connector.
| 9. INSTALL LUGGAGE CLOSER CABLE ASSEMBLY (w/ Lock Cylinder) |
Engage the clamp to install the luggage compartment door lock cable.
| 10. INSTALL LUGGAGE DOOR CLOSER ASSEMBLY |
Install the luggage compartment door lock assembly with the 2 bolts.
Connect the luggage compartment door lock cable to the luggage compartment door lock assembly.
Engage the claw to close the cover.
Connect the connector.
| 11. INSTALL LUGGAGE COMPARTMENT DOOR LOCK CYLINDER PACKING (w/ Lock Cylinder) |
Install the new luggage compartment door lock cylinder packing.
| 12. INSTALL LUGGAGE COMPARTMENT DOOR LOCK CYLINDER ASSEMBLY (w/ Lock Cylinder) |
Connect the luggage compartment door lock cable to the luggage compartment door lock cylinder assembly.
Install the luggage compartment door lock cylinder assembly with the 2 nuts.
| 13. INSTALL LUGGAGE COMPARTMENT DOOR CUSHION |
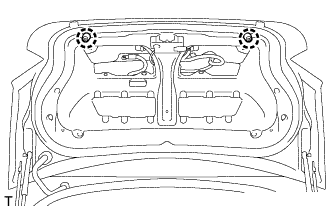 |
Engage the 2 claws to install 2 new luggage compartment door cushions.
| 14. INSTALL REAR SPOILER (except Sport Package) |
| 15. INSTALL REAR SPOILER (for Sport Package) |
| 16. INSTALL LUGGAGE COMPARTMENT DOOR COVER (w/ Entry and Start System) |
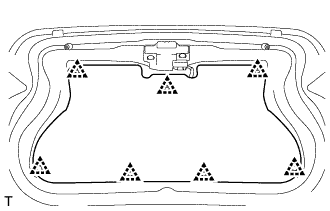 |
Install the luggage compartment door cover with the 7 clips.