 |
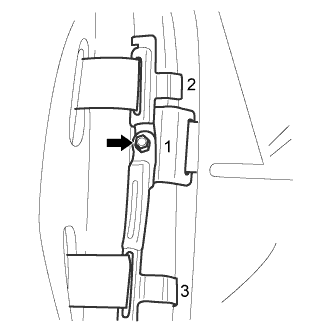
Install the 3 brackets to the separate type front seatback spring assembly in the order shown in the illustration.
FRONT SEAT SIDE AIRBAG ASSEMBLY > INSTALLATION |
| 1. INSTALL FRONT SEAT AIRBAG ASSEMBLY |
Install the front seat airbag assembly with 2 new nuts.
Engage the 2 clamps.
| 2. INSTALL SEPARATE TYPE FRONT SEATBACK COVER WITH PAD |
Temporarily install the separate type front seatback cover with pad to the separate type front seatback spring assembly.
|
Install the 3 brackets to the separate type front seatback spring assembly in the order shown in the illustration.
Install a new nut.
Engage the 4 claws to install the 2 front seat headrest supports.
Engage the 2 hooks.
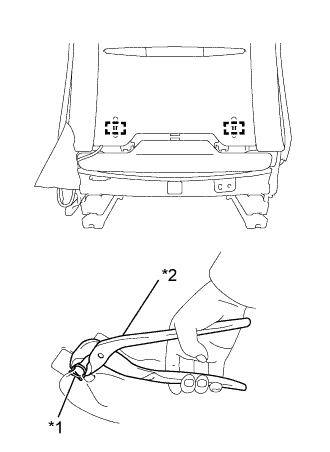 |
Using hog ring pliers, install 2 new hog rings.
| *1 | Hog Ring |
| *2 | Hog Ring Pliers |
Turn back the separate type front seatback cover.
Close the 2 fasteners.
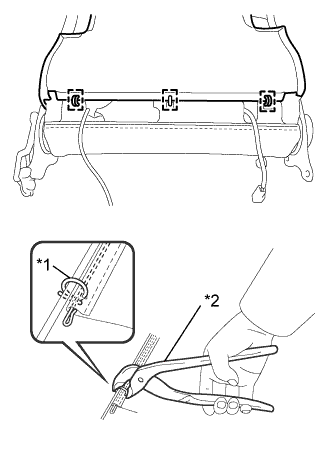 |
Using hog ring pliers, install 5 new hog rings.
| *1 | Hog Ring |
| *2 | Hog Ring Pliers |
| 3. INSTALL SEPARATE TYPE FRONT SEATBACK ASSEMBLY |
Using a T40 "TORX" socket wrench, install the separate type front seatback assembly and No. 2 front seat travel link with 4 new bolts.
Install a new washer (for Fold Down Seat Type).
Engage the claw and 4 clamps to install the front seat airbag assembly wire harness.
Engage the fastener to secure the front seat airbag assembly wire harness.
Engage the clamp and connect the front seat heater connector. (w/ Seat Heater System)
Connect the rubber band of the separate type front seatback cover.
Engage the 2 hooks.
| 4. INSTALL FRONT SEAT INNER CUSHION SHIELD |
Engage the 2 claws and 4 guides to install the front seat inner cushion shield.
| 5. INSTALL FRONT SEAT CUSHION SHIELD |
Engage the 4 claws, 5 guides and clip to install the front seat inner cushion shield.
Install the 2 screws.
| 6. INSTALL SEAT ADJUSTER COVER CAP |
Engage the 3 claws to install the seat adjuster cover cap.
| 7. INSTALL VERTICAL ADJUSTING HANDLE (for Driver Side) |
Install the vertical adjusting handle with the screw.
| 8. INSTALL RECLINING ADJUSTER RELEASE HANDLE |
Engage the claw to install the reclining adjuster release handle.
| 9. INSTALL FRONT SEAT ASSEMBLY |
| 10. PERFORM DIAGNOSTIC SYSTEM CHECK |