 |
Move the link plate in the direction of the arrow in the illustration to press in the plunger.
| *1 | Link Plate |
| *2 | Plunger |
TIMING CHAIN > INSTALLATION |
| 1. INSTALL CHAIN SUB-ASSEMBLY (for Bank 2) |
|
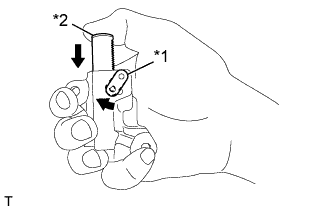
Move the link plate in the direction of the arrow in the illustration to press in the plunger.
| *1 | Link Plate |
| *2 | Plunger |
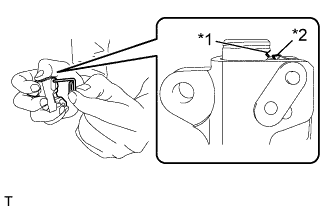 |
Insert an approximately 1 mm (0.039 in.) wire or the like into the chain tensioner through the stopper pin hole, and hold the plunger.
| *1 | First notch of the plunger rack |
| *2 | Stopper Tooth |
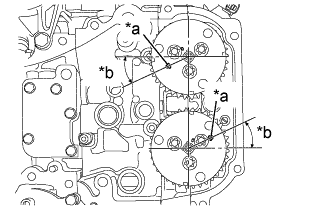 |
Position the alignment marks on the camshaft timing intake gear assembly LH and camshaft timing exhaust gear assembly LH as shown in the illustration.
| *a | Alignment Mark |
| *b | 25° to 30° |
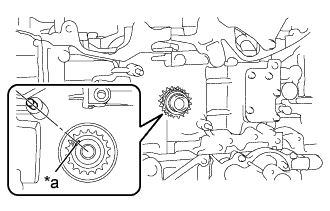 |
Check that the alignment mark on the crankshaft timing gear or sprocket is at the position shown in the illustration.
| *a | Crankshaft Timing Gear Key |
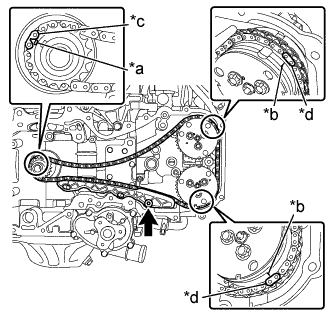 |
Install the chain sub-assembly in the following order.
| *a | Alignment Mark (Oval) |
| *b | Alignment Mark (Engraved Line) |
| *c | Mark plate (Grayish Blue) |
| *d | Mark plate (Pink) |
Align the mark plate (grayish blue) on the chain sub-assembly with the alignment mark (oval) on the crankshaft timing gear or sprocket.
Align the mark plate (pink) on the chain sub-assembly with the alignment mark (engraved line) on the camshaft timing exhaust gear assembly LH.
Align the mark plate (pink) on the chain sub-assembly with the alignment mark (engraved line) on the camshaft timing intake gear assembly LH.
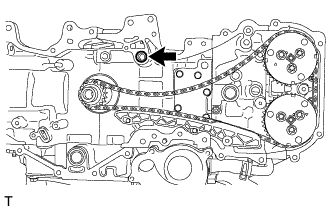
Apply engine oil to the bolt.
Using a 5 mm hexagon socket wrench, install the No. 1 chain vibration damper with the bolt.
 |
Install a new O-ring to the cylinder block (bank 2).
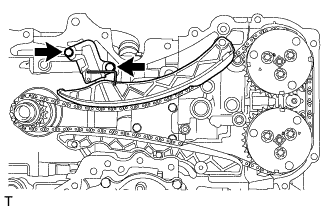 |
Install the chain tensioner slipper.
Install the No. 2 chain tensioner assembly with the 2 bolts.
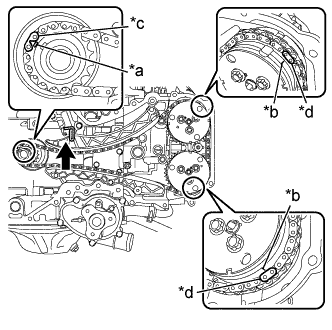 |
Check that the chain is correctly installed.
| *a | Alignment Mark (Oval) |
| *b | Alignment Mark (Engraved Line) |
| *c | Mark plate (Grayish Blue) |
| *d | Mark plate (Pink) |
The mark plate (grayish blue) on the chain sub-assembly is aligned with the alignment mark (oval) on the crankshaft timing gear or sprocket.
The mark plate (pink) on the chain sub-assembly is aligned with the alignment mark (engraved line) on the camshaft timing intake gear assembly LH.
The mark plate (pink) on the chain sub-assembly is aligned with the alignment mark (engraved line) on the camshaft timing exhaust gear assembly LH.
Pull out the wire or the like from the No. 2 chain tensioner assembly.
Temporarily install the crankshaft pulley spacer and crankshaft pulley.
Using SST, turn the crankshaft clockwise to make sure that there are no abnormal conditions.
| 2. INSTALL CHAIN SUB-ASSEMBLY (for Bank 1) |
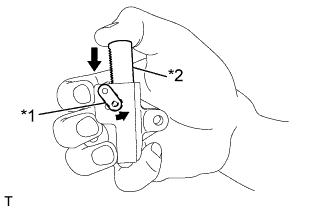 |
Move the link plate in the direction of the arrow in the illustration to press in the plunger.
| *1 | Link Plate |
| *2 | Plunger |
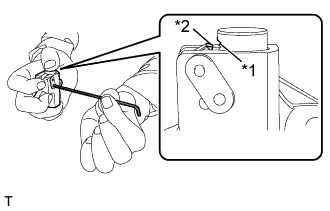 |
Insert a 2.5 mm (0.098 in.) hexagon wrench into the No. 1 chain tensioner assembly through the stopper pin hole, and hold the plunger.
| *1 | First notch of the plunger rack |
| *2 | Stopper Tooth |
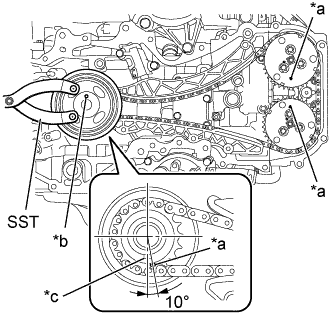 |
Using SST, turn the crankshaft pulley clockwise until the alignment marks on the camshaft timing intake gear assembly LH and the camshaft timing exhaust gear assembly LH, and the crankshaft pulley pin hole are aligned at the positions shown in the illustration.
| *a | Alignment Mark |
| *b | Crankshaft Pulley Pin Hole |
| *c | Crankshaft Timing Gear Key |
Remove the crankshaft pulley and crankshaft pulley spacer.
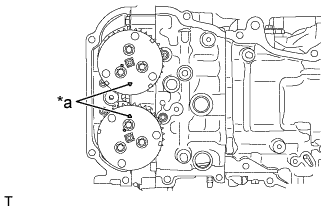 |
Align the alignment marks of the camshaft timing intake gear assembly RH and camshaft timing exhaust gear assembly RH as shown in the illustration.
| *a | Alignment Mark |
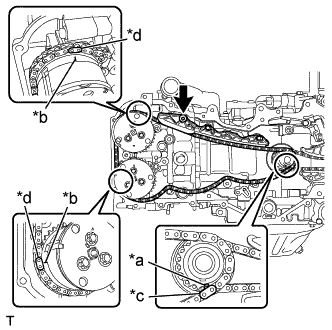 |
Install the chain sub-assembly in the following order.
| *a | Alignment Mark (Oval) |
| *b | Alignment Mark (Engraved Line) |
| *c | Mark plate (Grayish Blue) |
| *d | Mark plate (Pink) |
Align the mark plate (grayish blue) on the chain sub-assembly with the alignment mark (oval) on the crankshaft timing gear or sprocket.
Align the mark plate (pink) on the chain sub-assembly with the alignment mark (engraved line) on the camshaft timing intake gear assembly RH.
Align the mark plate (pink) on the chain sub-assembly with the alignment mark (engraved line) on the camshaft timing exhaust gear assembly RH.
Apply engine oil to the bolt.
Using a 5 mm hexagon socket wrench, install the No. 1 chain vibration damper with the bolt.
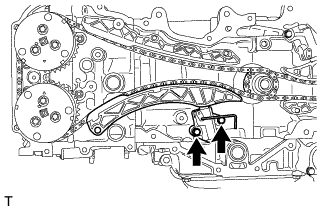 |
Install the chain tensioner slipper.
Install the No. 1 chain tensioner assembly with the 2 bolts.
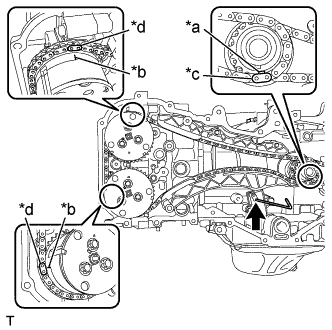 |
Check that the chain is correctly installed.
| *a | Alignment Mark (Oval) |
| *b | Alignment Mark (Engraved Line) |
| *c | Mark plate (Grayish Blue) |
| *d | Mark plate (Pink) |
The mark plate (grayish blue) on the chain sub-assembly is aligned with the alignment mark (oval) on the crankshaft timing gear or sprocket.
The mark plate (pink) on the chain sub-assembly is aligned with the alignment mark (engraved line) on the camshaft timing intake gear assembly RH.
The mark plate (pink) on the chain sub-assembly is aligned with the alignment mark (engraved line) on the camshaft timing exhaust gear assembly RH.
Pull out the hexagon wrench from the No. 1 chain tensioner assembly.
Temporarily install the crankshaft pulley spacer and crankshaft pulley.
Using SST, turn the crankshaft clockwise to make sure that there are no abnormal conditions.
Remove the crankshaft pulley and crankshaft pulley spacer.
| 3. INSTALL TIMING CHAIN OR BELT COVER SUB-ASSEMBLY |