FA20 ENGINE MECHANICAL CYLINDER HEAD DISASSEMBLY
PROCEDURE

 1.REMOVE CHAIN COVER MOUNT BOLT
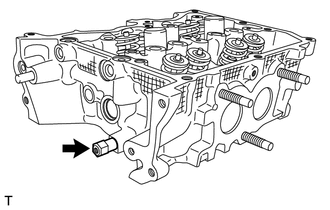
Remove the chain cover mount bolt.
2.REMOVE STUD BOLT
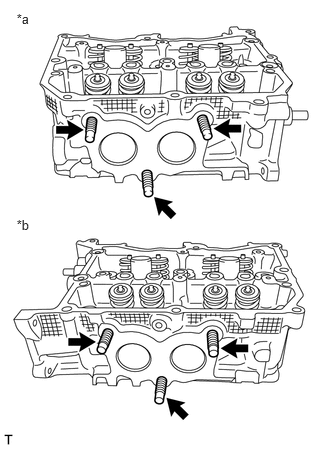
- HINT:
-
If any of the stud bolts is deformed or the threads are damaged, replace it.
Remove the 6 stud bolts from the cylinder heads.
| *a | for Bank 1 |
| *b | for Bank 2 |
13711
3.REMOVE INTAKE VALVE
- NOTICE:
-
Place a cloth, etc. to avoid scratching the mating surface of the cylinder head during servicing.
- HINT:
- ·
Mark each part to prevent confusion.
·Arrange the removed parts in the correct order.
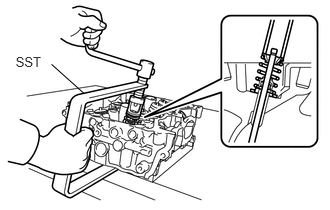
Using SST, compress the spring and remove the valve spring retainer locks.
- SST
- 09202-70020 (09202-00010, 09202-01010, 09202-01020)
Remove the valve, valve spring retainer, valve spring and valve spring seat.
13715
4.REMOVE EXHAUST VALVE
- CAUTION:
- ·
The exhaust valve is encapsulated with metallic sodium. The metallic sodium is a strong alkaline and prone to cause a serious chemical reaction. Therefore, extra caution is required when handling or disposing the exhaust valve.
·Never disassemble the exhaust valve. The metallic sodium may cause blindness if it gets into your eyes, or cause burn injuries or chemical reactions resulting in fire if it comes into contact with your skin or any heat source.
·Make sure to wear safety glasses and protective gloves when removing a damaged exhaust valve.
·Do not intentionally damage the exhaust valve to remove the metallic sodium.
- NOTICE:
-
If it is clearly stated that the industrial waste disposal method is not pressing but dissolution, ask the industrial waste disposal operator to dispose of the valve. If the exhaust valve is damaged, remove the exhaust valve, perform the following neutralization process, and then dispose of it according to the same procedures that are provided for other parts.
- HINT:
- ·
The exhaust valve is encapsulated with metallic sodium. This is safe as long as it does not come into contact with air.
·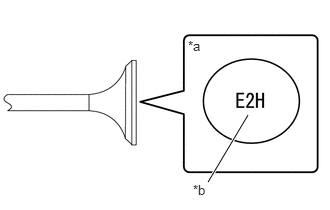 2.167,1.896 2.583,1.198 true 1.958,0.396 2.271,0.594 0.313,0.198 10 false *a 2.01,1.896 2.323,2.094 0.313,0.198 10 false *b
The exhaust valve in which metallic sodium is encapsulated can be identified with the embossed mark.
| *a | Example |
| *b | Embossed mark (E2H, E3H or E4H is for FA20 Engine) |
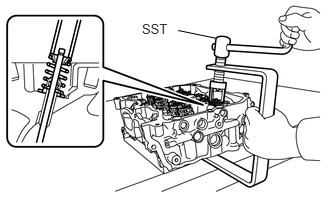
Using SST, compress the spring and remove the valve spring retainer locks.
- SST
- 09202-70020 (09202-00010, 09202-01010, 09202-01020)
Remove the valve, valve spring retainer, valve spring and valve spring seat.
5.REMOVE VALVE STEM OIL SEAL
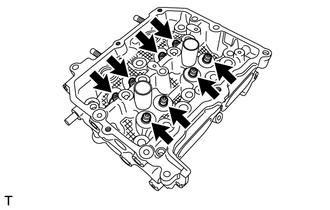
Remove the 8 valve stem oil seals.
- NOTICE:
- ·
Place a cloth, etc. to avoid scratching the mating surface of the cylinder head during servicing.
·Be careful not to damage the valve guide bushes and cylinder head.
13715
6.DISPOSE OF EXHAUST VALVE
- CAUTION:
- ·
The exhaust valve is encapsulated with metallic sodium. The metallic sodium is a strong alkaline and prone to cause a serious chemical reaction. Therefore, extra caution is required when handling or disposing the exhaust valve.
·Never disassemble the exhaust valve. The metallic sodium may cause blindness if it gets into your eyes, or cause burn injuries or chemical reactions resulting in fire if it comes into contact with your skin or any heat source.
·Make sure to wear safety glasses and protective gloves when removing a damaged exhaust valve.
·Do not intentionally damage the exhaust valve to remove the metallic sodium.
- NOTICE:
-
If it is clearly stated that the industrial waste disposal method is not pressing but dissolution, ask the industrial waste disposal operator to dispose of the valve. If the exhaust valve is damaged, remove the exhaust valve, perform the following neutralization process, and then dispose of it according to the same procedures that are provided for other parts.
- HINT:
- ·
The exhaust valve is encapsulated with metallic sodium. This is safe as long as it does not come into contact with air.
·
2.167,1.896 2.583,1.198 true 1.958,0.396 2.271,0.594 0.313,0.198 10 false *a 2.01,1.896 2.323,2.094 0.313,0.198 10 false *b
The metallic sodium within the exhaust valve can be identified using the embossed mark.
| *a | Example |
| *b | Embossed mark (E2H, E3H or E4H is for FA20 Engine) |
Preparation for neutralization process
- CAUTION:
- ·
Ensure a fire extinguisher is at hand.
·Wear safety glasses.
·Wear protective gloves.
Neutralization process
Wear protective gloves and then remove the damaged valve from the cylinder head.
Place a large container (bucket or other container) in a well-ventilated area and fill it with water (at least 10 liters).
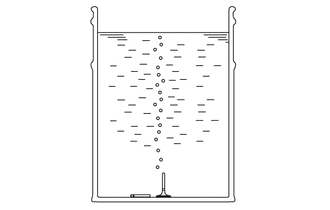
Place the damaged exhaust valve inside the container in an upright position using large pliers or similar tool to submerge it under water.
- CAUTION:
- ·
Ensure the damaged exhaust valve is fully submerged in water.
·Keep any fire sparks or fire sources away from this container because hydrogen gas will be emitted from the chemical reaction.
·Because of serious chemical reaction, step back at least 2 to 3 m from the container.
After the chemical reaction has completed (approximately 4 to 5 hours), using large pliers or similar tool, carefully remove the valve from the container, and then dispose of it according to the same procedures that are provided for other parts.
- CAUTION:
- ·
After the chemical reaction, be careful not to let used liquid (sodium hydrate) contact your skin. Should it contact your skin, immediately rinse it with plenty of water.
·After the chemical reaction, dispose of used liquid (sodium hydrate) according to all applicable government and local regulations.