RM2090E
_51
Engine / Hybrid System
_060670
FA20 COOLING
_0297526
RADIATOR
G
FA20 COOLING RADIATOR ON-VEHICLE INSPECTION
PROCEDURE

 16401
1.CHECK RADIATOR CAP SUB-ASSEMBLY
a.
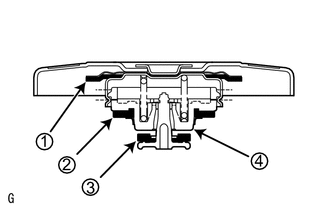
Measure the valve opening pressure.
i.
If there are water stains or foreign matter on rubber packings 1, 2 or 3, clean the part(s) with water and finger scouring.
ii.
Check that rubber packings 1, 2 or 3 are not deformed, cracked or swollen.
iii.
Check that rubber packings 3 and 4 are not stuck together.
iv.
Apply engine coolant to rubber packings 2 and 3 before using the radiator cap tester.
v.
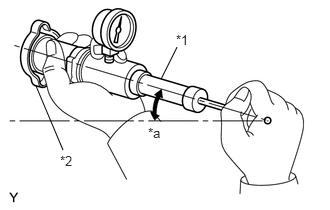
1.677,0.823 1.844,0.49
false
0.656,1.563 0.375,0.896
false
1.833,0.333 2.146,0.531
0.313,0.198
10
false
*1
1.542,1.302 1.854,1.5
0.313,0.198
10
false
*a
0.625,1.594 0.938,1.792
0.313,0.198
10
false
*2
When using the cap tester, tilt it 30° or more.
| *1 | Radiator Cap Tester |
| *2 | Radiator cap sub-assembly |
| *a | 30° or more |
vi.
Pump the cap tester several times, and check the maximum pressure*1.
- Pumping speed:
1 pump per second
- HINT:
-
*1: Even if the cap cannot maintain the maximum pressure, it is not a defect.
- Judgment Criterion:
Item Specified Condition Standard valve
(for brand-new cap)93 to 123 kPa (0.95 to 1.25 kgf/cm2, 14 to 18 psi) Minimum standard valve
(for used cap)83 kPa (0.85 kgf/cm2, 12 psi)
If the maximum pressure is less than the minimum standard valve, replace the radiator cap sub-assembly.