TX6A AUTOMATIC TRANSMISSION / TRANSAXLE AUTOMATIC TRANSMISSION UNIT DISASSEMBLY
PROCEDURE

 35015S
1.REMOVE REFILL PLUG
Remove the refill plug.
Remove the O-ring from the refill plug.
35572
2.REMOVE TRANSMISSION CONTROL SHAFT LEVER RH
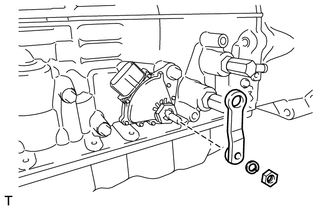
Remove the nut, spring washer and the transmission control shaft lever RH from the park/neutral position switch assembly.
84540
3.REMOVE PARK/NEUTRAL POSITION SWITCH ASSEMBLY
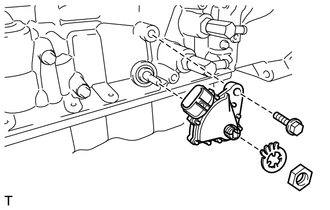
Using a screwdriver, bend the tabs of the lock washer.
Remove the nut and the lock washer.
Remove the bolt and the park/neutral position switch assembly from the automatic transmission case sub-assembly.
- HINT:
-
Make sure that the manual valve lever shaft has not been rotated prior to installing the park/neutral position switch assembly as the detent spring may become detached from the manual valve lever shaft.
4.REMOVE OIL COOLER TUBE UNION
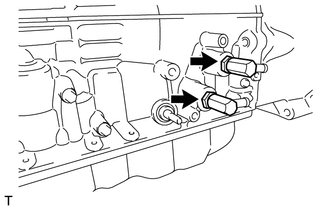
Remove the 2 oil cooler tube union from the automatic transmission case sub-assembly.
89413B
5.REMOVE TRANSMISSION REVOLUTION SENSOR
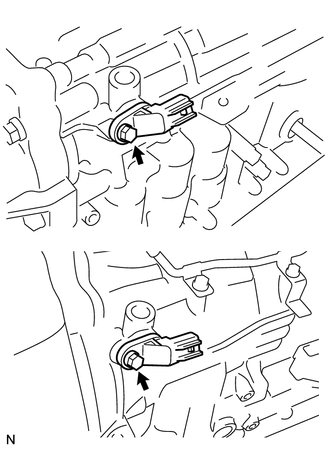
Remove the 2 bolts and the 2 transmission revolution sensors from the automatic transmission case sub-assembly.
Remove the 2 O-rings from the 2 transmission revolution sensors.
35122
6.REMOVE AUTOMATIC TRANSMISSION BREATHER TUBE
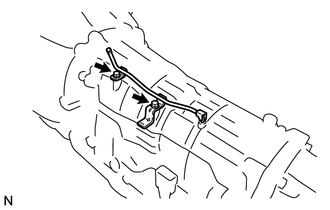
Remove the 2 bolts and the automatic transmission breather tube from the automatic transmission case sub-assembly.
35104A
7.REMOVE AUTOMATIC TRANSMISSION CASE PLUG
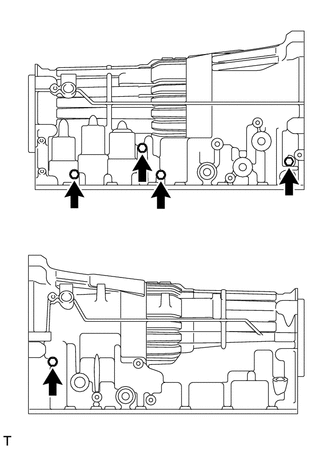
Remove the 5 automatic transmission case plugs from the automatic transmission case sub-assembly.
Remove the 5 O-rings from the 5 automatic transmission case plugs.
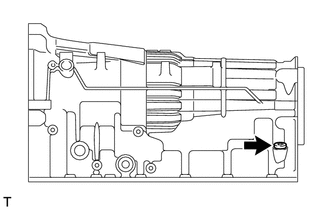
Using "TORX" socket wrench T55, remove the automatic transmission case plug from the automatic transmission case sub-assembly.
Remove the O-ring from the automatic transmission case plug.
35111
8.REMOVE AUTOMATIC TRANSMISSION HOUSING
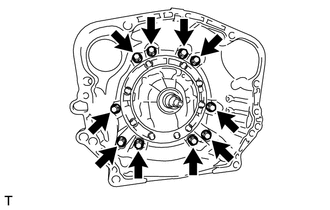
Remove the 10 bolts and the automatic transmission housing from the automatic transmission case sub-assembly.
35146
9.REMOVE EXTENSION HOUSING DUST DEFLECTOR
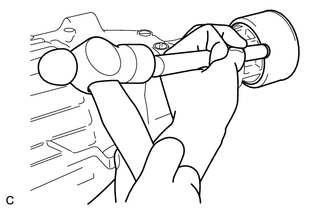
Using a brass bar and a hammer, tap out the extension housing dust deflector from the extension housing sub-assembly.
- NOTICE:
-
Be careful not to damage the extension housing sub-assembly.
35108
10.REMOVE EXTENSION HOUSING SUB-ASSEMBLY
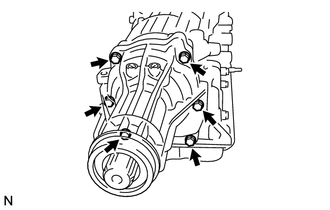
Remove the 6 bolts.
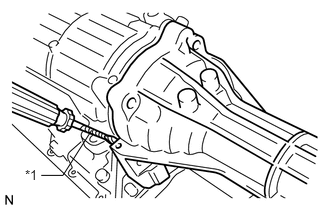
Using a screwdriver, remove the extension housing sub-assembly from the automatic transmission case sub-assembly.
| *1 | Protective Tape |
- NOTICE:
-
Do not pry the surface where the extension housing sub-assembly contacts the automatic transmission case sub-assembly.
- HINT:
-
Tape the screwdriver tip before use.
35015L
11.REMOVE TRANSMISSION CASE ADAPTER RADIAL BALL BEARING
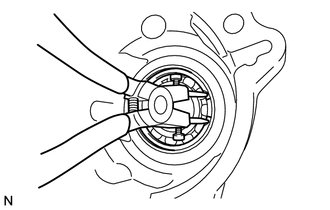
Using snap ring pliers, remove the snap ring from the extension housing sub-assembly.
Remove the transmission case adapter radial ball bearing from the extension housing sub-assembly.
35108R
12.REMOVE AUTOMATIC TRANSMISSION EXTENSION HOUSING OIL SEAL
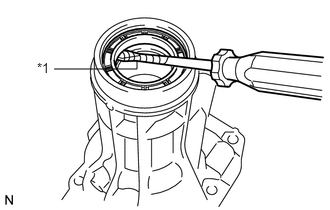
Using a screwdriver, pry out the automatic transmission extension housing oil seal from the extension housing sub-assembly.
| *1 | Protective Tape |
- NOTICE:
-
Be careful not to damage the extension housing sub-assembly.
- HINT:
-
Tape the screwdriver tip before use.
35770A
13.REMOVE OUTPUT SHAFT THRUST BEARING
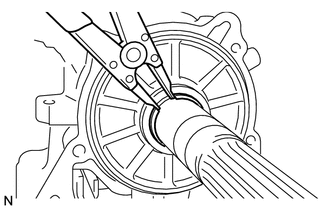
Using a snap ring expander, remove the snap ring from the output shaft of the rear planetary gear assembly.
Remove the rear output shaft thrust bearing race, output shaft thrust bearing and the output shaft thrust bearing race.
35104
14.SECURE AUTOMATIC TRANSMISSION CASE SUB-ASSEMBLY
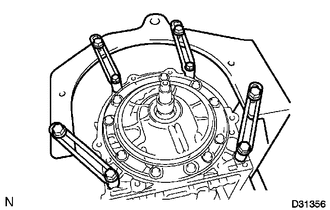
Install the automatic transmission case sub-assembly to an overhaul attachment.
35106
15.REMOVE AUTOMATIC TRANSMISSION OIL PAN SUB-ASSEMBLY
- NOTICE:
-
Do not turn the transmission over as this will contaminate the valve body with foreign matter located at the bottom of the oil pan.
Using a socket hexagon wrench 5 mm, remove the overflow plug and gasket.
Remove the drain plug and gasket.
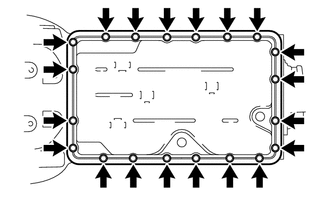
Remove the 20 bolts, automatic transmission oil pan sub-assembly and the automatic transmission oil pan gasket.
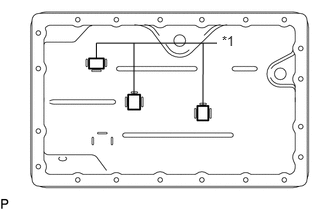
Remove the 3 transmission oil cleaner magnets from the automatic transmission oil pan sub-assembly.
| *1 | Transmission Oil Cleaner Magnet |
Examine the particles in the automatic transmission oil pan sub-assembly.
Collect any steel chips with the removed transmission oil cleaner magnets. Carefully inspect the foreign matter and particles in the automatic transmission oil pan sub-assembly and on the transmission oil cleaner magnets to anticipate the type of wear you will find in the automatic transmission assembly.
Steel (magnetic): bearing, gear and clutch plate wear
Brass (non-magnetic): bush wear
35330
16.REMOVE VALVE BODY OIL STRAINER ASSEMBLY
Turn over the automatic transmission case sub-assembly.
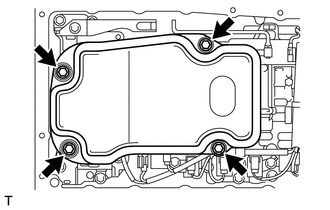
Remove the 4 bolts and the valve body oil strainer assembly from the transmission valve body assembly.
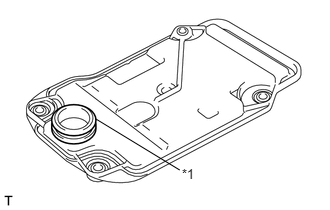
Remove the O-ring from the valve body oil strainer assembly.
| *1 | O-ring |
82125J
17.REMOVE TRANSMISSION WIRE
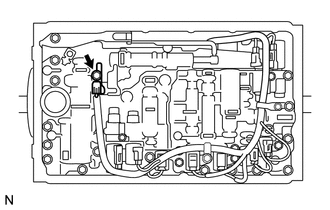
Remove the bolt and the temperature sensor clamp, and separate the ATF temperature sensor.
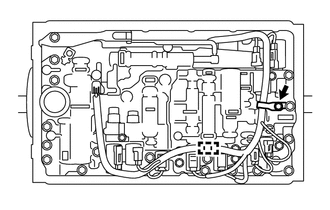
Remove the bolt and the valve body wire harness clamp.
Disengage the wire harness clamp.
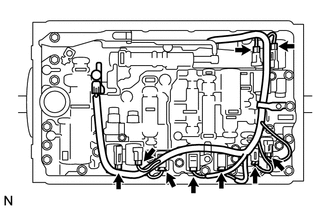
Disconnect the 9 solenoid valve connectors.
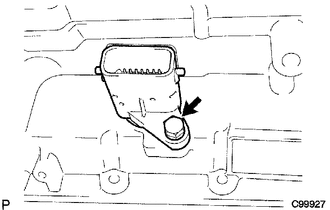
Remove the bolt and pull out the transmission wire.
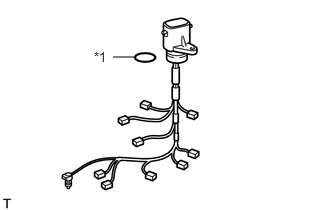
Remove the O-ring from the transmission wire.
| *1 | O-ring |
35410
18.REMOVE TRANSMISSION VALVE BODY ASSEMBLY
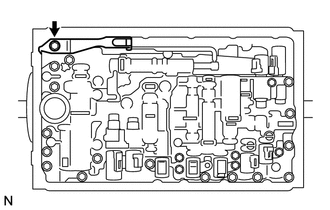
Remove the bolt, detent spring cover and the detent spring from the transmission valve body assembly.
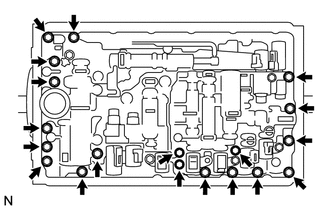
Remove the 19 bolts and the transmission valve body assembly from the automatic transmission case sub-assembly.
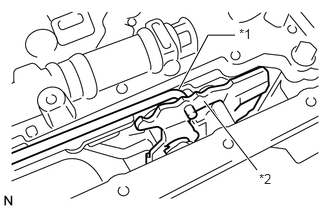
Disconnect the manual valve connecting rod sub-assembly from the manual valve lever sub-assembly.
| *1 | Manual Valve Connecting Rod Sub-assembly |
| *2 | Manual Valve Lever Sub-assembly |
35145C
19.REMOVE TRANSMISSION CASE GASKET
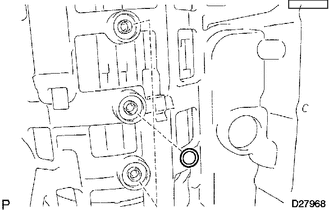
Remove the 3 transmission case gaskets from the automatic transmission case sub-assembly.
35159
20.REMOVE BRAKE DRUM GASKET
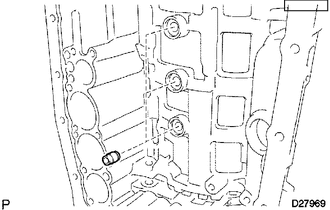
Remove the 3 brake drum gaskets from the automatic transmission case sub-assembly.
35251
21.REMOVE CHECK BALL BODY
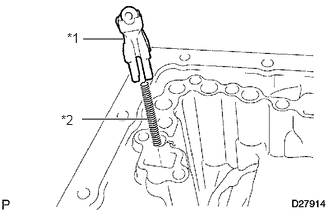
Remove the check ball body and the compression spring from the automatic transmission case sub-assembly.
| *1 | Check Ball Body |
| *2 | Compression Spring |
35425A
22.REMOVE C-2 ACCUMULATOR PISTON
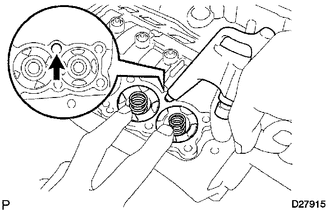
While blowing compressed air into the oil hole, remove the C-2 accumulator piston and the spring from the automatic transmission case sub-assembly.
- NOTICE:
-
Take care as the C-3 and B-3 accumulator pistons may jump out.
Remove the 2 O-rings from the C-2 accumulator piston.
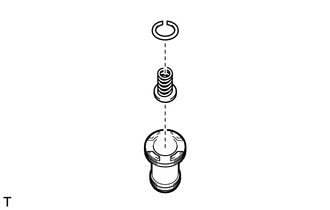
Using a screwdriver, remove the snap ring and the spring sub-assembly from the C-2 accumulator piston.
- NOTICE:
-
Be careful not to damage the C-2 accumulator piston.
- HINT:
-
Tape the screwdriver tip before use.
35427K
23.REMOVE B-3 ACCUMULATOR PISTON
While blowing compressed air into the oil hole, remove the B-3 accumulator piston and the spring from the automatic transmission case sub-assembly.
- NOTICE:
-
Take care as the C-3 accumulator piston may jump out.
Remove the 2 O-rings from the B-3 accumulator piston.
Using a screwdriver, remove the snap ring and the spring sub-assembly from the B-3 accumulator piston.
- NOTICE:
-
Be careful not to damage the B-3 accumulator piston.
- HINT:
-
Tape the screwdriver tip before use.
35426D
24.REMOVE C-3 ACCUMULATOR PISTON
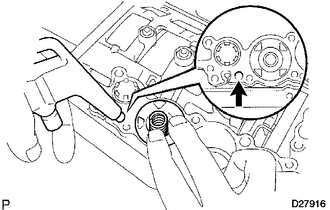
While blowing compressed air into the oil hole, remove the C-3 accumulator piston and the 2 springs from the automatic transmission case sub-assembly.
Remove the 2 O-rings from the C-3 accumulator piston.
25.REMOVE B-1 ACCUMULATOR VALVE
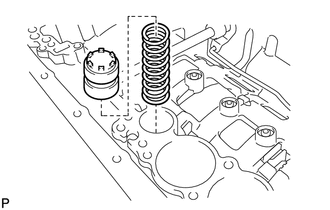
Remove the B-1 accumulator valve and the spring from the automatic transmission case sub-assembly.
35595
26.REMOVE PARKING LOCK PAWL BRACKET
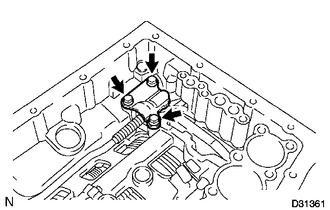
Remove the 3 bolts and the parking lock pawl bracket from the automatic transmission case sub-assembly.
35501
27.REMOVE PARKING LOCK ROD SUB-ASSEMBLY
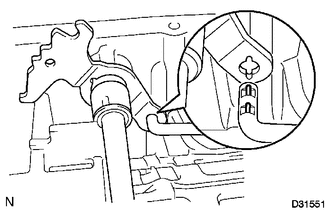
Remove the parking lock rod sub-assembly from the manual valve lever sub-assembly.
35556
28.REMOVE PARKING LOCK PAWL SHAFT
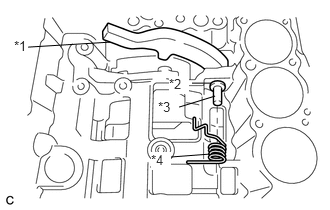
Pull out the parking lock pawl shaft from the front side, and remove the parking lock pawl and the torsion spring.
| *1 | Parking Lock Pawl |
| *2 | E-ring |
| *3 | Parking Lock Pawl Shaft |
| *4 | Torsion Spring |
Remove the E-ring from the parking lock pawl shaft.
35505
29.REMOVE MANUAL VALVE LEVER SUB-ASSEMBLY
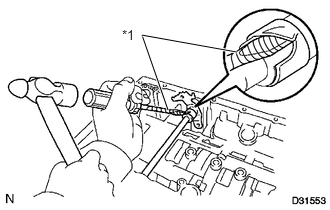
Using a screwdriver and a hammer, cut off the spacer and remove it from the manual valve lever shaft.
| *1 | Protective Tape |
- NOTICE:
-
Be careful not to damage the manual valve lever shaft.
- HINT:
-
Tape the screwdriver tip before use.
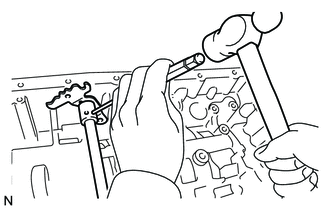
Using a pin punch 3 mm and a hammer, drive out the spring pin.
- HINT:
-
Slowly drive out the spring pin so that it does not fall into the automatic transmission case sub-assembly.
Pull the manual valve lever shaft out through the case and remove the manual valve lever sub-assembly.
35506F
30.REMOVE MANUAL VALVE LEVER SHAFT OIL SEAL
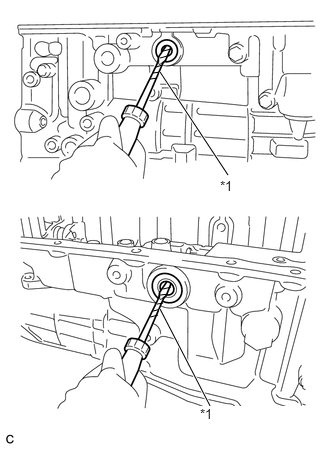
Using a screwdriver, pry out the 2 manual valve lever shaft oil seals from the automatic transmission case sub-assembly.
| *1 | Protective Tape |
- NOTICE:
-
Be careful not to damage the automatic transmission case sub-assembly.
- HINT:
-
Tape the screwdriver tip before use.
31.REMOVE OIL PUMP ASSEMBLY
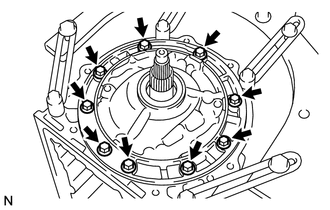
Remove the 9 bolts.
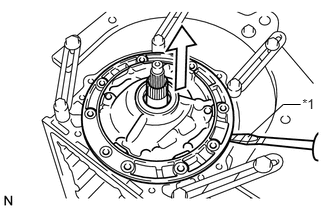
Using a screwdriver, pull out the oil pump assembly from the automatic transmission case sub-assembly.
| *1 | Protective Tape |
- NOTICE:
-
Be careful not to damage the oil pump assembly or automatic transmission case sub-assembly.
- HINT:
-
Tape the screwdriver tip before use.
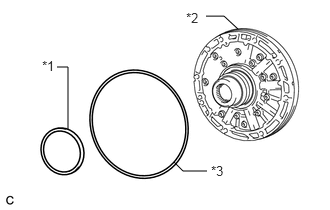
Remove the No. 1 thrust bearing race from the oil pump assembly.
| *1 | No. 1 Thrust Bearing Race |
| *2 | Oil Pump Assembly |
| *3 | O-ring |
Remove the O-ring from the oil pump assembly.
32.REMOVE CLUTCH DRUM AND INPUT SHAFT ASSEMBLY
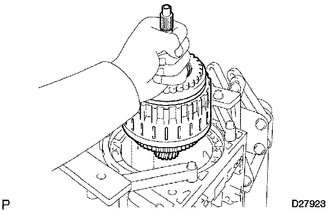
Remove the clutch drum and input shaft assembly from the automatic transmission case sub-assembly.
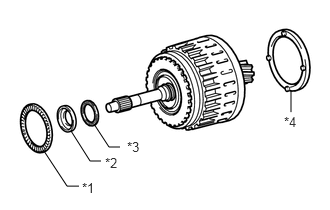
Remove the clutch drum thrust washer, thrust needle roller bearing, input shaft front thrust bearing race and the input shaft front thrust needle roller bearing from the clutch drum and input shaft assembly.
| *1 | Thrust Needle Roller Bearing |
| *2 | Input Shaft Front Thrust Bearing Race |
| *3 | Input Shaft Front Thrust Needle Roller Bearing |
| *4 | Clutch Drum Thrust Washer |
35780B
33.REMOVE NO. 2 ONE-WAY CLUTCH ASSEMBLY
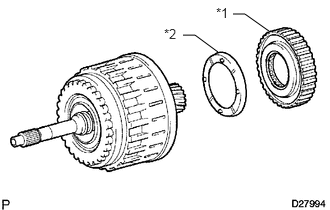
Remove the No. 2 one-way clutch assembly and the input shaft clutch drum thrust washer from the clutch drum and input shaft assembly.
| *1 | No. 2 One-way Clutch Assembly |
| *2 | Input Shaft Clutch Drum Thrust Washer |
34.SUPPORT CLUTCH DRUM AND INPUT SHAFT ASSEMBLY
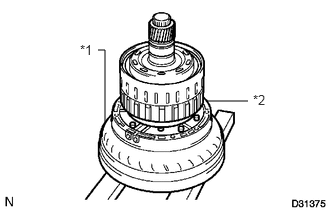
Place the oil pump assembly onto the torque converter assembly, and then place the clutch drum and input shaft assembly onto the oil pump assembly.
| *1 | Torque Converter Assembly |
| *2 | Oil Pump Assembly |
35049
35.REMOVE REVERSE CLUTCH HUB SUB-ASSEMBLY
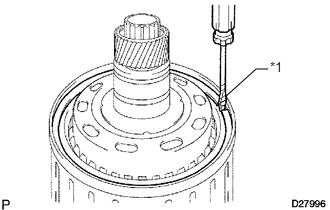
Using a screwdriver, remove the snap ring from the reverse clutch piston sub-assembly.
| *1 | Protective Tape |
- NOTICE:
-
Be careful not to damage the reverse clutch piston sub-assembly.
- HINT:
-
Tape the screwdriver tip before use.
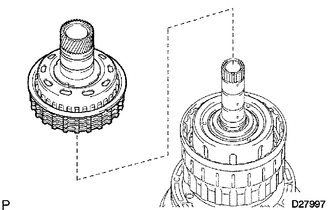
Remove the reverse clutch hub sub-assembly from the reverse clutch drum sub-assembly.
35659
36.REMOVE REVERSE CLUTCH REACTION SLEEVE
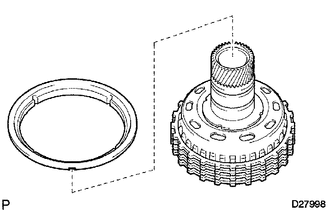
Remove the reverse clutch reaction sleeve from the reverse clutch hub sub-assembly.
35677C
37.REMOVE NO. 3 CLUTCH DISC (REAR CLUTCH DISC)
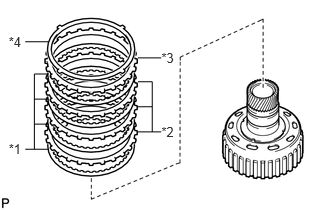
Remove the clutch cushion plate, reverse clutch flange, 4 No. 3 clutch discs and the 3 No. 3 clutch plates from the reverse clutch hub sub-assembly.
| *1 | No. 3 Clutch Disc |
| *2 | No. 3 Clutch Plate |
| *3 | Reverse Clutch Flange |
| *4 | Clutch Cushion Plate |
35061
38.REMOVE FORWARD CLUTCH HUB SUB-ASSEMBLY
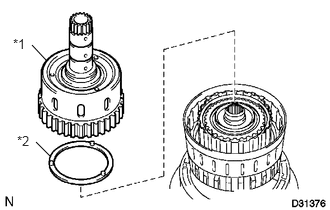
Remove the forward clutch hub sub-assembly and the No. 3 clutch hub thrust washer from the reverse clutch drum sub-assembly.
| *1 | Forward Clutch Hub Sub-assembly |
| *2 | No. 3 Clutch Hub Thrust Washer |
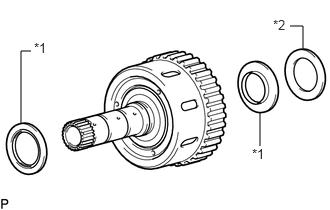
Remove the 2 thrust needle roller bearings and the No. 2 thrust bearing race from the forward clutch hub sub-assembly.
| *1 | Thrust Needle Roller Bearing |
| *2 | No. 2 Thrust Bearing Race |
35064
39.REMOVE COAST CLUTCH HUB SUB-ASSEMBLY
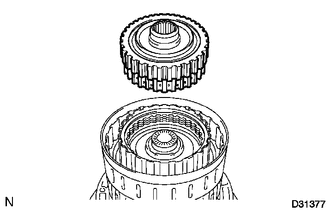
Remove the coast clutch hub sub-assembly from the reverse clutch drum sub-assembly.
35790H
40.REMOVE NO. 4 ONE-WAY CLUTCH ASSEMBLY
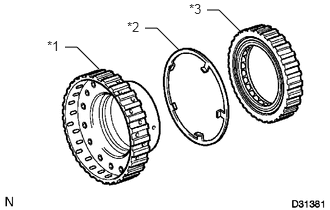
Remove the No. 4 one-way clutch assembly and the No. 2 clutch hub thrust washer from the coast clutch hub sub-assembly.
| *1 | Coast Clutch Hub Sub-assembly |
| *2 | No. 2 Clutch Hub Thrust Washer |
| *3 | No. 4 One-way Clutch Assembly |
35633B
41.REMOVE NO. 1 CLUTCH DISC (FORWARD CLUTCH DISC)
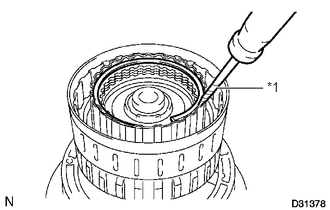
Using a screwdriver, remove the snap ring.
| *1 | Protective Tape |
- NOTICE:
-
Be careful not to damage the input shaft.
- HINT:
-
Tape the screwdriver tip before use.
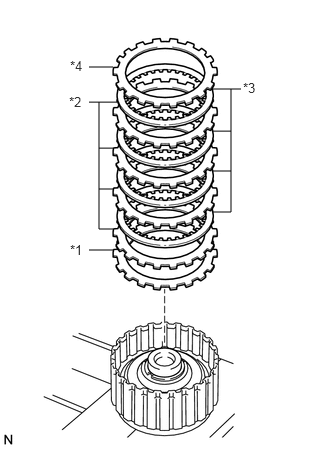
Remove the forward clutch flange, 4 No. 1 clutch discs, 4 No. 1 clutch plates and the clutch cushion plate from the input shaft.
| *1 | Clutch Cushion Plate |
| *2 | No. 1 Clutch Plate |
| *3 | No. 1 Clutch Disc |
| *4 | Forward Clutch Flange |
35685
42.REMOVE NO. 4 CLUTCH DISC (COAST CLUTCH DISC)
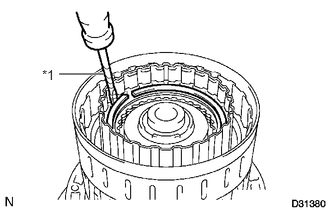
Using a screwdriver, remove the snap ring.
| *1 | Protective Tape |
- NOTICE:
-
Be careful not to damage the forward clutch piston sub-assembly.
- HINT:
-
Tape the screwdriver tip before use.
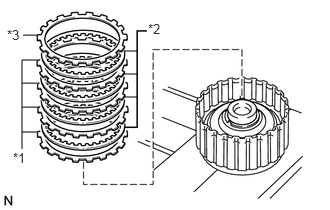
Remove the coast clutch flange, 4 No. 4 clutch discs and the 4 No. 4 clutch plates from the forward clutch piston sub-assembly.
| *1 | No. 4 Clutch Plate |
| *2 | No. 4 Clutch Disc |
| *3 | Coast Clutch Flange |
43.REMOVE INPUT SHAFT
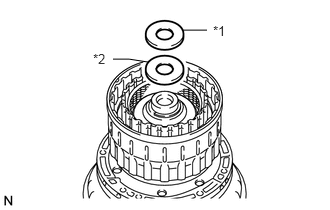
Remove the thrust needle roller bearing and the input shaft rear thrust bearing race from the input shaft.
| *1 | Thrust Needle Roller Bearing |
| *2 | Input Shaft Rear Thrust Bearing Race |
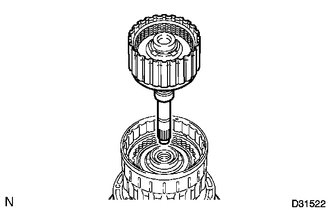
Remove the input shaft from the reverse clutch drum sub-assembly.
35617
44.REMOVE CLUTCH DRUM OIL SEAL RING
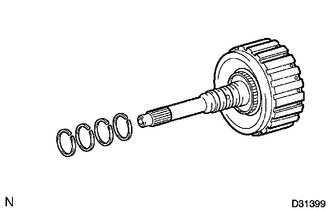
Remove the 4 clutch drum oil seal rings from the input shaft.
35668
45.REMOVE NO. 1 CLUTCH BALANCER
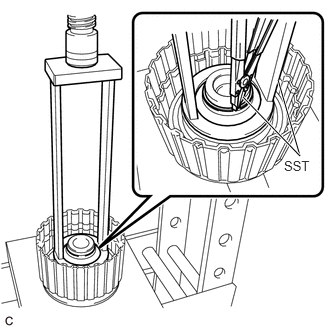
Place SST on the No. 1 clutch balancer, and compress the forward clutch return spring sub-assembly with a press.
- SST
- 09387-00110
Using SST, remove the snap ring.
- SST
- 09350-30020 (09350-07070)
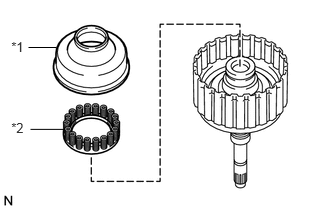
Remove the No. 1 clutch balancer and the forward clutch return spring sub-assembly from the input shaft.
| *1 | No. 1 Clutch Balancer |
| *2 | Forward Clutch Return Spring Sub-assembly |
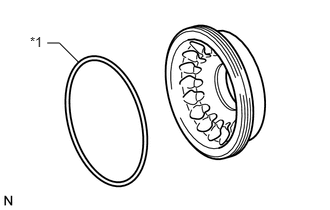
Remove the D-ring from the No. 1 clutch balancer.
| *1 | D-ring |
35602A
46.REMOVE FORWARD CLUTCH PISTON SUB-ASSEMBLY
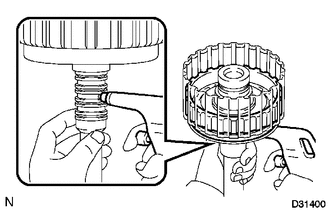
Hold the forward clutch piston sub-assembly and apply compressed air (392 kPa, 4.0 kgf/cm2, 57 psi) to the input shaft to remove the forward clutch piston sub-assembly.
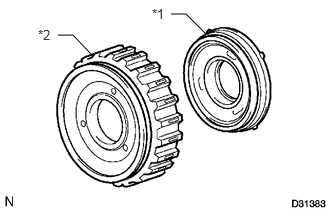
Remove the coast clutch piston from the forward clutch piston sub-assembly.
| *1 | Coast Clutch Piston |
| *2 | Forward Clutch Piston Sub-assembly |
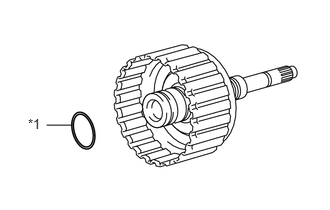
Remove the O-ring from the input shaft.
| *1 | O-ring |
35649
47.REMOVE REVERSE CLUTCH FLANGE
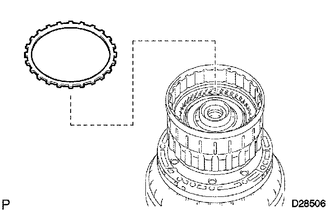
Remove the reverse clutch flange from the reverse clutch drum sub-assembly.
35667A
48.REMOVE NO. 2 CLUTCH DISC (DIRECT CLUTCH DISC)
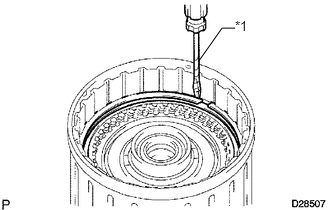
Using a screwdriver, remove the 2 snap rings from the reverse clutch drum sub-assembly.
| *1 | Protective Tape |
- NOTICE:
-
Be careful not to damage the reverse clutch drum sub-assembly.
- HINT:
-
Tape the screwdriver tip before use.
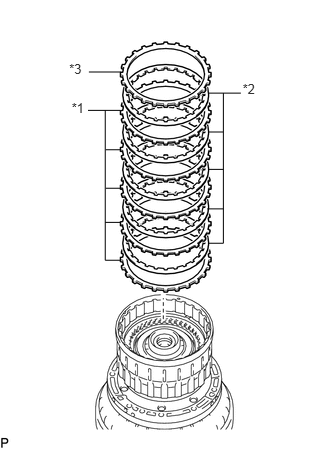
Remove the direct clutch flange, 5 No. 2 clutch discs and the 5 No. 2 clutch plates from the reverse clutch drum sub-assembly.
| *1 | No. 2 Clutch Plate |
| *2 | No. 2 Clutch Disc |
| *3 | Direct Clutch Flange |
35688
49.REMOVE NO. 3 CLUTCH BALANCER
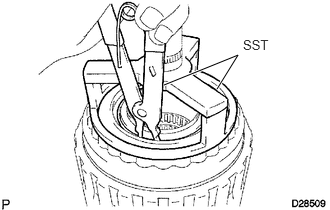
Place SST on the No. 3 clutch balancer, and compress the reverse clutch return spring sub-assembly with a press.
- SST
- 09387-00070
Using SST, remove the snap ring.
- SST
- 09350-30020 (09350-07070)
Remove the No. 3 clutch balancer.
35047
50.REMOVE REVERSE CLUTCH RETURN SPRING SUB-ASSEMBLY
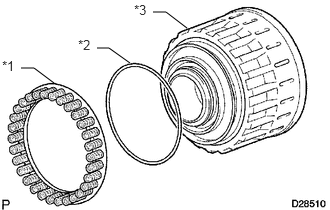
Remove the reverse clutch return spring sub-assembly and O-ring from the reverse clutch piston sub-assembly.
| *1 | Reverse Clutch Return Spring Sub-assembly |
| *2 | O-ring |
| *3 | Reverse Clutch Piston Sub-assembly |
35048
51.REMOVE REVERSE CLUTCH PISTON SUB-ASSEMBLY
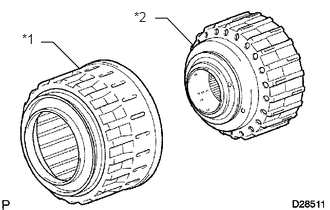
Remove the reverse clutch piston sub-assembly from the reverse clutch drum sub-assembly.
| *1 | Reverse Clutch Piston Sub-assembly |
| *2 | Reverse Clutch Drum Sub-assembly |
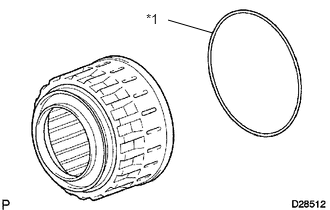
Remove the O-ring from the reverse clutch piston sub-assembly.
| *1 | O-ring |
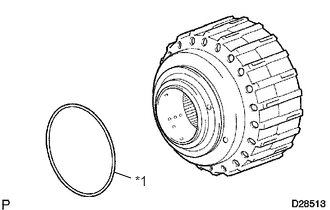
Remove the O-ring from the reverse clutch drum sub-assembly.
| *1 | O-ring |
35606A
52.REMOVE DIRECT CLUTCH PISTON SUB-ASSEMBLY
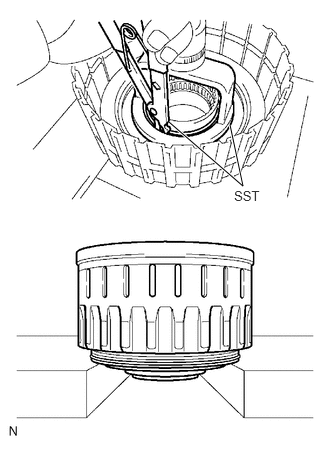
Place SST on the No. 2 clutch balancer, and compress the direct clutch return spring sub-assembly with a press.
- SST
- 09320-89010
Using SST, remove the snap ring.
- SST
- 09350-30020 (09350-07070)
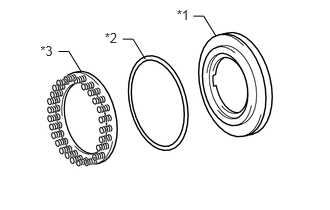
Remove the No. 2 clutch balancer and the direct clutch return spring sub-assembly.
| *1 | No. 2 Clutch Balancer |
| *2 | O-ring |
| *3 | Direct Clutch Return Spring Sub-assembly |
Remove the O-ring from the No. 2 clutch balancer.
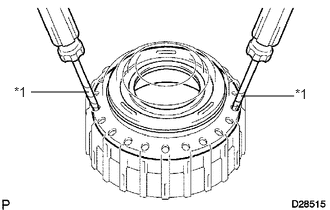
Using 2 screwdrivers, remove the direct clutch piston sub-assembly from the reverse clutch drum sub-assembly.
| *1 | Protective Tape |
- NOTICE:
-
Be careful not to damage the direct clutch piston sub-assembly.
- HINT:
-
Tape the screwdriver tip before use.
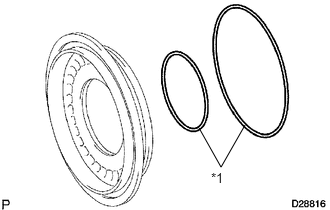
Remove the 2 O-rings from the direct clutch piston sub-assembly.
| *1 | O-ring |
35066
53.REMOVE NO. 3 BRAKE DISC (2ND BRAKE DISC SET)
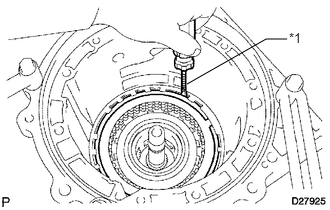
Using a screwdriver, remove the snap ring from the automatic transmission case sub-assembly.
| *1 | Protective Tape |
- NOTICE:
-
Be careful not to damage the automatic transmission case sub-assembly.
- HINT:
-
Tape the screwdriver tip before use.
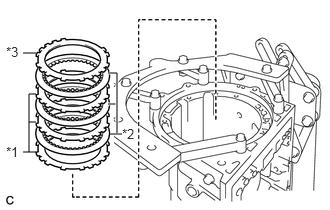
Remove the No. 3 brake flange, 3 No. 3 brake discs and the 3 No. 3 brake plates from the automatic transmission case sub-assembly.
| *1 | No. 3 Brake Plate |
| *2 | No. 3 Brake Disc |
| *3 | No. 3 Brake Flange |
35664
54.REMOVE 2ND BRAKE CYLINDER
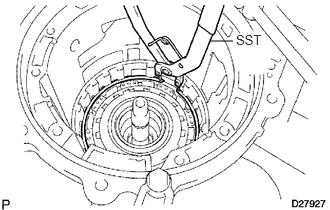
Using SST, remove the snap ring from the automatic transmission case sub-assembly.
- SST
- 09350-30020 (09350-07060)
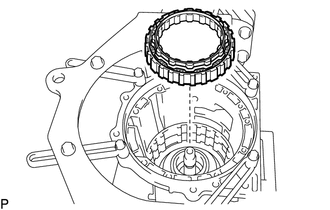
Remove the 2nd brake cylinder from the automatic transmission case sub-assembly.
35624
55.REMOVE 2ND BRAKE PISTON
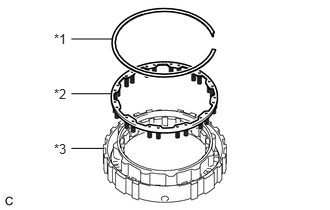
Using a screwdriver, remove the snap ring and the No. 3 brake piston return spring sub-assembly from the 2nd brake cylinder.
| *1 | Snap Ring |
| *2 | No. 3 Brake Piston Return Spring Sub-assembly |
| *3 | 2nd Brake Cylinder |
- NOTICE:
-
Be careful not to damage the 2nd brake cylinder.
- HINT:
-
Tape the screwdriver tip before use.
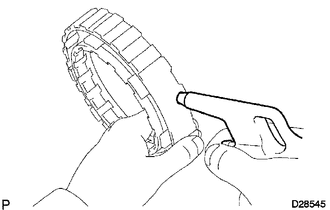
Hold the 2nd brake piston and apply compressed air (392 kPa, 4.0 kgf/cm2, 57 psi) to the 2nd brake cylinder to remove the 2nd brake piston.
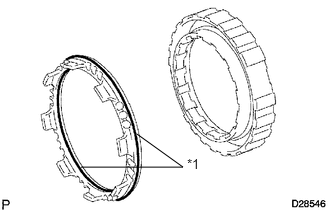
Remove the 2 O-rings from the 2nd brake piston.
| *1 | O-ring |
35790
56.REMOVE ONE-WAY CLUTCH ASSEMBLY
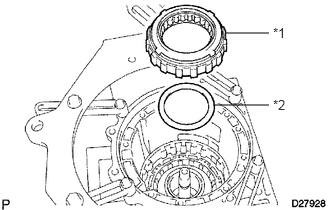
Remove the one-way clutch assembly and the No. 1 planetary carrier thrust washer from the automatic transmission case sub-assembly.
| *1 | One-way Clutch Assembly |
| *2 | No. 1 Planetary Carrier Thrust Washer |
35720
57.REMOVE FRONT PLANETARY GEAR ASSEMBLY
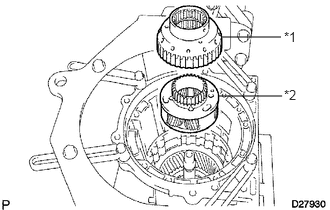
Remove the front planetary gear assembly and the one-way clutch inner race sub-assembly from the automatic transmission case sub-assembly.
| *1 | One-way Clutch Inner Race Sub-assembly |
| *2 | Front Planetary Gear Assembly |
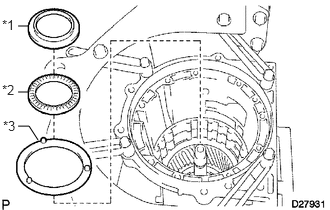
Remove the front planetary flange rear thrust bearing race, front planetary flange thrust needle roller bearing and the No. 2 planetary carrier thrust washer from the automatic transmission case sub-assembly.
| *1 | Front Planetary Flange Rear Thrust Bearing Race |
| *2 | Front Planetary Flange Thrust Needle Roller Bearing |
| *3 | No. 2 Planetary Carrier Thrust Washer |
35743
58.REMOVE FRONT PLANETARY RING GEAR
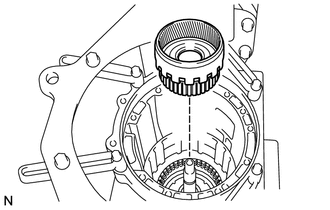
Remove the front planetary ring gear from the automatic transmission case sub-assembly.
35763
59.REMOVE CENTER PLANETARY RING GEAR
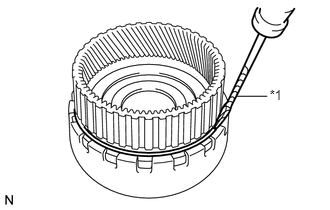
Using a screwdriver, remove the snap ring.
| *1 | Protective Tape |
- NOTICE:
-
Be careful not to damage the front planetary ring gear.
- HINT:
-
Tape the screwdriver tip before use.
Remove the center planetary ring gear from the front planetary ring gear.
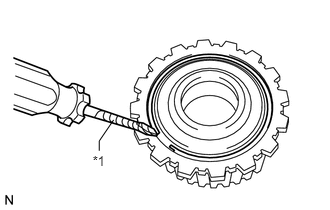
Using a screwdriver, remove the snap ring.
| *1 | Protective Tape |
- NOTICE:
-
Be careful not to damage the center planetary ring gear.
- HINT:
-
Tape the screwdriver tip before use.
Remove the front planetary ring gear flange sub-assembly from the center planetary ring gear.
35681A
60.REMOVE NO. 1 BRAKE DISC
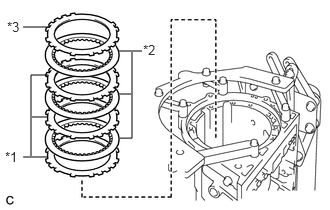
Remove the No. 1 brake flange, 3 No. 1 brake discs and the 3 No. 1 brake plates from the automatic transmission case sub-assembly.
| *1 | No. 1 Brake Plate |
| *2 | No. 1 Brake Disc |
| *3 | No. 1 Brake Flange |
35608J
61.REMOVE BRAKE PISTON RETURN SPRING SUB-ASSEMBLY
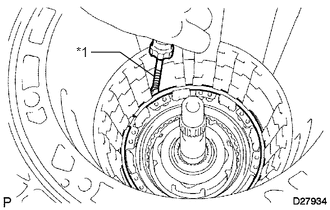
Using a screwdriver, remove the snap ring from the automatic transmission case sub-assembly.
| *1 | Protective Tape |
- NOTICE:
-
Be careful not to damage the automatic transmission case sub-assembly.
- HINT:
-
Tape the screwdriver tip before use.
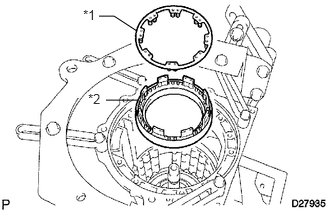
Remove the brake piston return spring sub-assembly and the No. 1 brake cylinder from the automatic transmission case sub-assembly.
| *1 | Brake Piston Return Spring Sub-assembly |
| *2 | No. 1 Brake Cylinder |
35621V
62.REMOVE NO. 1 BRAKE PISTON
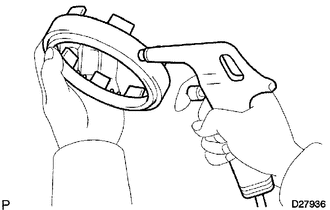
Hold the No. 1 brake piston and apply compressed air (392 kPa, 4.0 kgf/cm2, 57 psi) to the No. 1 brake cylinder to remove the No. 1 brake piston.
- HINT:
-
If the piston does not pop out with compressed air, lift the piston out with needle-nose pliers.
Remove the 2 O-rings from the No. 1 brake piston.
35682A
63.REMOVE NO. 2 BRAKE DISC
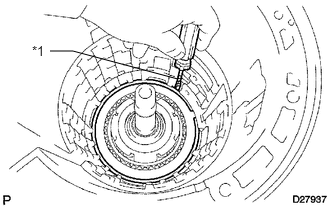
Using a screwdriver, remove the snap ring from the automatic transmission case sub-assembly.
| *1 | Protective Tape |
- NOTICE:
-
Be careful not to damage the automatic transmission case sub-assembly.
- HINT:
-
Tape the screwdriver tip before use.
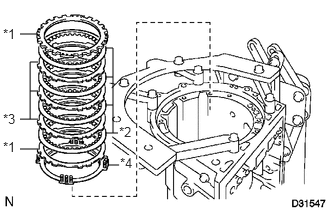
Remove the 2 No. 2 brake flanges, 4 No. 2 brake discs, 3 No. 2 brake plates and the No. 2 brake piston return spring sub-assembly from the automatic transmission case sub-assembly.
| *1 | No. 2 Brake Flange |
| *2 | No. 2 Brake Disc |
| *3 | No. 2 Brake Plate |
| *4 | No. 2 Brake Piston Return Spring Sub-assembly |
35622G
64.REMOVE NO. 2 BRAKE PISTON
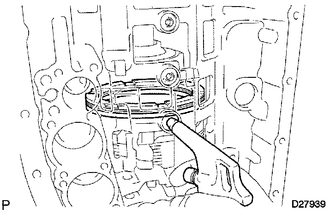
Hold the No. 2 brake piston and apply compressed air (392 kPa, 4.0 kgf/cm2, 57 psi) to the transmission case to remove the No. 2 brake piston and the No. 2 brake cylinder.
- HINT:
-
If the piston does not pop out with compressed air, lift the piston out with needle-nose pliers.
Remove the No. 2 brake piston from the No. 2 brake cylinder.
Remove the 2 O-rings from the No. 2 brake piston.
35750
65.REMOVE CENTER PLANETARY GEAR ASSEMBLY
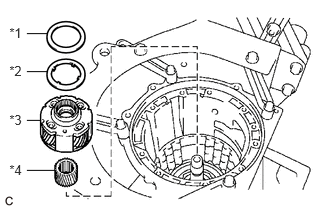
Remove the center planetary gear assembly, planetary sun gear, thrust needle roller bearing and the No. 4 thrust bearing race from the automatic transmission case sub-assembly.
| *1 | Thrust Needle Roller Bearing |
| *2 | No. 4 Thrust Bearing Race |
| *3 | Center Planetary Gear Assembly |
| *4 | Planetary Sun Gear |
35713
66.REMOVE INTERMEDIATE SHAFT
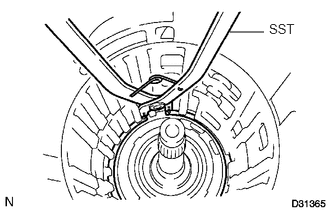
Using SST, remove the snap ring from the automatic transmission case sub-assembly.
- SST
- 09350-30020 (09350-07060)
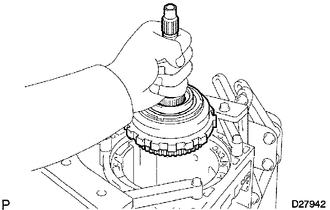
Remove the intermediate shaft together with the No. 3 one-way clutch assembly from the automatic transmission case sub-assembly.
35770C
67.REMOVE NO. 3 ONE-WAY CLUTCH ASSEMBLY
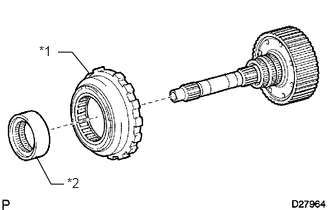
Remove the No. 3 one-way clutch assembly and the one-way clutch inner race from the intermediate shaft.
| *1 | No. 3 One-way Clutch Assembly |
| *2 | One-way Clutch Inner Race |
35077D
68.REMOVE REAR PLANETARY RING GEAR FLANGE SUB-ASSEMBLY
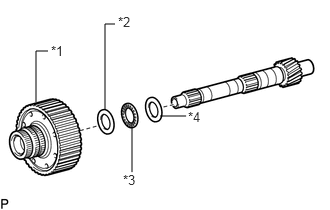
Remove the rear planetary ring gear flange sub-assembly, No. 7 thrust bearing race, thrust needle roller bearing and the No. 8 thrust bearing race from the intermediate shaft.
| *1 | Rear Planetary Ring Gear Flange Sub-assembly |
| *2 | No. 7 Thrust Bearing Race |
| *3 | Thrust Needle Roller Bearing |
| *4 | No. 8 Thrust Bearing Race |
35639B
69.REMOVE BRAKE PLATE STOPPER SPRING
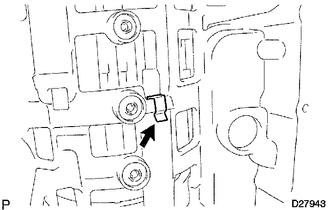
Remove the brake plate stopper spring from the automatic transmission case sub-assembly.
35684
70.REMOVE NO. 4 BRAKE DISC
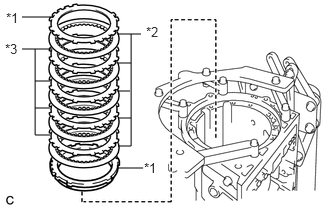
Remove the 2 No. 4 brake flanges, 5 No. 4 brake discs and the 4 No. 4 brake plates from the automatic transmission case sub-assembly.
| *1 | No. 4 Brake Flange |
| *2 | No. 4 Brake Disc |
| *3 | No. 4 Brake Plate |
35760
71.REMOVE REAR PLANETARY GEAR ASSEMBLY
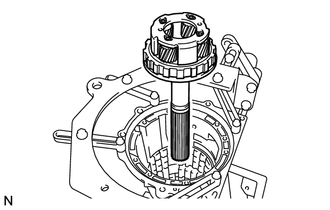
Remove the rear planetary gear assembly from the automatic transmission case sub-assembly.
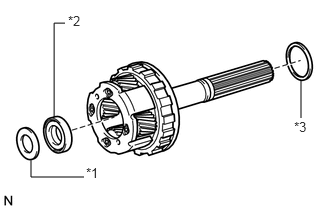
Remove the thrust bearing race, thrust needle roller bearing and the No. 9 thrust bearing race from the rear planetary gear assembly.
| *1 | Thrust Bearing Race |
| *2 | Thrust Needle Roller Bearing |
| *3 | No. 9 Thrust Bearing Race |
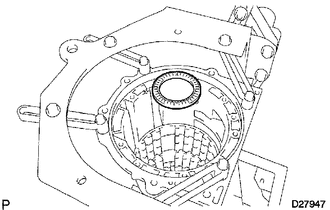
Remove the thrust needle roller bearing from the automatic transmission case sub-assembly.
35068
72.REMOVE 1ST AND REVERSE BRAKE RETURN SPRING SUB-ASSEMBLY
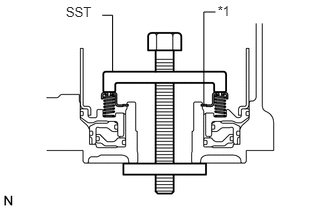
Place SST on the 1st and reverse brake return spring sub-assembly and compress the 1st and reverse brake return spring sub-assembly.
| *1 | Snap Ring |
- SST
- 09350-30020 (09350-07050)
Using SST, remove the snap ring and the 1st and reverse brake return spring sub-assembly.
- SST
- 09350-30020 (09350-07070)
35666
73.REMOVE BRAKE APPLY TUBE
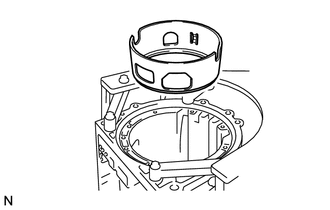
Remove the brake apply tube from the automatic transmission case sub-assembly.
35623H
74.REMOVE 1ST AND REVERSE BRAKE PISTON
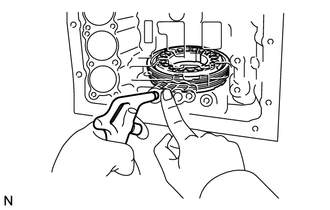
Hold the 1st and reverse brake piston and apply compressed air (392 kPa, 4.0 kgf/cm2, 57 psi) to the transmission case to remove the 1st and reverse brake piston.
- HINT:
-
If the piston does not pop out with compressed air, lift the piston out with needle-nose pliers.
Remove the O-ring from the 1st and reverse brake piston.
35626
75.REMOVE BRAKE REACTION SLEEVE
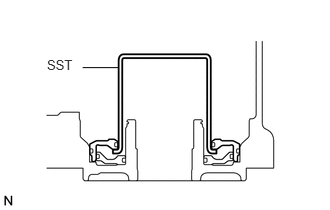
Using SST, remove the brake reaction sleeve from the automatic transmission case sub-assembly.
- SST
- 09350-30020 (09350-07080)
Remove the 2 O-rings from the brake reaction sleeve.
35629A
76.REMOVE NO. 4 BRAKE PISTON
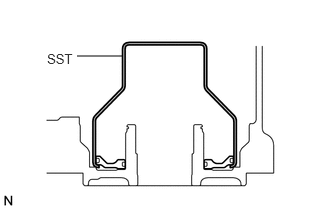
Using SST, remove the No. 4 brake piston from the automatic transmission case sub-assembly.
- SST
- 09350-30020 (09350-07090)
Remove the 2 O-rings from the No. 4 brake piston.