TL70 MANUAL TRANSMISSION / TRANSAXLE MANUAL TRANSAXLE UNIT REASSEMBLY
PROCEDURE

 1.INSTALL NO. 3 GEAR SHIFT FORK SHAFT
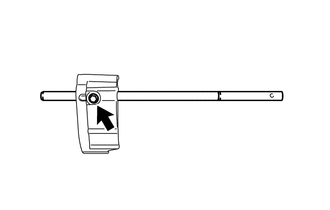
Install the No. 3 gear shift fork shaft to the No. 3 gear shift fork with a new bolt.
- Torque:
- 20 N*m (199 kgf*cm, 14 ft.*lbf)
2.INSTALL NO. 1 GEAR SHIFT FORK SHAFT
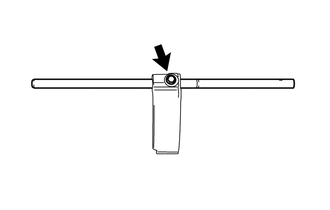
Install the No. 1 gear shift fork shaft to the No. 1 gear shift fork with a new bolt.
- Torque:
- 20 N*m (199 kgf*cm, 14 ft.*lbf)
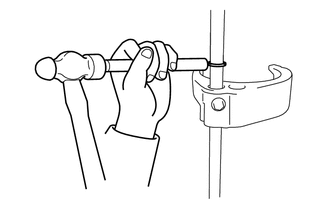
Using a brass bar and a hammer, install a new shaft snap ring.
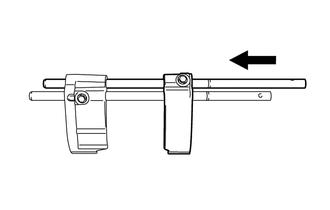
Install the No. 1 gear shift fork shaft together with the No. 1 gear shift fork to the No. 3 gear shift fork shaft and No. 3 gear shift fork.
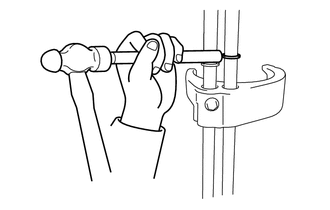
Using a brass bar and a hammer, install a new shaft snap ring.
3.INSTALL NO. 2 GEAR SHIFT FORK SHAFT
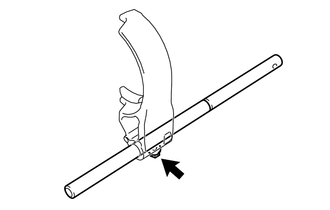
Install the No. 2 gear shift fork shaft to the No. 2 gear shift fork with a new bolt.
- Torque:
- 20 N*m (199 kgf*cm, 14 ft.*lbf)
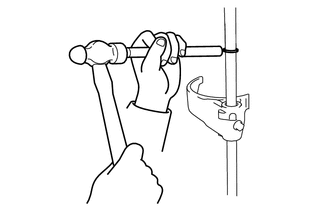
Using a brass bar and a hammer, install a new shaft snap ring.
4.INSTALL TRANSMISSION FRONT BEARING RETAINER OIL SEAL
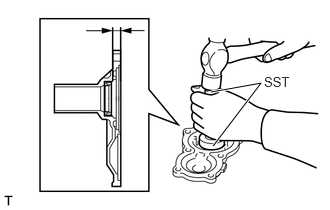
Using SST and a hammer, install a new transmission front bearing retainer oil seal.
- SST
- 09950-60010 (09951-00420)
09950-70010 (09951-07100)
- Installation depth:
11.1 to 11.9 mm (0.437 to 0.469 in.) (from the end surface of the front bearing retainer)
- NOTICE:
- ·
Do not damage the lip of the transmission front bearing retainer oil seal.
·Do not damage the front bearing retainer.
Apply MP grease to the lip of the transmission front bearing retainer oil seal.
5.INSTALL REVERSE IDLER GEAR SHAFT
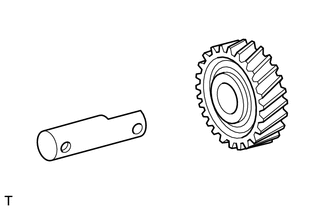
Apply manual transmission gear oil to the reverse idle gear shaft, and then install it to the reverse idler gear.
6.INSTALL INPUT SHAFT
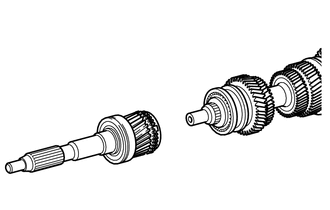
Apply manual transmission gear oil to the needle roller bearing of the input shaft, and then install the input shaft to the output shaft.
7.INSTALL COUNTER SHAFT
Install the input shaft, output shaft, counter shaft, reverse idler gear, reverse idler gear shaft, No. 1 gear shift fork shaft, No. 2 gear shift fork shaft and No. 3 gear shift fork shaft all together to the clutch housing.
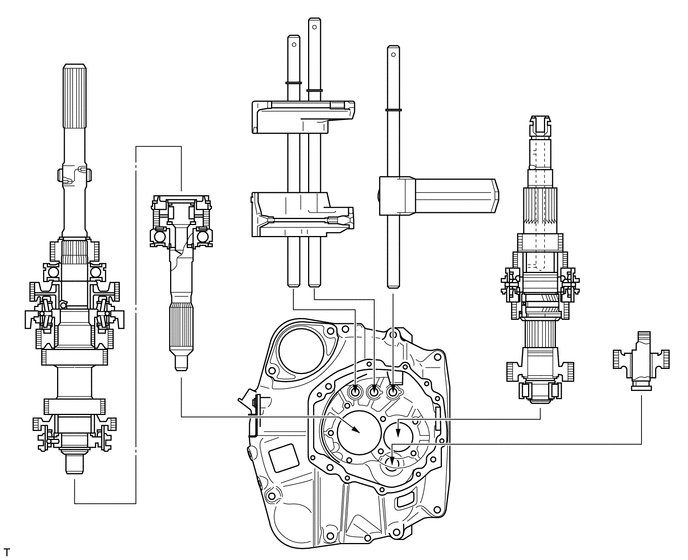
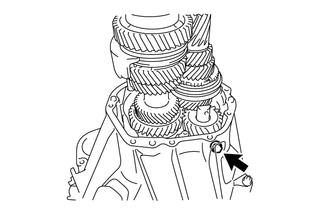
Using a new gasket and a new bolt, temporarily install the reverse idler gear shaft (clutch housing side).
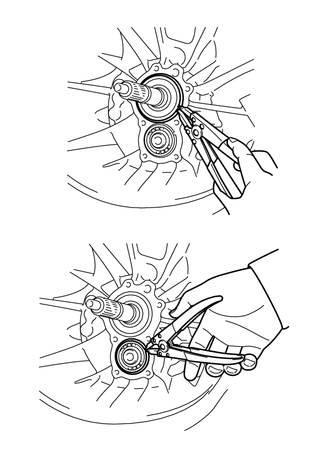
Using a snap ring expander, install 2 new shaft snap rings.
- HINT:
-
Install the shaft snap rings to the input shaft and counter shaft.
8.INSTALL FRONT BEARING RETAINER
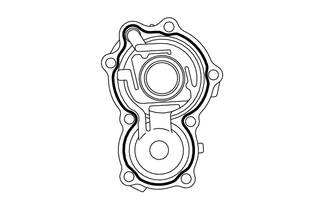
Apply seal packing 1281 continuously to the front bearing retainer as shown in the illustration.

|
Seal Packing 1281 |
- NOTICE:
-
Install it within 10 minutes of the seal packing application.
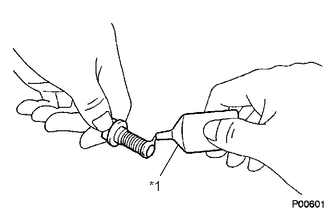
Apply adhesive 1344 to the 2nd and 3rd pitches from the tip of new bolt.
| *1 | Adhesive 1344 |
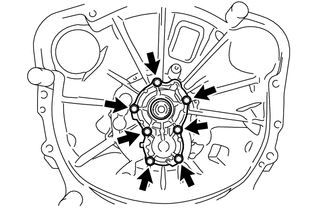
Install the front bearing retainer with the 7 bolts.
- Torque:
- 17 N*m (173 kgf*cm, 13 ft.*lbf)
- NOTICE:
-
Install the front bearing retainer ensuring that the transmission front bearing retainer oil seal lip is not damaged.
9.INSTALL OIL RECEIVER PIPE
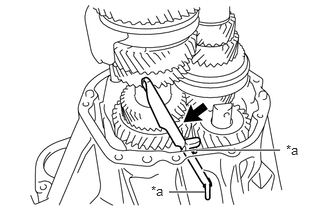
Install the oil receiver pipe.
- NOTICE:
-
Confirm that the protrusions of the oil receiver pipe are properly fitted in the grooves.
| *a | Protrusion |
10.INSTALL TRANSMISSION CASE
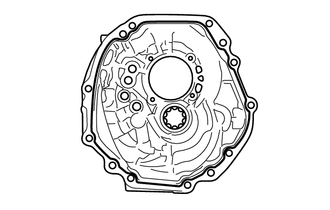
Apply seal packing 1281 continuously to the transmission case as shown in the illustration.
|
|
Seal Packing 1281 |
- NOTICE:
-
Install within 10 minutes of the seal packing application.
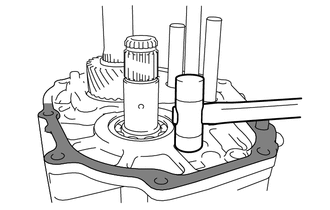
Check the location of the knock pin, and then using a plastic hammer, install the transmission case.

|
Do not hit hard. |
Apply adhesive 1324 to the 2nd and 3rd pitches.
| *1 | Adhesive 1324 |
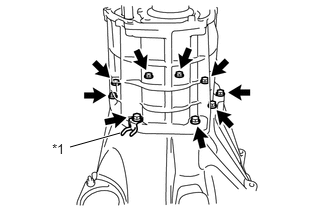
Install the transmission case and clamp with the 9 bolts.
| *1 | clamp |
- Torque:
- 29 N*m (296 kgf*cm, 21 ft.*lbf)
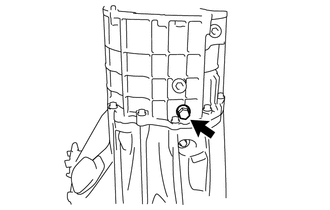
Install a new reverse idler gear shaft fixing bolt and new gasket (transmission case side).
- Torque:
- 28 N*m (286 kgf*cm, 21 ft.*lbf)
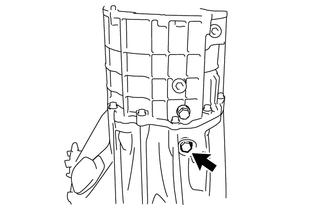
Securely tighten the reverse idler gear shaft fixing bolt (clutch housing side).
- Torque:
- 28 N*m (286 kgf*cm, 21 ft.*lbf)
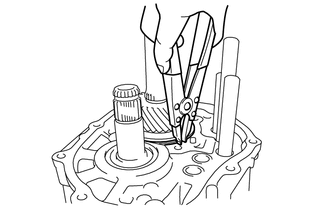
Using a snap ring expander, install a new shaft snap ring.
11.INSTALL REAR BEARING RETAINER
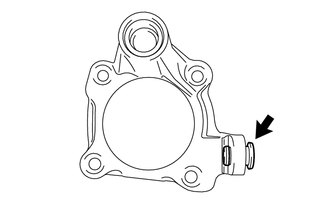
Install the shift arm pivot to the rear bearing retainer.
Apply adhesive 1324 to the 2nd and 3rd pitches from the tip of new bolt.
| *1 | Adhesive 1324 |
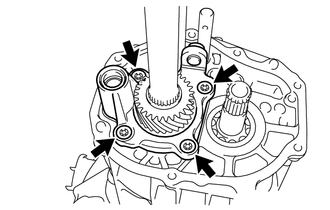
Using a T45 "TORX" socket wrench, install the rear bearing retainer with the 4 bolts.
- Torque:
- 30 N*m (306 kgf*cm, 22 ft.*lbf)
12.INSTALL 6TH GEAR THRUST WASHER
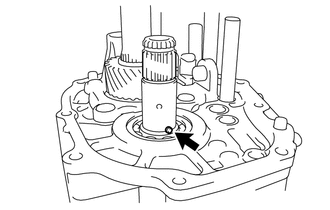
Install the straight pin to the counter shaft.
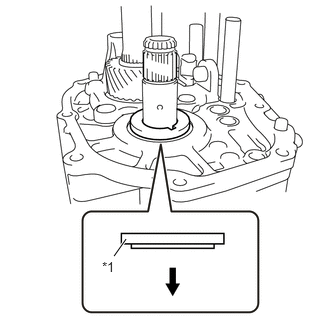
Apply manual transmission gear oil to the 6th gear thrust washer.
| *1 | 6th Gear Thrust Washer |

|
Front Side |
As shown in the illustration, install the 6th gear thrust washer to the counter shaft.
13.INSTALL NEEDLE ROLLER BEARING
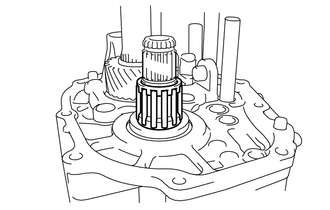
Apply manual transmission gear oil to the needle roller bearing, and then install the needle roller bearing to the counter shaft.
14.INSTALL COUNTER SHAFT 6TH GEAR
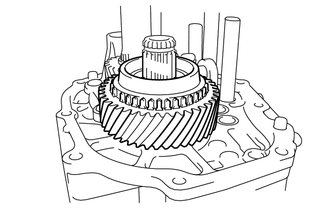
Apply manual transmission gear oil to the counter shaft 6th gear, and then install the counter shaft 6th gear to the counter shaft.
15.INSTALL NO. 2 SYNCHRONIZER RING
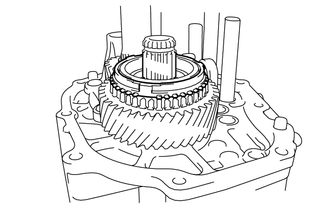
Apply manual transmission gear oil to the No. 2 synchronizer ring, and then install the No. 2 synchronizer ring to the counter shaft.
16.INSTALL NO. 4 TRANSMISSION HUB SLEEVE
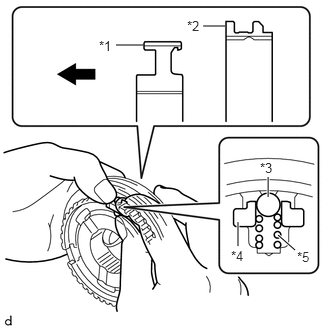
Apply manual transmission gear oil to the moving parts of the No. 4 transmission clutch hub.
| *1 | No. 4 Transmission Clutch Hub |
| *2 | No. 4 Transmission Hub Sleeve |
| *3 | Ball |
| *4 | No. 1 Synchromesh Shifting Key |
| *5 | No. 1 Synchromesh Shifting Key Spring |
|
|
Front Side |
As shown in the illustration, install the No. 4 transmission hub sleeve to the No. 4 transmission clutch hub, and install the 3 No. 1 synchromesh shifting keys and 3 No. 1 synchromesh shifting key springs all together, and then install the 3 balls.
- HINT:
- ·
Install the ball while holding down the No. 1 synchromesh shifting key spring.
·After the installation, settle the No. 1 synchromesh shifting key spring.
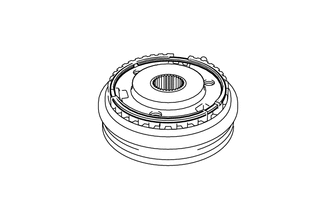
Install a new hole snap ring.
17.INSTALL NO. 4 TRANSMISSION CLUTCH HUB
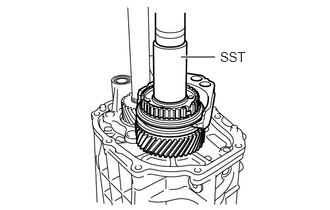
Using SST and a press, install the No. 4 transmission clutch hub, No. 4 transmission hub sleeve, and No. 4 gear shift fork all together.
- SST
- 09632-36010
- HINT:
- ·
Align the No. 4 transmission clutch hub and the No. 2 synchronizer ring so that they can fit together.
·Engage the No. 4 gear shift fork with the groove of the No. 4 transmission hub sleeve.
18.INSTALL SHAFT SNAP RING
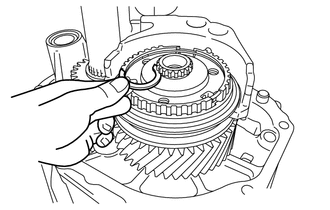
Select a shaft snap ring that is suitable to retain the specific thrust clearance between the No. 4 transmission clutch hub and shaft snap ring.
- Standard clearance:
0 to 0.1 mm (0 to 0.00394 in.)
- HINT:
-
Select the thickest shaft snap ring possible for installation.
| Part No. | Thickness mm (in.) | Mark |
|---|---|---|
| SU003-03552 | 2.80 (0.11023) | A |
| SU003-03553 | 2.85 (0.11220) | B |
| SU003-03554 | 2.90 (0.11417) | C |
| SU003-03555 | 2.95 (0.11614) | D |
| SU003-03556 | 3.00 (0.11811) | E |
| SU003-03557 | 3.05 (0.12007) | F |
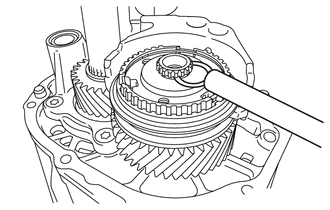
Using a brass bar and a hammer, install a new shaft snap ring to the counter shaft.
19.INSTALL NO. 2 GEAR SHIFT HEAD
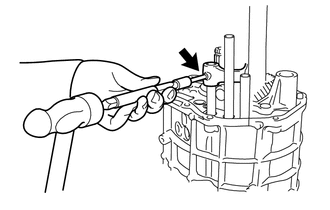
Install the No. 2 gear shift head to the No. 2 gear shift fork shaft.
Using a 5 mm pin punch and a hammer, install a new slotted spring pin to the No. 2 gear shift fork shaft.
- NOTICE:
-
Do not tap the pin too deep.
- Standard depth:
0 mm (0 in.) (from the end surface of the No. 2 gear shift head)
20.INSTALL 5TH SHIFT HEAD
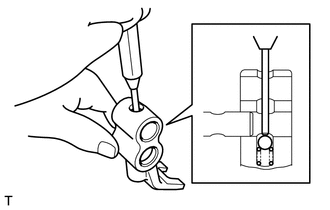
Install the compression spring to the 5th shift head, and then, while holding down the ball with the 5 mm pin punch, install the 5th shift head to the No. 3 gear shift fork shaft.
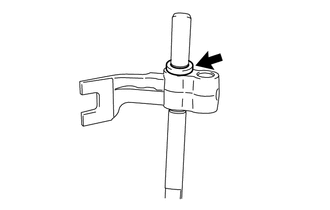
Install the washer.
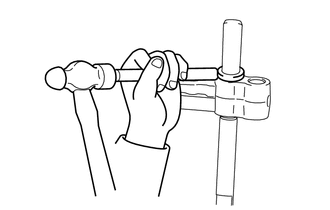
Using a brass bar and a hammer, install a new shaft snap ring to the No. 3 gear shift fork shaft.
21.INSTALL NO. 3 GEAR SHIFT FORK SHAFT
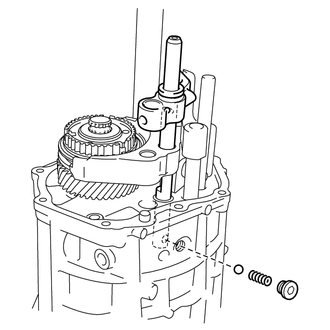
As shown in the illustration, insert the No. 3 gear shift fork shaft. Using a T40 "TORX" socket wrench, install the ball and compression spring, and then tighten with a new head straight screw plug.
- Torque:
- 19 N*m (194 kgf*cm, 14 ft.*lbf)
22.INSTALL SHIFT ARM
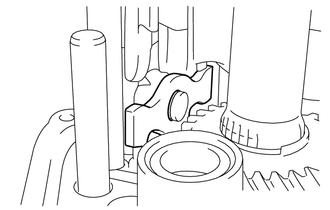
Install the shift arm to the shift arm pivot.
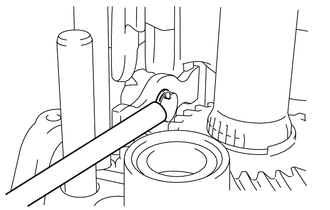
Using a brass bar and a hammer, install a new E- ring to the shift arm pivot.
23.INSTALL NO. 2 GEAR SHIFT FORK SHAFT
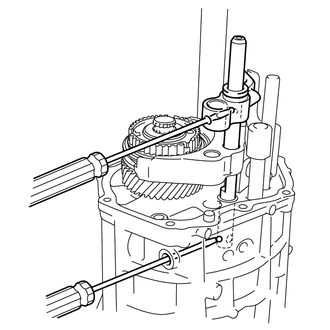
Using a screwdriver, install the 2 balls to the No. 3 gear shift fork shaft.
- HINT:
-
Support the ball with the screwdriver so that the ball does not fall off.
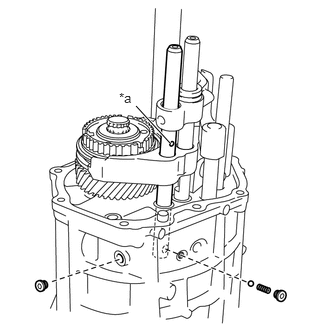
While the identification hole is facing towards the outside, insert the No. 2 gear shift fork shaft. And then, using a T40 "TORX" socket wrench, install the ball and compression spring, and then tighten 2 new head straight screw plugs.
| *a | Identification Hole |
- Torque:
- 19 N*m (194 kgf*cm, 14 ft.*lbf)
for Pin:
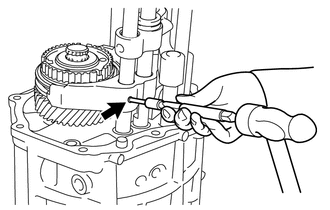
Using a 5 mm pin punch and a hammer, install a new slotted spring pin to the No. 2 gear shift fork shaft.
- NOTICE:
-
Do not tap the pin too deep.
- Standard depth:
0 mm (0 in.) (from the end surface of the No. 4 gear shift fork)
for Bolt:
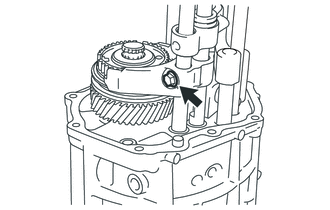
Install a new bolt to the No. 2 gear shift fork shaft.
- Torque:
- 20 N*m (199 kgf*cm, 14 ft.*lbf)
24.INSTALL NO. 3 GEAR SHIFT HEAD
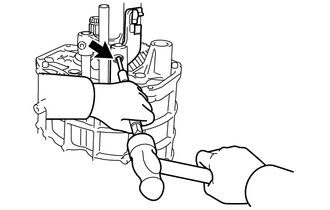
Install the No. 3 gear shift head to the No. 3 gear shift fork shaft.
- HINT:
-
While rotating, install the No. 3 gear shift head so that the shift arm is engaged with the groove of the No. 3 gear shift head.
Using a 5 mm pin punch and a hammer, install a new slotted spring pin to the No. 3 gear shift fork shaft.
- NOTICE:
-
Do not tap the pin too deep.
- Standard depth:
0 mm (0 in.) (from the end surface of the No. 3 gear shift head)
25.INSTALL NO. 1 GEAR SHIFT HEAD
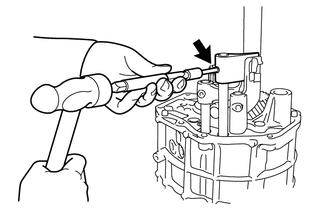
Install the No. 1 gear shift head to the No. 1 gear shift fork shaft.
Using a 5 mm pin punch and a hammer, install a new slotted spring pin to the No. 1 gear shift fork shaft.
- NOTICE:
-
Do not tap the pin too deep.
- Standard depth:
0 mm (0 in.) (from the end surface of the No. 1 gear shift head)
26.INSTALL FRONT SHIFT INNER LEVER
Apply adhesive 1324 to the 2nd and 3rd pitches from the tip of new bolt.
| *1 | Adhesive 1324 |
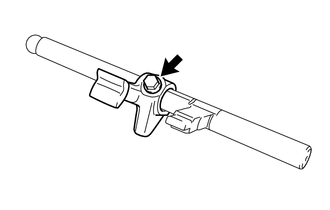
Install the front shift inner lever to the shift shaft with a new bolt.
- Torque:
- 33 N*m (340 kgf*cm, 25 ft.*lbf)
27.INSTALL NO. 1 SHIFT INTER LOCK BLOCK
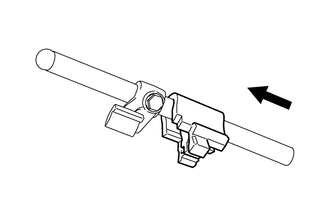
Install the No. 1 shift inter lock block to the shift shaft.
28.INSTALL SHIFT SHAFT
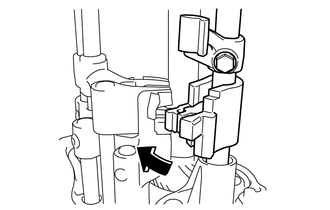
Install the shift shaft and No. 1 shift inter lock block by sliding them.
29.INSTALL NO. 1 EXTENSION HOUSING OIL RECEIVER PIPE
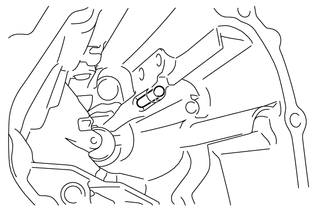
Install the straight pin.
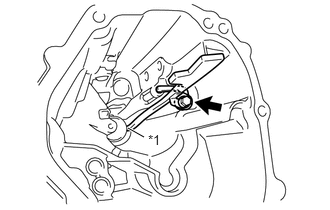
Install the No. 1 extension housing oil receiver pipe and stopper plate with a new bolt.
| *1 | No. 1 Extension Housing Oil Receiver Pipe End |
- Torque:
- 8.5 N*m (87 kgf*cm, 75 in.*lbf)
- NOTICE:
-
Confirm that the end of No. 1 extension housing oil receiver pipe is properly fitted in the groove.
30.INSTALL NO. 2 EXTENSION HOUSING OIL RECEIVER PIPE
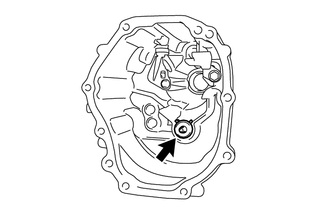
Install the No. 2 extension housing oil receiver pipe.
31.INSTALL TRANSMISSION EXTENSION HOUSING OIL SEAL
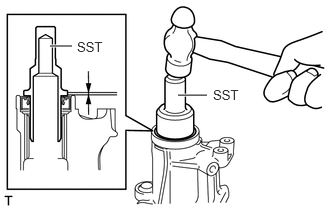
Apply MP grease to the lip of the new transmission extension housing oil seal.
Using SST and a hammer, install a new transmission extension housing oil seal.
- SST
- 09325-20010
- Installation depth:
0.1 to 1.1 mm (0.00394 to 0.0433 in.) (from the end surface of the transmission extension housing sub-assembly)
- NOTICE:
-
Do not damage the lip of the transmission extension housing oil seal.
32.INSTALL EXTENSION HOUSING DUST DEFLECTOR
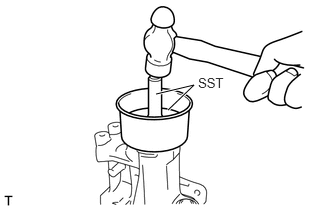
Using SST and a hammer, install a new extension housing dust deflector.
- SST
- 09950-60020 (09951-00750)
09950-70010 (09951-07100)
- HINT:
-
Make sure to tap it until it touches the transmission extension housing sub-assembly.
33.INSTALL EXTENSION HOUSING REAR OIL SEAL
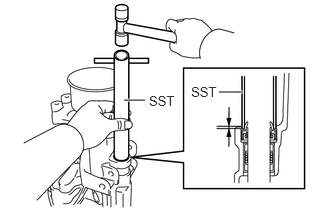
Using SST and a hammer, install a new extension housing rear oil seal.
- SST
- 09612-70100 (09612-07210)
- Installation depth:
1.0 to 2.0 mm (0.0394 to 0.0787 in.) (from the end surface of the transmission extension housing sub-assembly)
- NOTICE:
-
Do not damage the lip of the extension housing rear oil seal.
Apply MP grease to the lip of the extension housing rear oil seal.
34.INSTALL TRANSMISSION EXTENSION HOUSING SUB-ASSEMBLY
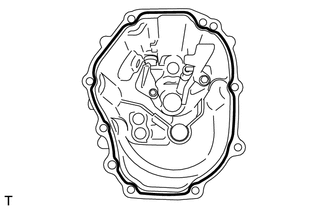
Apply seal packing 1281 continuously to the transmission extension housing sub-assembly as shown in the illustration.
|
|
Seal Packing 1281 |
- NOTICE:
-
Install it within 10 minutes of the seal packing application.
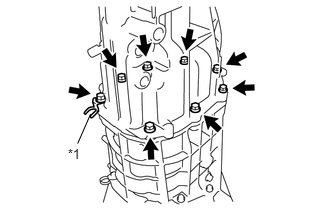
Install the transmission extension housing sub-assembly and clamp with 8 new bolts.
| *1 | clamp |
- Torque:
- 29 N*m (296 kgf*cm, 21 ft.*lbf)
- NOTICE:
- ·
Be sure to install the transmission extension housing sub-assembly while the transmission is in neutral.
·Make sure to align the knock pin with the hole securely.
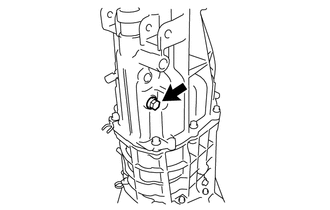
Install a new bolt.
- Torque:
- 31 N*m (316 kgf*cm, 23 ft.*lbf)
35.INSTALL HOLDER
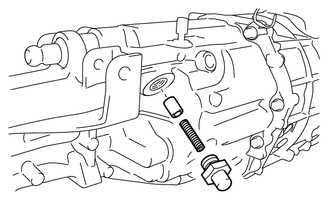
Using a 27 mm deep socket wrench, install a new holder, compression spring and lock ball pin.
- Torque:
- 39 N*m (400 kgf*cm, 29 ft.*lbf)
36.INSTALL LOCK BALL PIN
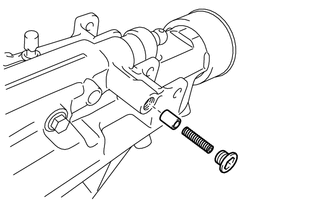
Using a 10 mm hexagon socket wrench, install a new head straight screw plug, compression spring and lock ball pin.
- Torque:
- 25 N*m (250 kgf*cm, 18 ft.*lbf)
37.INSTALL WIRE HARNESS CLAMP BRACKET
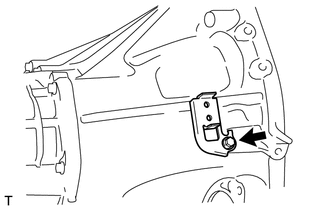
Install the wire harness clamp bracket with a new bolt.
- Torque:
- 7.0 N*m (71 kgf*cm, 62 in.*lbf)
38.INSTALL NEUTRAL POSITION SWITCH ASSEMBLY
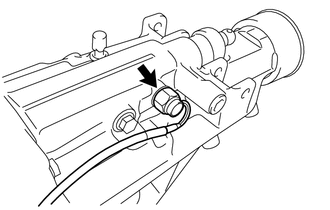
Using a 19 mm union nut wrench, install the neutral position switch assembly and a new gasket.
- Torque:
- 32 N*m (329 kgf*cm, 24 ft.*lbf)
- NOTICE:
-
Use the formula to calculate special torque values for situations where the union nut wrench is combined with a torque wrench (See page General>INTRODUCTION>REPAIR INSTRUCTION>PRECAUTION).
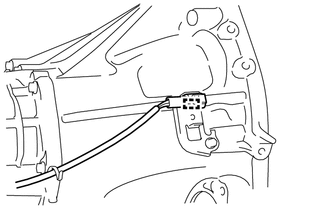
Engage the clamp and connect the neutral position switch assembly wire.
84210
39.INSTALL BACK-UP LIGHT SWITCH ASSEMBLY
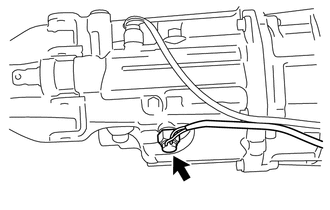
Using a 19 mm union nut wrench, install the back-up light switch assembly and a new gasket.
- Torque:
- 32 N*m (329 kgf*cm, 24 ft.*lbf)
- NOTICE:
-
Use the formula to calculate special torque values for situations where the union nut wrench is combined with a torque wrench (See page General>INTRODUCTION>REPAIR INSTRUCTION>PRECAUTION).
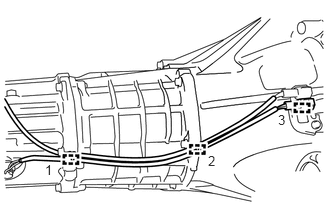
In the order indicated in the illustration, engage the 3 clamps in place, and connect the back-up light switch assembly wire and neutral position switch assembly wire.
- HINT:
-
Install the wire harness so that there is slack on the connector side.
31236B
40.INSTALL RELEASE FORK SUPPORT
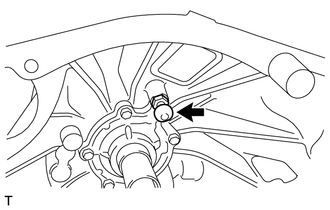
Using a 19 mm deep socket wrench, install the release fork support to the clutch housing.
- Torque:
- 16 N*m (163 kgf*cm, 12 ft.*lbf)
41.INSTALL MANUAL TRANSMISSION DRAIN PLUG
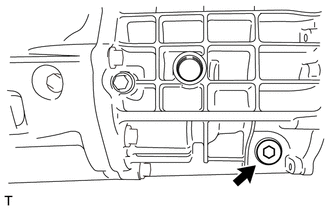
Install the manual transmission drain plug with a new gasket to the transmission case.
- Torque:
- 37 N*m (377 kgf*cm, 27 ft.*lbf)
42.INSTALL MANUAL TRANSMISSION FILLER PLUG
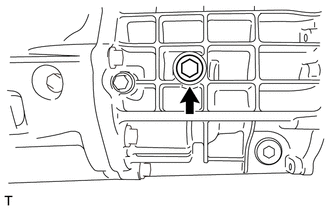
Install the manual transmission filler plug with a new gasket to the transmission case.
- Torque:
- 37 N*m (377 kgf*cm, 27 ft.*lbf)