AXLE AND DIFFERENTIAL REAR DIFFERENTIAL CARRIER ASSEMBLY DISASSEMBLY
PROCEDURE

 41110K
1.REMOVE REAR DIFFERENTIAL BREATHER PLUG
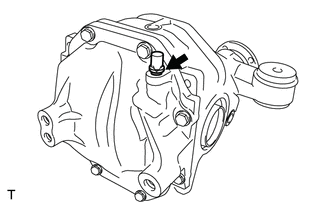
Remove the rear differential breather plug from the rear differential carrier cover.
41181H
2.REMOVE REAR DIFFERENTIAL CARRIER COVER
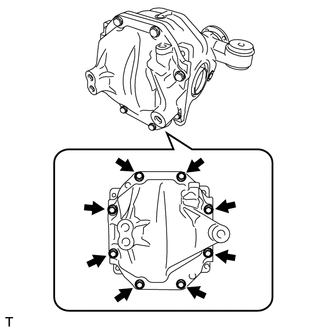
Remove the 8 bolts.
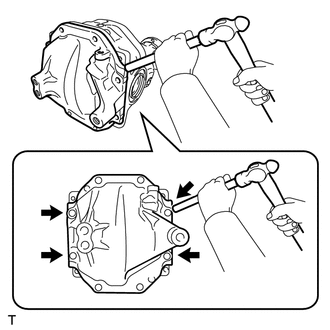
Using a brass bar and a hammer, remove the rear differential carrier cover from the rear differential carrier assembly.
- NOTICE:
- ·
Place the brass bar onto the corners of the rear differential carrier cover.
·Do not damage the sealing surface of the rear differential carrier.
41183
3.REMOVE REAR DIFFERENTIAL BREATHER PLUG OIL DEFLECTOR
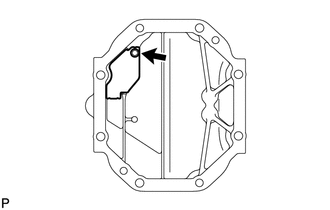
Remove the bolt and the rear differential breather plug oil deflector from the rear differential carrier cover.
41101
4.SECURE REAR DIFFERENTIAL CARRIER SUB-ASSEMBLY
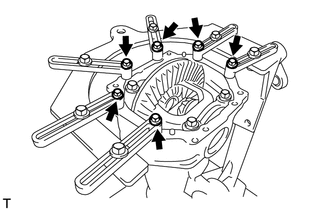
Secure the rear differential carrier sub-assembly to the overhaul stand with the 6 bolts.
5.INSPECT RUNOUT OF DIFFERENTIAL RING GEAR
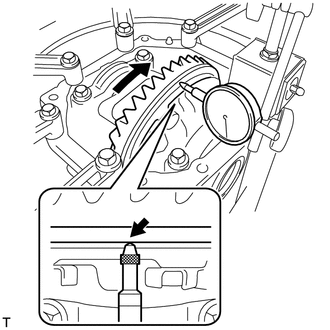
Set a dial indicator perpendicular to the end of the differential ring gear face.
Rotate the differential ring gear and measure the runout.
- Maximum runout:
0.07 mm (0.00275 in.)
If the runout is more than the specified maximum value, remove the differential ring gear and check the runout of the rear differential case sub-assembly.
6.INSPECT DIFFERENTIAL RING GEAR BACKLASH
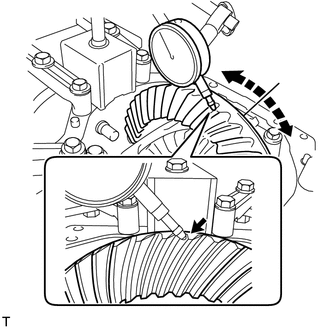
While holding the rear drive pinion companion flange sub-assembly, rotate the differential ring gear and measure the backlash.
- Standard Backlash:
0.13 to 0.18 mm (0.00512 to 0.00708 in.)
- HINT:
- ·
Record the measured backlash to use as a reference for selecting a rear differential side gear shaft plate washer.
·Inspect the tooth contact and use the result as a reference for selecting a rear differential side gear shaft plate washer.
7.INSPECT TOOTH CONTACT BETWEEN RING GEAR AND DRIVE PINION
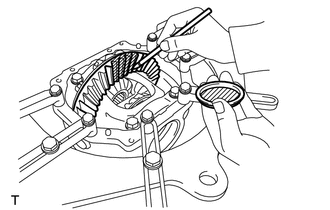
Coat 3 or 4 teeth at 3 different positions on the differential ring gear with Prussian blue.
Rotate the differential ring gear in both directions.
Inspect the tooth contact pattern.
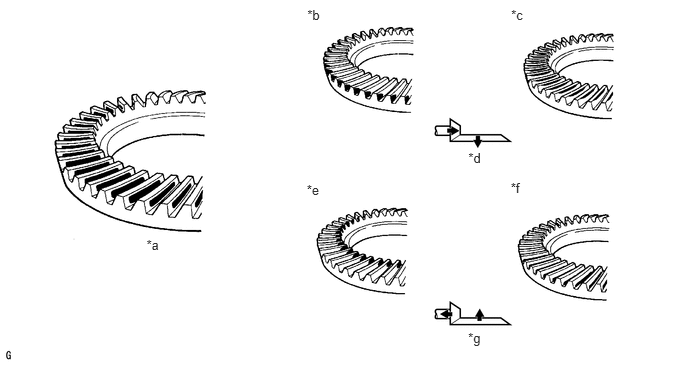
| *a | Proper Contact | *b | Heel Contact |
| *c | Face Contact | *d | Select an adjusting washer that brings the drive pinion closer to the ring gear |
| *e | Toe Contact | *f | Flank Contact |
| *g | Select an adjusting washer that shifts the drive pinion away from the ring gear | - | - |
8.INSPECT DIFFERENTIAL SIDE GEAR BACKLASH
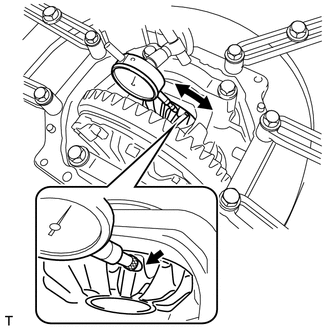
Place a dial indicator on the tip of a side gear tooth at a right angle. Hold the pinion gear in the rear differential case sub-assembly and check that the backlash.
- Standard Backlash:
0 mm (0 in.)
If the result is not as specified, replace the rear differential case sub-assembly with a new one.
41204
9.INSPECT RUNOUT OF REAR DRIVE PINION COMPANION FLANGE SUB-ASSEMBLY
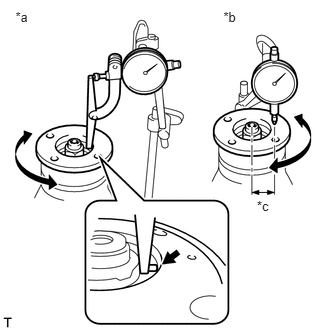
Using a dial indicator, measure the vertical and lateral runout of the rear drive pinion companion flange sub-assembly.
| *a | Vertical Runout |
| *b | Lateral Runout |
| *c | 30 mm (1.181 in.) |
- Maximum Runout:
Item Specified Condition Vertical runout 0.09 mm (0.00354 in.) Lateral runout 0.09 mm (0.00354 in.)
- NOTICE:
-
Measure the runout of the rear drive pinion companion flange horizontally at a position 30 mm (1.18 in.) away from the center of the differential drive pinion shaft.
If the runout is more than the maximum value, replace the rear drive pinion companion flange.
10.INSPECT DIFFERENTIAL DRIVE PINION PRELOAD
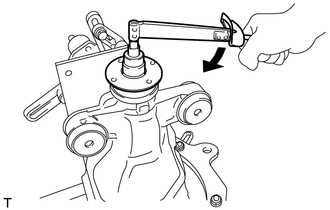
Using a torque wrench, measure the starting torque of the differential drive pinion.
- Differential drive pinion preload (at starting):
1.87 to 2.17 N*m (19.07 to 22.13 kgf*cm, 16.55 to 19.21 in.*lbf)
- HINT:
- ·
The backlash between the differential drive pinion and differential ring gear should allow enough movement of the differential drive pinion to allow this measurement to be performed.
·Make sure not to include the preload of the differential ring gear (rear differential case sub-assembly) in the measurement of the differential drive pinion preload.
11.INSPECT TOTAL PRELOAD
Using a torque wrench, measure the preload with the teeth of the differential drive pinion and differential ring gear in contact.
- Total preload (at starting):
2.19 to 2.70 N*m (22.33 to 27.53 kgf*cm, 19.38 to 23.90 in.*lbf)
41334B
12.REMOVE REAR DIFFERENTIAL SIDE GEAR SHAFT OIL SEAL
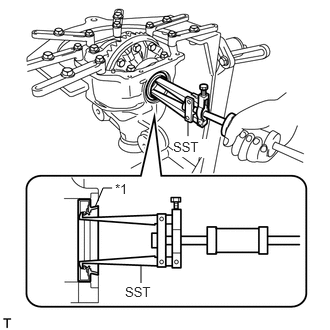
Using SST, remove the 2 rear differential side gear shaft oil seals.
- SST
- 09308-00010
| *1 | Rear Differential Side Gear Shaft Oil Seal |
41204B
13.REMOVE REAR DRIVE PINION NUT
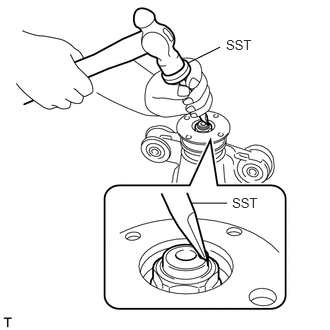
Using SST and a hammer, unstake the staked part of the rear drive pinion nut.
- SST
- 09930-00010
- NOTICE:
- ·
Be sure to use SST with the tapered surface facing the differential drive pinion.
·Do not grind the tip of SST with a grinder, etc.
·Completely loosen the staked part of the rear drive pinion nut when removing it.
·Do not damage the threads of the differential drive pinion.
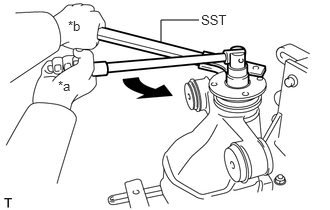
Using SST to hold the rear drive pinion companion flange, remove the rear drive pinion nut.
- SST
- 09330-00021
| *a | Turn |
| *b | Hold |
41204
14.REMOVE REAR DRIVE PINION COMPANION FLANGE SUB-ASSEMBLY
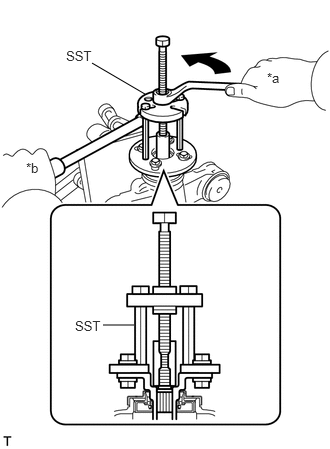
Using SST, remove the rear drive pinion companion flange sub-assembly.
| *a | Turn |
| *b | Hold |
- SST
- 09950-30012 (09951-03010, 09953-03010, 09954-03010, 09955-03030, 09956-03030)
- NOTICE:
-
Apply grease to the threads of SST center bolt before use.
41252
15.REMOVE REAR DIFFERENTIAL DUST DEFLECTOR
- HINT:
-
Perform this procedure only when the rear differential dust deflector is damaged.
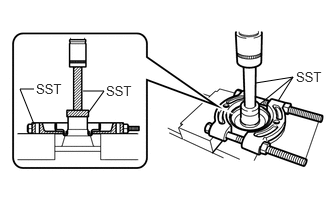
Using SST and a press, remove the rear differential dust deflector.
- SST
- 09950-00020
09950-60010 (09951-00380)
09950-70010 (09951-07100)
- NOTICE:
-
Do not drop the rear drive pinion companion flange.
41201C
16.REMOVE REAR DIFFERENTIAL CARRIER OIL SEAL
41214
17.REMOVE REAR DIFFERENTIAL DRIVE PINION OIL SLINGER
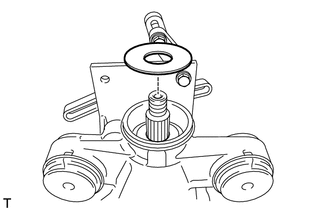
Remove the rear differential drive pinion oil slinger.
41201B
18.REMOVE REAR DRIVE PINION FRONT TAPERED ROLLER BEARING
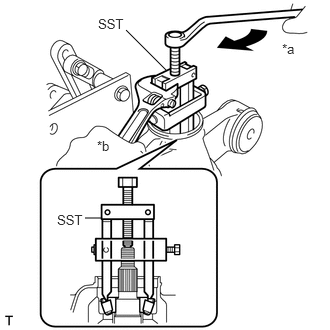
Using SST, remove the rear drive pinion front tapered roller bearing (inner race) from the differential drive pinion.
- SST
- 09556-22010
| *a | Turn |
| *b | Hold |
- NOTICE:
-
Apply grease to the threads and tip of SST center bolt before use.
41231
19.REMOVE REAR DIFFERENTIAL DRIVE PINION BEARING SPACER
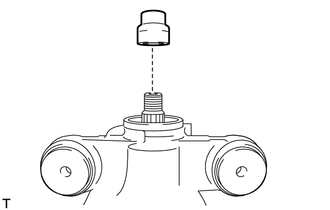
Remove the rear differential drive pinion bearing spacer.
41301
20.REMOVE REAR DIFFERENTIAL CASE SUB-ASSEMBLY
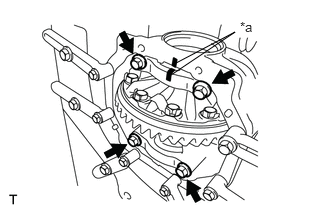
Put matchmarks on either the bearing cap and the rear differential carrier sub-assembly.
| *a | Matchmark |
Remove the 4 bolts and 2 bearing caps from the rear differential carrier sub-assembly.
- NOTICE:
-
Do not exchange bearing caps, as each cap is only suitable for its original location and the installation direction relative to the rear differential carrier sub-assembly for which it was manufactured.
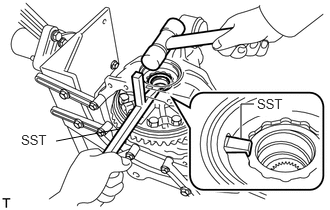
Using SST and a hammer, remove the 2 rear differential side gear shaft plate washers.
- SST
- 09504-22011
- NOTICE:
-
Put identification marks on the rear differential side gear shaft plate washers to show the location for installation (differential ring gear back side or differential ring gear teeth side), or keep them separate so that they can be distinguished.
- HINT:
-
Measure the thickness of each rear differential side gear shaft plate washer and note it.
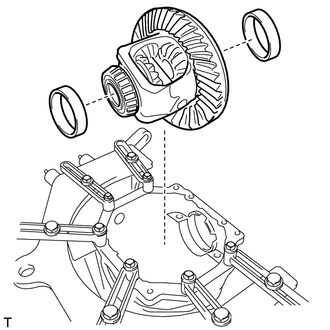
Remove the rear differential case sub-assembly and the rear differential case bearing outer races differential ring gear back side and differential ring gear teeth side from the rear differential carrier.
- NOTICE:
- ·
Do not damage the rear differential case bearing or the differential ring gear.
·Put identification marks on the rear differential case bearing outer races to show the location for installation (back side or teeth side), or keep them separate so that they can be distinguished.
41201A
21.REMOVE REAR DRIVE PINION REAR TAPERED ROLLER BEARING
Remove the differential drive pinion from the rear differential carrier sub-assembly.
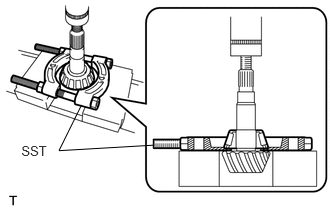
Using SST and a press, remove the rear drive pinion rear tapered roller bearing (inner race) from the differential drive pinion.
- SST
- 09950-00020
- NOTICE:
-
Do not drop the differential drive pinion.
- HINT:
-
If either the differential drive pinion or differential ring gear is damaged, replace both as a set.
Remove the rear differential drive pinion plate washer from the differential drive pinion.
- HINT:
-
Measure the thickness of the rear differential drive pinion plate washer and note it.
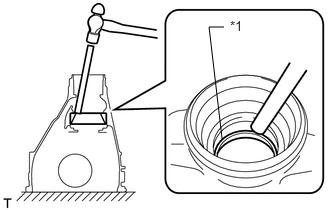
Using a brass bar and a hammer, remove the rear drive pinion rear tapered roller bearing (outer race) from the rear differential carrier sub-assembly.
| *1 | Outer Race |
- NOTICE:
-
Place the brass bar onto the rear drive pinion rear tapered roller bearing outer race. Do not damage the rear differential carrier.
41201B
22.REMOVE REAR DRIVE PINION FRONT TAPERED ROLLER BEARING
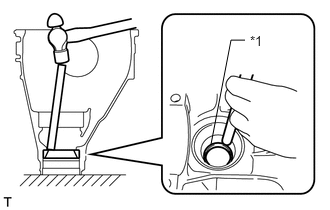
Using a brass bar and a hammer, remove the rear drive pinion front tapered roller bearing (outer race) from the rear differential carrier sub-assembly.
| *1 | Outer Race |
- NOTICE:
-
Place the brass bar onto the rear drive pinion front tapered roller bearing outer race. Do not damage the rear differential carrier sub-assembly.
23.REMOVE DIFFERENTIAL RING GEAR
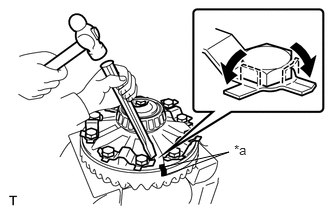
Hold the rear differential case sub-assembly in a vise between aluminum plates.
| *a | Matchmark |
- NOTICE:
-
Do not overtighten the vise.
Put matchmarks on the differential ring gear and the rear differential case sub-assembly.
Using a chisel and hammer, unstake the 5 rear differential ring gear set bolt lock plates.
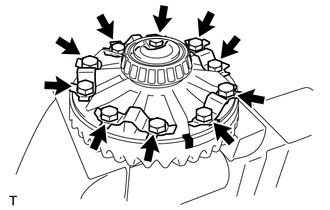
Remove the 10 rear differential ring gear set bolts and the 5 rear differential ring gear set bolt lock plates.
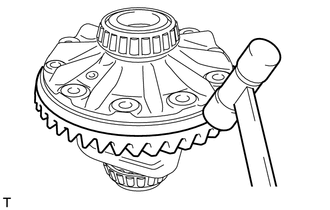
Using a plastic-faced hammer, tap on the differential ring gear to separate it from the rear differential case sub-assembly.
- NOTICE:
-
Do not damage the differential ring gear.
41301
24.INSPECT RUNOUT OF REAR DIFFERENTIAL CASE SUB-ASSEMBLY
- HINT:
-
Perform this procedure only when the runout of the differential ring gear exceeds the specified maximum value.
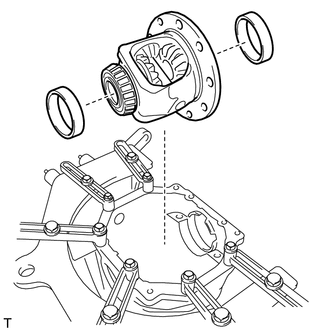
Install the rear differential case bearing outer races differential ring gear back side and differential ring gear teeth side to the rear differential case bearing inner races LH and RH respectively.
- NOTICE:
- ·
Be sure to install the rear differential case bearing outer races in the correct position.
·Do not damage the rear differential case bearing or differential ring gear.
Install the rear differential case sub-assembly to the rear differential carrier sub-assembly.
Install the differential ring gear back side and differential ring gear teeth side rear differential side gear shaft plate washers so that there is no looseness in the rear differential case bearings.
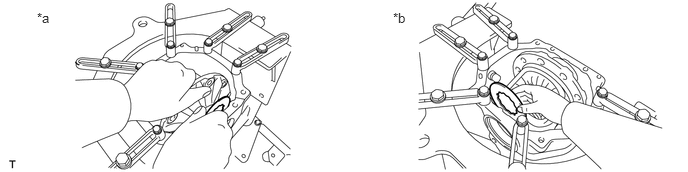
| *a | Differential Ring Gear Back Side | *b | Differential Ring Gear Teeth Side |
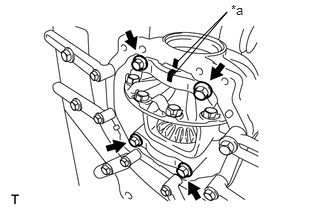
Align the matchmarks on the bearing cap and the rear differential carrier sub-assembly and install the 2 bearing caps.
| *a | Matchmark |
- NOTICE:
-
Make sure that the right and left bearing caps are not interchanged.
Tighten both bearing caps with the 4 bolts.
- Torque:
- 85 N*m (867 kgf*cm, 63 ft.*lbf)
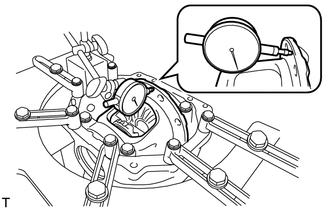
Using a dial indicator, measure the rear differential case sub-assembly runout.
- Maximum runout:
0.07 mm (0.00275 in.)
If the runout is more than the maximum value, replace the rear differential case sub-assembly with a new one.
Remove the 4 bolts and 2 bearing caps.
- NOTICE:
-
Do not exchange the bearing caps, as each cap is only suitable for its original location and the installation direction relative to the carrier for which it was manufactured.
Remove the rear differential case sub-assembly and the rear differential case bearing outer races differential ring gear back side and differential ring gear teeth side from the rear differential carrier sub-assembly.
- NOTICE:
-
Do not damage the rear differential case bearing or differential ring gear.
41301A
25.REMOVE REAR DIFFERENTIAL CASE BEARING
- HINT:
-
Perform this procedure only when replacing the rear differential case bearing or rear differential case sub-assembly.
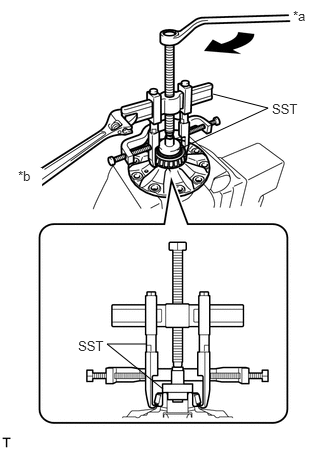
Hold the rear differential case sub-assembly in a vise between aluminum plates.
| *a | Turn |
| *b | Hold |
- NOTICE:
-
Do not overtighten the vise.
Using SST, remove the rear differential case bearing inner races LH and RH from the rear differential case sub-assembly.
- SST
- 09950-40011 (09951-04020, 09952-04010, 09953-04030, 09954-04010, 09955-04061, 09957-04010, 09958-04011)
09950-60010 (09951-00350, 09951-00480, 09952-06010)
- NOTICE:
- ·
Do not deform the bearing cage if the bearing is to be reused.
·Hook the claws of SST to the rear differential case bearing inner race.
·Apply grease to the threads and tip of SST center bolt before use.
26.INSPECT DIFFERENTIAL SIDE GEAR BACKLASH
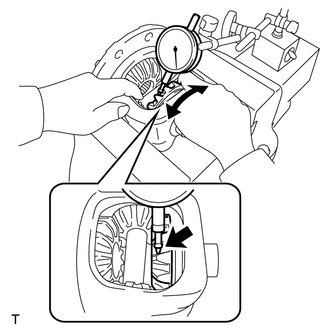
Secure the rear differential case sub-assembly in a vise between aluminum plates.
- NOTICE:
-
Do not overtighten the vise.
Place a dial indicator on the tip of a side gear tooth at a right angle. Hold the pinion gear in the rear differential case sub-assembly and check that the backlash.
- Standard Backlash:
0 mm (0 in.)
If the result is not as specified, replace the rear differential case sub-assembly with a new one.