INTERIOR PANELS / TRIM ROOF HEADLINING REASSEMBLY
PROCEDURE

 86101J
1.INSTALL NO. 2 ANTENNA CORD SUB-ASSEMBLY
82171
2.INSTALL NO. 1 ROOF WIRE (w/ Illumination)
w/ Rear View Monitor System
Engage the 6 clamps to install the No. 1 roof wire as shown in the illustration.
- NOTICE:
-
Make sure that the No. 1 roof wire is not twisted and that the marking line (white) faces up.
Apply the 4 adhesive tapes as shown in the illustration.
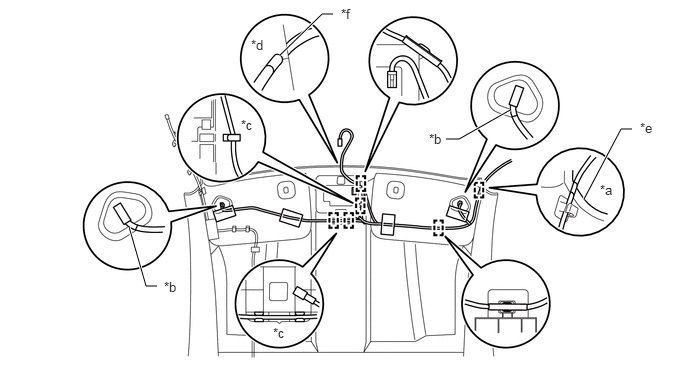
| *a | Align the center of the white tape on the wire with the edge of the roof headlining assembly, and fix the wire in place. | *b | Align the edge of the white tape on the wire with the sun visor mounting. |
| *c | Align the white tape on the wire with the clamp, and fix the wire in place. | *d | Align the edge of white tape on the No. 1 roof wire with notch on the roof headlining assembly. |
| *e | Edge of the roof headlining assembly | *f | Notch on the roof headlining assembly |

|
Adhesive tape | - | - |
w/o Rear View Monitor System
Engage the 2 clamps to install the No. 1 roof wire as shown in the illustration.
- NOTICE:
-
Make sure that the No. 1 roof wire is not twisted and that the marking line (white) faces up.
Apply the 5 adhesive tapes as shown in the illustration.
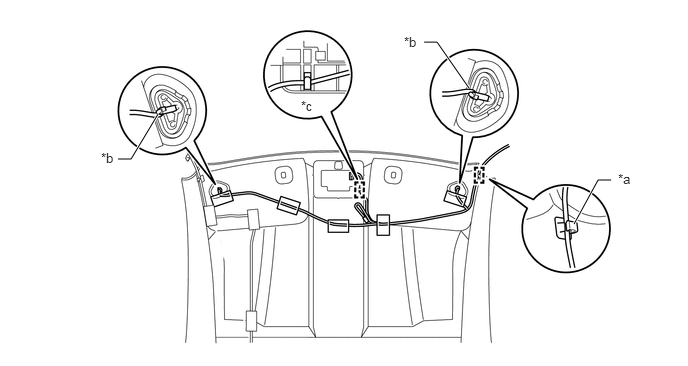
| *a | Align the center of the white tape on the wire with the edge of the trim, and fix the wire in place. | *b | Align the edge of the white tape on the wire with the sun visor mounting. |
| *c | Align the white tape on the wire with the clip, and fix the wire in place. | - | - |
|
|
Adhesive tape | - | - |
82171
3.INSTALL NO. 1 ROOF WIRE (w/o Illumination)
w/o Rear View Monitor System
Engage the 2 clamps to install the No. 1 roof wire as shown in the illustration.
- NOTICE:
-
Make sure that the No. 1 roof wire is not twisted and that the marking line (white) faces up.
Apply the 5 adhesive tapes as shown in the illustration.
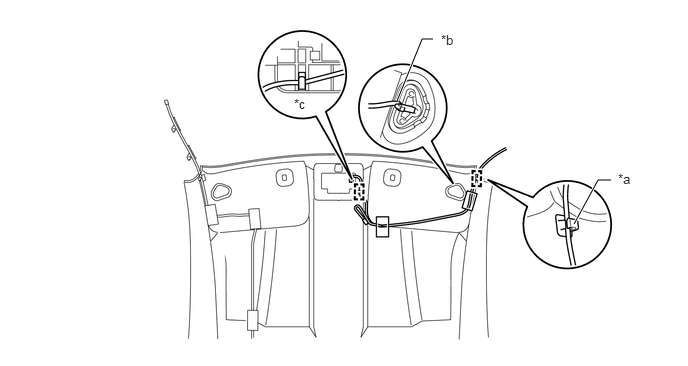
| *a | Align the center of the white tape on the wire with the edge of the trim, and fix the wire in place. | *b | Align the edge of the white tape on the wire with the sun visor mounting. |
| *c | Align the white tape on the wire with the clip, and fix the wire in place. | - | - |
|
|
Adhesive tape | - | - |