K3-VE ENGINE MECHANICAL ENGINE UNIT REASSEMBLY
PROCEDURE

 11115
1.INSTALL CYLINDER HEAD GASKET
11101
2.INSTALL CYLINDER HEAD SUB-ASSEMBLY
11381A
3.INSTALL REAR ENGINE OIL SEAL
Apply a light coat of MP grease to the lip of a new oil seal.
- NOTICE:
-
Keep the lip free of foreign matter.
Using SST, install a new rear engine oil seal.
- SST
- 09950-70010 (09951-07100)
09223-15020
- Protrusion of seal from edge:
0.5 mm (0.020 in.) or less
- Depth of seal from edge:
1.0 mm (0.039 in.) or less
- NOTICE:
- ·
Do not tap in the oil seal at an angle.
·Keep the lip free of foreign matter.
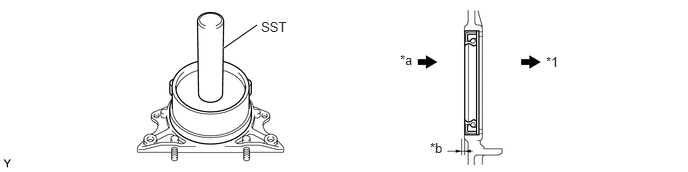
| *1 | Cylinder Block side | *a | Press |
| *b | 0.5 mm (0.0197 in.) | - | - |
11381
4.INSTALL REAR ENGINE OIL SEAL RETAINER
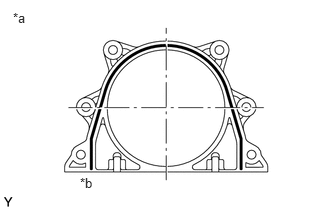
| *a | Seal Width |
| *b | 3.5 to 4.5 mm (0.1378 to 0.1772 in.) |
Apply seal packing to the rear engine oil seal retainer.
- Seal packing:
Toyota Genuine Seal Packing Black, Three Bond 1207B or equivalent
- NOTICE:
- ·
Remove any oil from the contact surface.
·Install the rear engine oil seal retainer within 3 minutes, then tighten the bolts within 15 minutes of applying the seal packing.
·Do not expose the seal packing to engine oil for at least 2 hours after installation.
·Do not start the engine for at least 2 hours after installation.
Install the rear engine oil seal retainer with the 4 bolts.
- Torque:
- 8.5 N*m (87 kgf*cm, 75 in.*lbf)
83530
5.INSTALL ENGINE OIL PRESSURE SWITCH ASSEMBLY
11432M
6.INSTALL CYLINDER BLOCK UNION
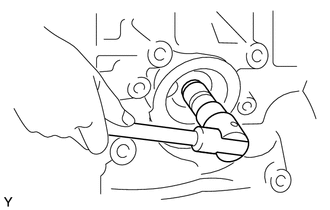
Install a new O-ring onto the oil filter cylinder block union.
Using a 12 mm socket hexagon wrench, install the cylinder block union.
- Torque:
- 44 N*m (449 kgf*cm, 33 ft.*lbf)
15609
7.INSTALL OIL FILTER BRACKET SUB-ASSEMBLY
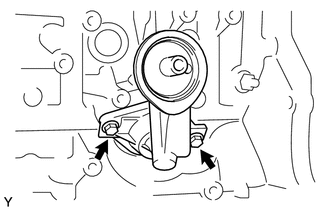
Install a new O-ring, then install the oil filter bracket sub-assembly with the 2 bolts.
- Torque:
- 19 N*m (194 kgf*cm, 14 ft.*lbf)
15601
8.INSTALL OIL FILTER SUB-ASSEMBLY
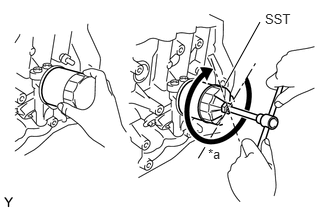
| *a | 3/4 Turn |
Remove any dirt or foreign matter on the contact surface of the engine side.
Apply a light coat of engine oil to the O-ring of a new oil filter.
Install the O-ring by hand until it comes into contact with the contact surface.
Using SST, tighten it by an additional 3/4 turn.
- SST
- 09228-06501
- Torque:
- 10 N*m (102 kgf*cm, 7 ft.*lbf)
13523
9.INSTALL CAMSHAFT TIMING GEAR OR SPROCKET
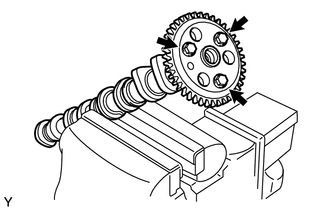
Clamp No. 2 camshaft in a vise.
Align the knock pin of No. 2 camshaft with the pin groove of the camshaft timing gear or sprocket, then install it with the 3 bolts.
- Torque:
- 8.0 N*m (82 kgf*cm, 71 in.*lbf)
10.INSTALL CAMSHAFT
13520
11.INSTALL CAMSHAFT TIMING SPROCKET ASSEMBLY
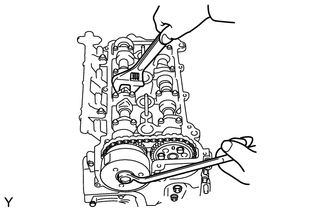
Align the knock pin of the camshaft and the pin groove of the sprocket, then install the sprocket onto the camshaft.
Using the hexagonal lobe of the camshaft, install the camshaft timing sprocket assembly with the bolt.
- Torque:
- 47 N*m (479 kgf*cm, 35 ft.*lbf)
15100
12.INSTALL OIL PUMP ASSEMBLY
15708
13.INSTALL NO. 1 OIL NOZZLE SUB-ASSEMBLY
13591
14.INSTALL TIMING CHAIN TENSION ARM
13566B
15.INSTALL TIMING CHAIN GUIDE
13506
16.INSTALL CHAIN SUB-ASSEMBLY
13545
17.INSTALL CHAIN TENSIONER PLUNGER
19315
18.INSTALL NO. 1 CRANKSHAFT POSITION SENSOR PLATE
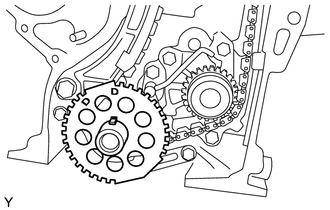
Install the No. 1 crankshaft position sensor plate with the D marks facing outward.
11302A
19.INSTALL TIMING CHAIN OR BELT COVER OIL SEAL
11302
20.INSTALL TIMING CHAIN OR BELT COVER SUB-ASSEMBLY
15104
21.INSTALL OIL STRAINER SUB-ASSEMBLY
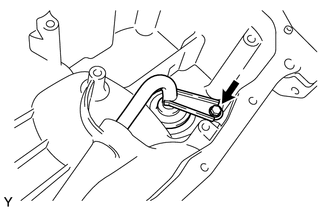
Install a new O-ring onto the oil strainer sub-assembly.
Install the oil strainer sub-assembly with the bolt.
- Torque:
- 8.5 N*m (87 kgf*cm, 75 in.*lbf)
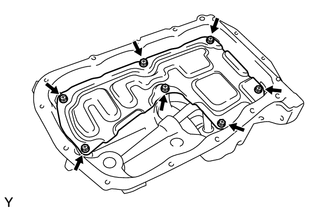
Install the oil pan baffle plate with the 7 bolts.
- Torque:
- 8.5 N*m (87 kgf*cm, 75 in.*lbf)
12101
22.INSTALL OIL PAN SUB-ASSEMBLY
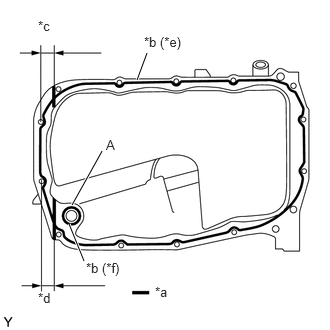
| *a | Seal Packing |
| *b | Digmeter |
| *c | 18 mm (0.7087 in.) |
| *d | 17 mm (0.6693 in.) |
| *e | 3.0 to 4.0 mm (0.1181 to 0.1575 in.) |
| *f | 1.3 to 1.5 mm (0.0512 to 0.0591 in.) |
Apply seal packing to the oil pan sub-assembly.
- Seal packing:
Toyota Genuine Seal Packing Black, Three Bond 1207B or equivalent
- NOTICE:
- ·
Make sure that seal packing does not come into contact with area A in the illustration.
·Remove any oil from the contact surface.
·Install the oil pan within 3 minutes, and tighten the bolts within 15 minutes of applying of the seal packing.
·Do not expose the seal packing to engine oil for at least 2 hours after the installation.
·Do not start the engine for at least 2 hours after the installation.
·Do not begin or finish applications of seal packing near the engine front chain cover or the rear oil seal retainer. Any joints in the seal packing should be on the intake or exhaust sides of the cylinder block.
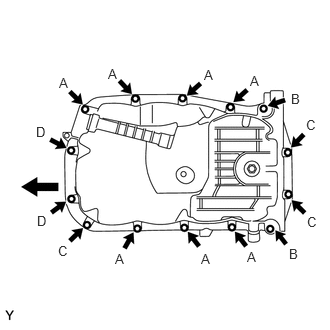

|
Engine Front |
Install the oil pan sub-assembly with the 11 bolts and 3 nuts.
- Torque:
- 9.4 N*m (95 kgf*cm, 83 in.*lbf)
for bolt A
- 42 N*m (428 kgf*cm, 31 ft.*lbf)
for bolt B
- 9.4 N*m (95 kgf*cm, 83 in.*lbf)
for nut C
- 9.4 N*m (95 kgf*cm, 83 in.*lbf)
for bolt D
- HINT:
-
Each bolt length is as follows.
-
A: 18 mm (0.709 in.)
-
B: 25 mm (0.984 in.)
-
D: 20 mm (0.787 in.)
13471
23.INSTALL CRANKSHAFT PULLEY
24.INSPECT VALVE CLEARANCE
25.ADJUST VALVE CLEARANCE
15330
26.INSTALL CAM TIMING OIL CONTROL VALVE ASSEMBLY
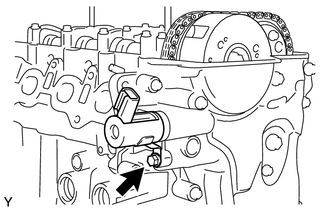
Install the camshaft timing oil control valve sub-assembly with the bolt.
- Torque:
- 7.5 N*m (76 kgf*cm, 66 in.*lbf)
11201
27.INSTALL CYLINDER HEAD COVER SUB-ASSEMBLY
12108
28.INSTALL OIL FILLER CAP SUB-ASSEMBLY
Install the oil filler cap sub-assembly to the cylinder head cover sub-assembly.
19100P
29.INSTALL SPARK PLUG
Using a spark plug wrench, install the 4 plugs.
- Torque:
- 22 N*m (224 kgf*cm, 16 ft.*lbf)
30.INSTALL ENGINE HANGERS
Install the engine hanger with the 2 bolts.
- Torque:
- 20 N*m (204 kgf*cm, 15 ft.*lbf)