A4Q AUTOMATIC TRANSMISSION / TRANSAXLE AUTOMATIC TRANSMISSION ASSEMBLY INSTALLATION
PROCEDURE

 84248A
1.INSTALL SWITCH HARNESS CLAMP
Install the switch harness clamp with the 2 bolts.
- Torque:
- 8.4 N*m (85 kgf*cm, 74 in.*lbf)
Connect the park/neutral position switch connector clamp.
32000
2.INSTALL TORQUE CONVERTER CLUTCH ASSEMBLY
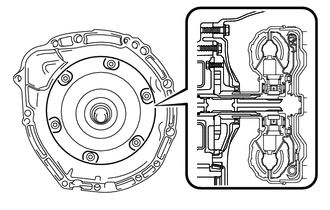
Engage the splines of the input shaft and turbine runner.
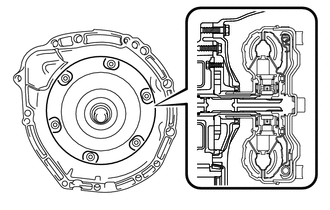
Insert the splines of the stator shaft and the stator while turning the torque converter assembly.
- HINT:
-
If the stator shaft splines are difficult to engage with the stator splines, move the torque converter back approximately 10 mm and engage the splines while rotating the torque converter.
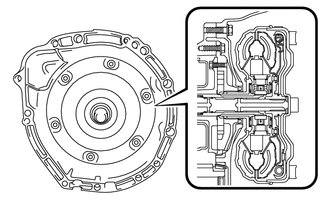
Turn the torque converter assembly to insert the key of the oil pump drive gear into the groove of the torque converter assembly.
Clean the torque converter set bolt holes.
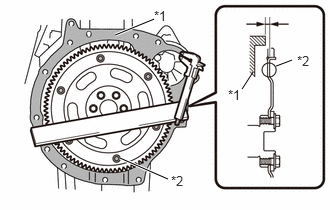
| *1 | Engine Surface |
| *2 | Drive Plate Surface |
Using a vernier caliper and a straightedge, measure dimension A between the transaxle contact surface of the engine and the torque converter contact surface of the drive plate.
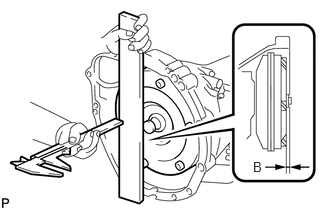
Using a vernier caliper and a straightedge, measure dimension B shown in the illustration and check that dimension B is more than dimension A, which was measured in step.
- Standard:
A + 16.5 mm (0.650 in.) or more
- NOTICE:
- ·
Make sure to deduct the thickness of the straightedge.
·If the transaxle is installed to the engine with the torque converter not sufficiently inserted, the torque converter may be damaged.
·Do not include the thickness of the set block.
Apply MP grease to the torque converter tip.
51022
3.INSTALL REAR ENGINE SUPPORT MEMBER SUB-ASSEMBLY
Connect the rear engine support member sub-assembly and automatic transmission assembly with the 3 bolts.
- Torque:
- 37 N*m (375 kgf*cm, 27 ft.*lbf)
35000
4.INSTALL AUTOMATIC TRANSMISSION ASSEMBLY
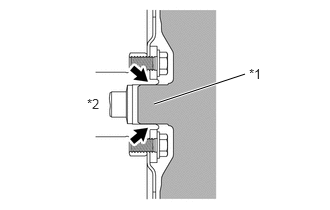
| *1 | Torque Converter Centerpiece |
| *2 | Crankshaft |
Apply clutch spline grease to the round of the crankshaft contact surface with the torque converter centerpiece.
- Clutch spline grease:
Toyota Genuine Clutch Spline Grease or equivalent
- Maximum spread:
Approximately 1 g (0.0353 oz)
Hang the oil cooler tube sub-assembly from the automatic transmission using a piece of string.
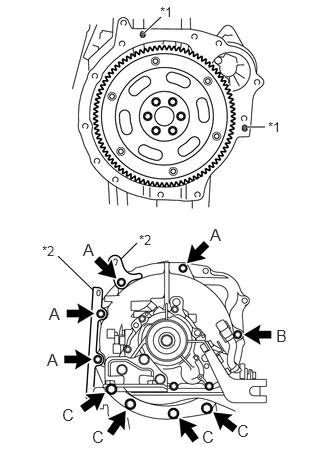
| *1 | Knock Pin |
| *2 | Wire Harness Clamp Bracket |
Install the automatic transmission assembly and wire harness clamp bracket with 4 new A bolts and the 5 bolts.
- Torque:
- Bolts A, B : 59 N*m (600 kgf*cm, 43 ft.*lbf)
- Bolt C : 37 N*m (375 kgf*cm, 27 ft.*lbf)
- Bolt length:
57 mm (2.244 in.) for bolt A
50 mm (1.969 in.) for bolt B
40 mm (1.575 in.) for bolt C
- NOTICE:
- ·
Since seal bolts should be used at position A, be sure to use new bolts.
·Confirm that 2 knock pins are on the transaxle fitting surface of the engine block before transaxle installation.
·After installing the transmission, confirm that the torque converter rotates smoothly.
Install the 6 bolts and torque converter mounting bolts.
- Torque:
- 28 N*m (280 kgf*cm, 20 ft.*lbf)
- HINT:
-
First install the silver blue bolt and then the remaining 5 black bolts.
28100
5.INSTALL STARTER ASSEMBLY
32906
6.INSTALL OIL COOLER TUBE SUB-ASSEMBLY
35013
7.INSTALL TRANSMISSION OIL FILLER TUBE SUB-ASSEMBLY
Coat a new O-ring with Toyota Genuine ATF Type T-IV, and install it onto the transmission oil filler tube sub-assembly.
Install the transmission oil filler tube sub-assembly with the bolt.
- Torque:
- 8.4 N*m (85 kgf*cm, 74 in.*lbf)
35103
8.INSTALL TRANSMISSION OIL LEVEL GAUGE SUB-ASSEMBLY
Install the transmission oil level gauge sub-assembly.
9.INSTALL ENGINE AND TRANSMISSION ASSEMBLY (for 3SZ-VE)
10.INSTALL ENGINE AND TRANSMISSION ASSEMBLY (for K3-VE)