PARKING BRAKE PARKING BRAKE SYSTEM ADJUSTMENT
PROCEDURE

 1.INSPECT PARKING BRAKE LEVER TRAVEL
Slowly pull the parking brake lever to the fully applied position, counting the number of clicks.
- Parking brake lever travel:
4 to 7 clicks at 196 N (20 kgf, 44 lbf)
2.ADJUST PARKING BRAKE LEVER TRAVEL
Remove the rear wheels.
Provisionally install the wheel nuts.
Remove the hole plug.
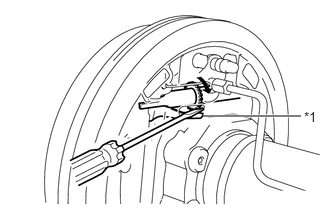
| *1 | Automatic adjust lever |

|
Expand |
Turn and expand the adjuster. Contact the brake shoes with the rear brake drum sub-assembly.
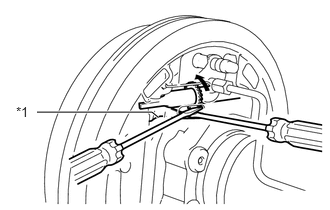
| *1 | Automatic adjust lever |
|
|
Contract |
Push the automatic adjust lever using a screwdriver. Turn and contract the adjuster using another screwdriver.
Turn and contract the adjuster until the brake shoe does not contact the rear brake drum sub-assembly, and then turn the adjuster 180 degree more and contract.
Install the hole plug.
Remove the wheel nuts.
Install the rear wheels.
Remove the rear console box assembly (See page Vehicle Interior>INTERIOR PANELS / TRIM>FRONT CONSOLE BOX>INSTALLATION).
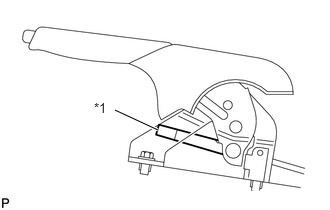
| *1 | Wire Adjusting Nut |
Turn the wire adjusting nut until the parking brake lever travel is corrected to within the specified range.
- Parking brake lever travel:
4 to 7 clicks at 196 N (20 kgf, 44 lbf)
Operate the parking brake lever 3 to 4 times, and check the parking brake lever travel.
Check whether the parking brake drags or not.
Install the rear console box assembly (See page Vehicle Interior>INTERIOR PANELS / TRIM>FRONT CONSOLE BOX>REMOVAL).
3.INSPECT BRAKE WARNING LIGHT
When operating the parking brake lever, check that the brake warning light illuminates.
- Standard:
Brake warning light always illuminates at the first click.