SUPPLEMENTAL RESTRAINT SYSTEMS AIRBAG SYSTEM SRS Warning Light does not Come ON
DESCRIPTION
Refer to "SRS Warning Light Remains ON" (See page Vehicle Interior>SUPPLEMENTAL RESTRAINT SYSTEMS>AIRBAG SYSTEM>SRS Warning Light Remains ON).
WIRING DIAGRAM
Refer to "SRS Warning Light Remains ON" (See page Vehicle Interior>SUPPLEMENTAL RESTRAINT SYSTEMS>AIRBAG SYSTEM>SRS Warning Light Remains ON).
CAUTION / NOTICE / HINT
- NOTICE:
- ·
After turning the ignition switch off, waiting time may be required before disconnecting the cable from the battery terminal. Therefore, make sure to read the disconnecting the cable from the battery terminal notice before proceeding with work (See page General>INTRODUCTION>REPAIR INSTRUCTION>PRECAUTION).
·When disconnecting the cable, some systems need to be initialized after the cable is reconnected (See page General>INTRODUCTION>REPAIR INSTRUCTION>INITIALIZATION).
·Inspect the fuses for circuits related to this system before performing the following procedure.
PROCEDURE
Measure the voltage of the battery.
- Standard voltage:
11 to 14 V
- Result:
Proceed to OK NG
OK
NG
Turn the ignition switch off.
Disconnect the cable from the negative (-) battery terminal, and wait for at least 90 seconds.
Check that the connectors are properly connected to the combination meter assembly.
- OK:
The connectors are properly connected.
- Result:
Proceed to OK NG
OK
NG
Disconnect the E60 center airbag sensor assembly connector.
Connect the cable to the negative (-) battery terminal, and wait for at least 2 seconds.
Turn the ignition switch to ON.
Check the SRS warning light condition.
- Result:
Result Proceed to The SRS warning light does not come on A The SRS warning light remains on B
A
B
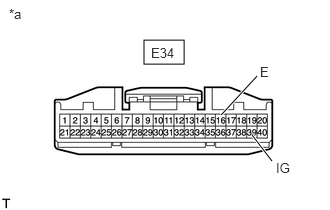
| *a | Front view of wire harness connector
(to Combination Meter Assembly) |
Disconnect the E34 connector from the combination meter assembly.
Connect the cable to the negative (-) battery terminal, and wait for at least 2 seconds.
Turn the ignition switch to ON.
Measure the voltage according to the value(s) in the table below.
- Standard Voltage:
Tester Connection Switch Condition Specified Condition E34-39 (IG) - Body ground Ignition switch ON 11 to 14 V
Turn the ignition switch off.
Disconnect the cable from the negative (-) battery terminal, and wait for at least 90 seconds.
Measure the resistance according to the value(s) in the table below.
- Standard Resistance:
Tester Connection Condition Specified Condition E34-16 (E) - Body ground Always Below 1 Ω
- Result:
Proceed to OK NG
OK
NG
Measure the resistance according to the value(s) in the table below.
- Standard Resistance:
Tester Connection Condition Specified Condition E60-21 (LA) - E34-17 (A/B) Always Below 1 Ω E60-21 (LA) - Body ground Always 10 kΩ or higher
- Result:
Proceed to OK NG
OK
NG