DOOR / HATCH FRONT DOOR REASSEMBLY
PROCEDURE

 67001A
1.INSTALL FRONT DOOR PANEL CUSHION
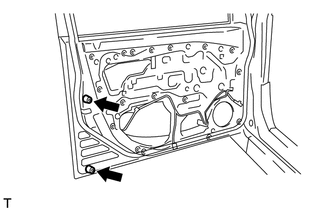
Install the new 2 front door panel cushions.
67862
2.INSTALL FRONT DOOR WEATHERSTRIP
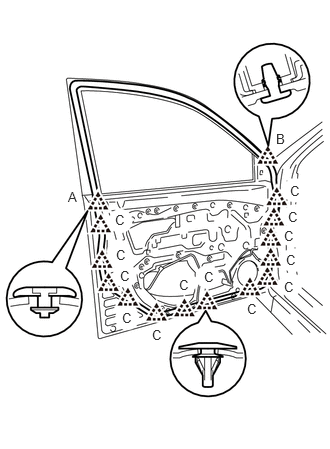
Engage the 13 clips <C>.
Engage the clip <A> and the clip <B> and install the front door weatherstrip.
68620
3.INSTALL FRONT DOOR CHECK ASSEMBLY
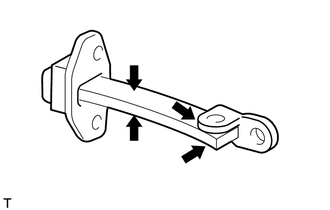
Apply MP grease to the sliding areas of the door check.
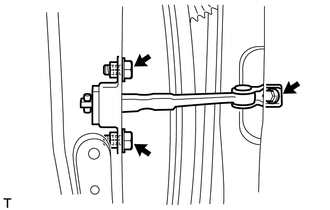
Install the front door check onto the door panel with the 2 bolts.
- Torque:
- 5.0 N*m (51 kgf*cm, 44 in.*lbf)
Apply adhesive to the threads of the bolts (body side).
- Adhesive:
Toyota Genuine Adhesive 1324, Three Bond 1324 or equivalent
Install the front door check onto the body panel with the bolt.
- Torque:
- 31 N*m (316 kgf*cm, 23 ft.*lbf)
69320
4.INSTALL FRONT DOOR LOCK ASSEMBLY
5.INSTALL FRONT DOOR OUTSIDE HANDLE ASSEMBLY
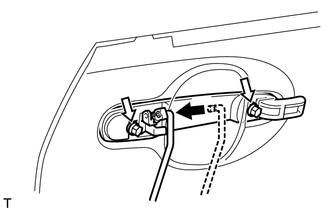
Install the front door outside handle with the 2 bolts.
- Torque:
- 5.0 N*m (51 kgf*cm, 44 in.*lbf)
Connect the control rod.
6.INSTALL HOLE PLUG
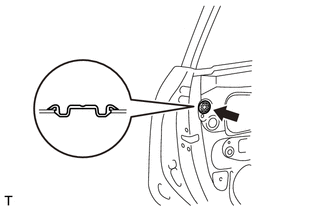
Install the new hole plug.
69503
7.INSTALL FRONT DOOR LOCK CYLINDER ASSEMBLY
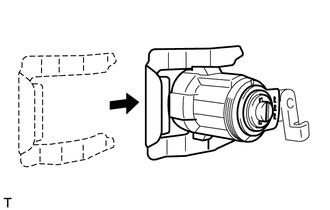
Install the front door lock cylinder assembly with the front door lock cylinder retainer.
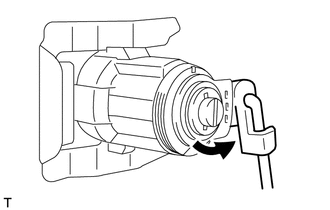
Connect the control rod.
67404F
8.INSTALL FRONT DOOR REAR LOWER FRAME SUB-ASSEMBLY
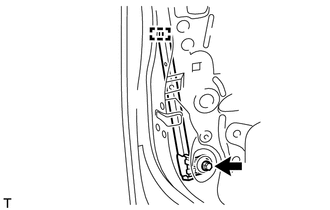
Engage the guide, and install the front door rear lower frame with the bolt.
- Torque:
- 5.0 N*m (51 kgf*cm, 44 in.*lbf)
69802
9.INSTALL FRONT DOOR WINDOW REGULATOR SUB-ASSEMBLY
Apply MP grease to the sliding and rotating areas of the front door window regulator sub-assembly.
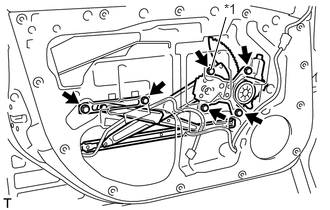
| *1 | Temporary Bolt |
Install the temporary bolt.
Tighten the 5 bolts and temporary bolt to install the front door window regulator sub-assembly.
- Torque:
- 7.5 N*m (77 kgf*cm, 66 in.*lbf)
Connect the connector.
68210C
10.INSTALL FRONT DOOR GLASS OUTER WEATHERSTRIP ASSEMBLY
68151E
11.INSTALL FRONT DOOR GLASS RUN
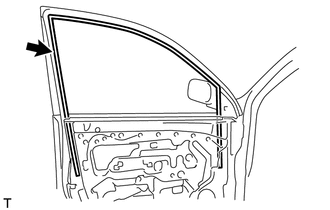
Install the front door glass run.
68102
12.INSTALL FRONT DOOR GLASS SUB-ASSEMBLY
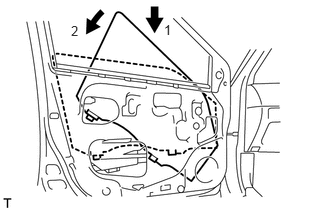
Insert door glass into the door panel along the glass run as indicated by the arrows in the illustration.
- NOTICE:
-
Do not damage the glass and body panel.
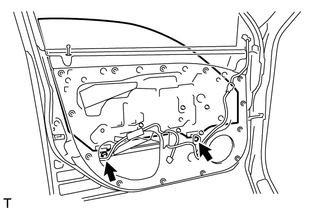
Install the front door glass sub-assembly onto the front door window regulator with the 2 bolts.
- Torque:
- 7.5 N*m (77 kgf*cm, 66 in.*lbf)
87910
13.INSTALL OUTER REAR VIEW MIRROR ASSEMBLY
- HINT:
-
Use the same procedure as for the LH side (see page Vehicle Exterior>MIRROR (EXT)>OUTER REAR VIEW MIRROR>INSTALLATION).
67832
14.INSTALL FRONT DOOR SERVICE HOLE COVER

|
Front Door Service Hole Cover |

|
Butyl Tape |
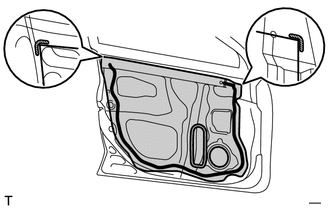
Apply butyl tape to the door panel, then install the new front door service hole cover as shown in the illustration.
- HINT:
- ·
When installing the service hole cover, pull the cables out through service hole.
·There should be no wrinkles or folds after attaching the service hole cover.
·After attaching the service hole cover, check the quality of the seal.
86160
15.INSTALL FRONT DOOR SPEAKER
69206B
16.INSTALL FRONT DOOR INSIDE HANDLE SUB-ASSEMBLY
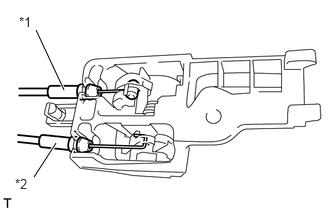
| *1 | Front door lock remote control cable assembly |
| *2 | Front door inside locking cable assembly |
Connect the front door lock remote control cable assembly and front door inside locking cable assembly.
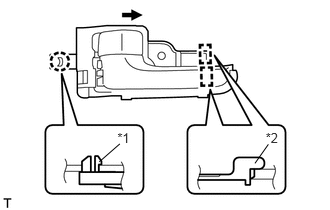
| *1 | Claw |
| *2 | Guide |
Engage the 2 guides.
Engage the claw and install front door inside handle sub-assembly.
67602
17.INSTALL FRONT DOOR TRIM BOARD SUB-ASSEMBLY
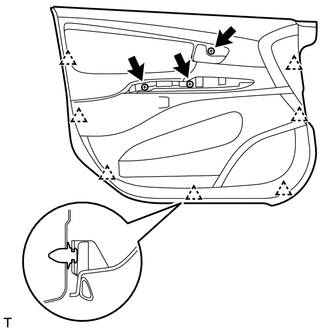
Engage the 7 clips and install the front door trim board.
Tighten the 3 screws.
84820
18.INSTALL POWER WINDOW REGULATOR MASTER SWITCH ASSEMBLY (for Driver Side)
84810
19.INSTALL POWER WINDOW REGULATOR SWITCH ASSEMBLY (for Front Passenger Side)
74640C
20.INSTALL DOOR ASSIST GRIP ASSEMBLY LH
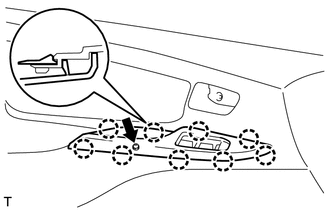
Engage the 9 claws and install the door assist grip assembly LH.
Install the screw.
74630C
21.INSTALL DOOR ASSIST GRIP ASSEMBLY RH
- HINT:
-
Use the same procedure as for the LH side.
67492A
22.INSTALL FRONT DOOR LOWER FRAME BRACKET GARNISH
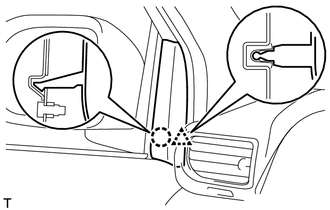
Engage the 2 claws while sliding the front door lower frame bracket garnish down as shown in the illustration.
Engage the clip and install the front door lower frame bracket garnish.
23.CONNECT CABLE FROM NEGATIVE BATTERY TERMINAL
- Torque:
- 6.4 N*m (65 kgf*cm, 57 in.*lbf)
- NOTICE:
-
When disconnecting the cable, some systems need to be initialized after the cable is reconnected (See page General>INTRODUCTION>REPAIR INSTRUCTION>INITIALIZATION).