LIGHTING (EXT) STOP LIGHT SWITCH INSTALLATION
CAUTION / NOTICE / HINT
- HINT:
- ·
Use the same procedure for the LHD and RHD vehicle.
·The procedure listed below is for the RHD vehicle.
PROCEDURE

 84345
1.INSTALL STOP LIGHT SWITCH MOUNTING ADJUSTER
Engage the 2 claws to install the stop light switch mounting adjuster.
84340
2.INSTALL STOP LIGHT SWITCH ASSEMBLY
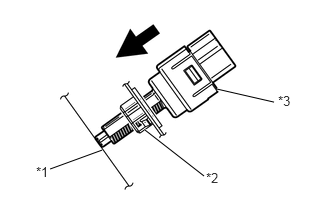
| *1 | Brake Pedal |
| *2 | Adjuster |
| *3 | Stop Light Switch Assembly |
Install the stop light switch assembly to the adjuster until the switch body slightly touches the brake pedal.
- NOTICE:
-
Do not depress the pedal.
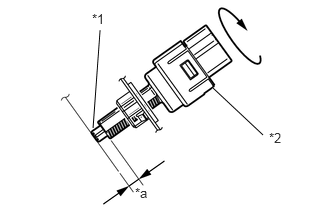
| *1 | Shaft |
| *2 | Stop Light Switch Assembly |
| *a | 0.2 to 2.8 mm |
Rotate the stop light switch assembly clockwise so that the clearance is between 0.2 to 2.8 mm (0.008 to 0.110 in.) as shown in the illustration.
- Torque:
- 1.5 N*m (15 kgf*cm, 13 in.*lbf)
- NOTICE:
-
Do not depress the pedal.
Check the stop light switch clearance.
- Stop light switch clearance:
0.2 to 2.8 mm (0.008 to 0.110 in.)
Connect the connector to the stop light switch assembly.
55458B
3.INSTALL INSTRUMENT LOWER COVER