INTERIOR PANELS / TRIM LOWER INSTRUMENT PANEL INSTALLATION
PROCEDURE

 55312
1.INSTALL LOWER INSTRUMENT PANEL
Install the 6 <B> bolts and 2 <D> bolts, and install the lower instrument panel.
Connect each connector and engage the clamp.
74128
2.INSTALL FRONT ASH RECEPTACLE RETAINER SUPPORT
Install the front ash receptacle retainer support.
74133
3.INSTALL FRONT ASH RECEPTACLE SEAL
Install the front ash receptacle seal.
4.INSTALL INSTRUMENT CENTER LOWER CLUSTER SEAL
Install the instrument center lower cluster seal.
81205
5.INSTALL ASH RECEPTACLE LIGHT SUB-ASSEMBLY
Install the ash receptacle light sub-assembly.
86316
6.INSTALL ANTENNA CABLE
55532B
7.INSTALL CIGAR LIGHTER HOLE COVER (w/o Cigarette Lighter)
Engage the 2 claws and install the cigar lighter hole cover.
85533
8.INSTALL CIGARETTE LIGHTER INDICATOR LENS (w/ Cigarette Lighter)
85500
9.INSTALL CIGARETTE LIGHTER ASSEMBLY (w/ Cigarette Lighter)
74102B
10.INSTALL FRONT ASH RECEPTACLE BOX SUB-ASSEMBLY
Install the front ash receptacle box sub-assembly.
55561A
11.INSTALL GLOVE COMPARTMENT DOOR LOCK STRIKER
Install the glove compartment door lock striker with the bolt <B> and screw <A>.
55560A
12.INSTALL GLOVE COMPARTMENT DOOR LOCK ASSEMBLY
Install the glove compartment door lock assembly with the screw <C>.
55557A
13.INSTALL GLOVE COMPARTMENT DOOR CHECK CUSHION
Install the 2 glove compartment door check cushions to the glove compartment door sub-assembly.
55501A
14.INSTALL GLOVE COMPARTMENT DOOR SUB-ASSEMBLY
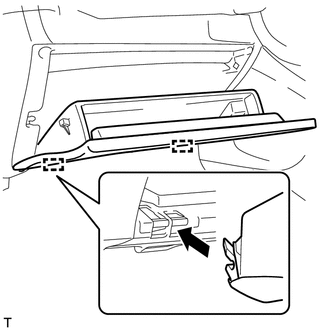
Horizontally engage the 2 hinges of the glove compartment door sub-assembly.
- NOTICE:
-
Make sure to install the glove compartment door sub-assembly hinges horizontally.
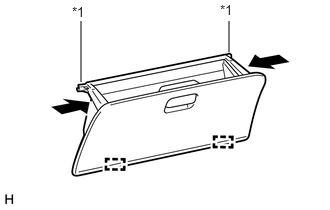
| *1 | Stopper |
Engage the 2 stoppers by pushing the sections indicated by the arrows.
55539E
15.INSTALL SPARE SWITCH HOLE COVER
Engage the 2 claws and install the spare switch hole cover.
55539E
16.INSTALL SPARE SWITCH HOLE COVER (w/o Rear Window Defogger)
Engage the 2 claws and install the spare switch hole cover.
84790
17.INSTALL REAR WINDOW DEFOGGER SWITCH ASSEMBLY (w/ Rear Window Defogger)
55547
18.INSTALL REMOTE CONTROL MIRROR HOLE COVER (w/o Outer Mirror Switch)
Engage the 4 claws and install the remote control mirror hole cover.
84870A
19.INSTALL OUTER MIRROR SWITCH ASSEMBLY (w/ Outer Mirror Switch)
55545
20.INSTALL FUSE BOX OPENING COVER
Engage the 7 claws and install the fuse opening cover.
55420A
21.INSTALL CENTER INSTRUMENT CLUSTER FINISH PANEL ASSEMBLY
Engage the 4 claws and 2 guides, and install the center instrument cluster finish panel assembly.
55458B
22.INSTALL INSTRUMENT LOWER COVER
Engage the 2 claws.
Install the instrument lower cover with the screw <A>.
55642
23.INSTALL NO. 2 INSTRUMENT PANEL UNDER COVER
Engage the 2 guides and the 4 claws, and install the No. 2 instrument panel under cover.
55608
24.INSTALL NO. 3 INSTRUMENT PANEL UNDER COVER SUB-ASSEMBLY
Engage the 2 guides and the clip, and install the No. 3 instrument panel under cover sub-assembly.
55606
25.INSTALL NO. 1 INSTRUMENT PANEL UNDER COVER SUB-ASSEMBLY
Engage the 2 guides and the clip, install the No. 1 instrument panel under cover sub-assembly.
45100
26.INSTALL STEERING WHEEL SUB-ASSEMBLY
(Click here Steering>STEERING COLUMN>STEERING WHEEL>INSTALLATION)
84650
27.INSTALL WINDSHIELD WIPER SWITCH ASSEMBLY
84140
28.INSTALL HEADLIGHT DIMMER SWITCH ASSEMBLY
58821A
29.INSTALL FRONT CONSOLE BOX
83100
30.INSTALL COMBINATION METER ASSEMBLY
55301
31.INSTALL INSTRUMENT PANEL SUB-ASSEMBLY
32.CONNECT CABLE FROM NEGATIVE BATTERY TERMINAL
- Torque:
- 6.4 N*m (65 kgf*cm, 57 in.*lbf)
- NOTICE:
-
When disconnecting the cable, some systems need to be initialized after the cable is reconnected (Click here General>INTRODUCTION>REPAIR INSTRUCTION>INITIALIZATION).